
If you want the short answer: source-removal cleaning is the best fit for most air duct systems. That means a contractor loosens dust and debris, then pulls it out under negative pressure so it does not blow back into your home in Chicago.
If I were choosing a duct cleaning method, I’d focus on three things first:
- How well it removes debris
- Whether it is safe for the duct material
- Whether the system stays under vacuum during the job
This article looks at five common methods:
- Mechanical agitation with negative-pressure vacuum
- Truck-mounted source removal
- Rotary brush and contact vacuum cleaning
- Compressed-air whip and air sweep cleaning
- Chemical and wet treatments
Here’s the main takeaway in plain English:
- Sheet metal ducts can usually handle stronger cleaning tools
- Flex duct needs a lighter touch
- Fiberglass-lined ducts can be damaged by hard brushing
- Chemicals do not replace physical cleaning
- Wet or mold-damaged fiberglass often needs replacement, not cleaning
A few numbers stand out. Truck-mounted systems may move about 10,000–12,000 CFM at the unit, while rotary brush systems often run around 300–1,200 RPM. But raw power alone is not the whole story. If dust is loosened but not pulled out right away, it can end up back in the air.
Contact Cleaning vs Negative Air Cleaning: How to Choose the Best Method for Your Duct Cleaning
sbb-itb-b5c10b1
Quick Comparison
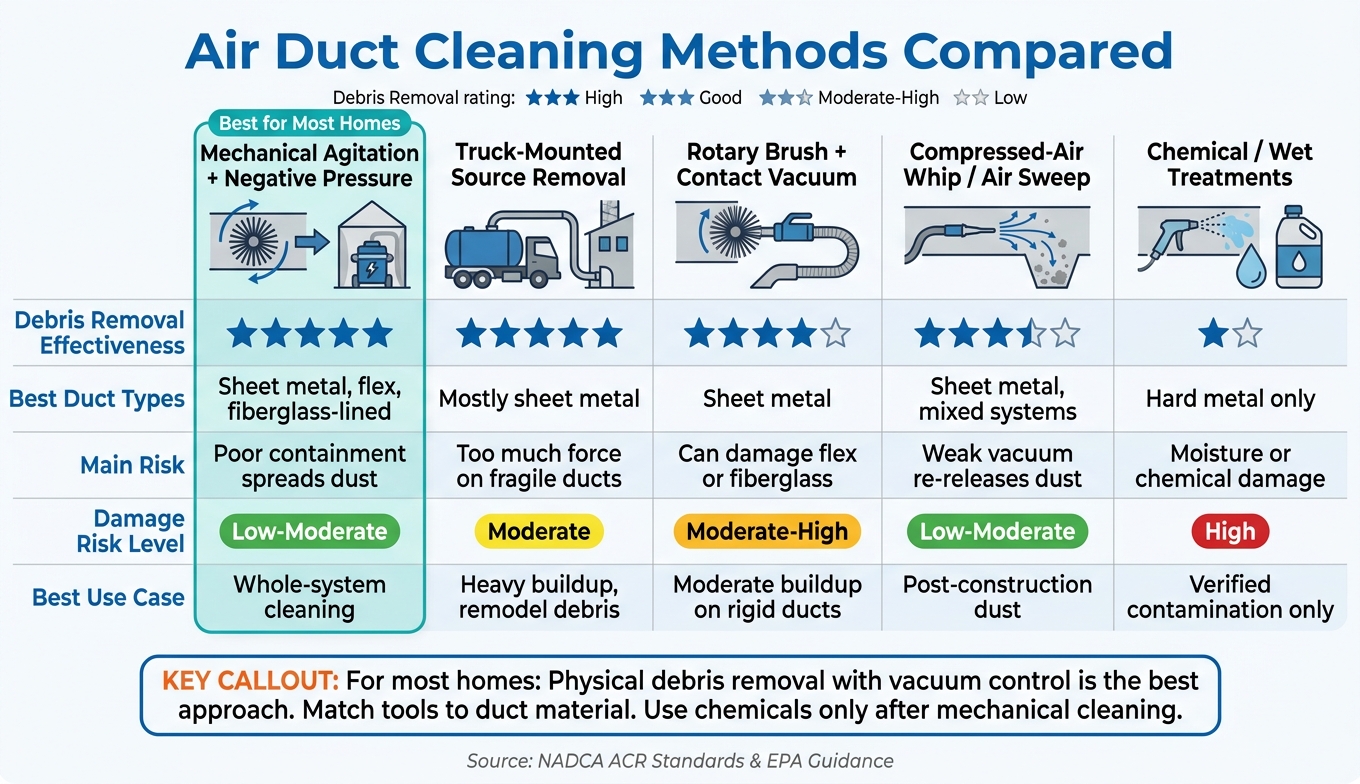
Air Duct Cleaning Methods Compared: Which Is Best for Your System?
| Method | Debris removal | Best duct types | Main risk | Best use |
|---|---|---|---|---|
| Mechanical agitation + negative pressure | High | Sheet metal, some flex, some fiberglass-lined | Poor containment can spread dust | Whole-system cleaning |
| Truck-mounted source removal | High | Mostly sheet metal; mixed systems with care | Too much force on fragile ducts | Heavy buildup, remodel debris |
| Rotary brush + contact vacuum | Good on stuck debris | Sheet metal | Can damage flex or fiberglass liner | Moderate buildup on rigid ducts |
| Compressed-air whip / air sweep | Good for loose debris | Sheet metal, mixed systems with care | Weak vacuum can re-release dust | Post-construction dust, lighter-contact cleaning |
| Chemical / wet treatments | Low for dust removal | Hard metal only in limited cases | Moisture or chemical damage | After cleaning, for verified contamination |
Bottom line: I’d treat chemical spraying as a last step, not the main job. For most homes, the best route is still physical debris removal with vacuum control, with tools matched to the duct material.
1. Mechanical Agitation with Negative Pressure Vacuum
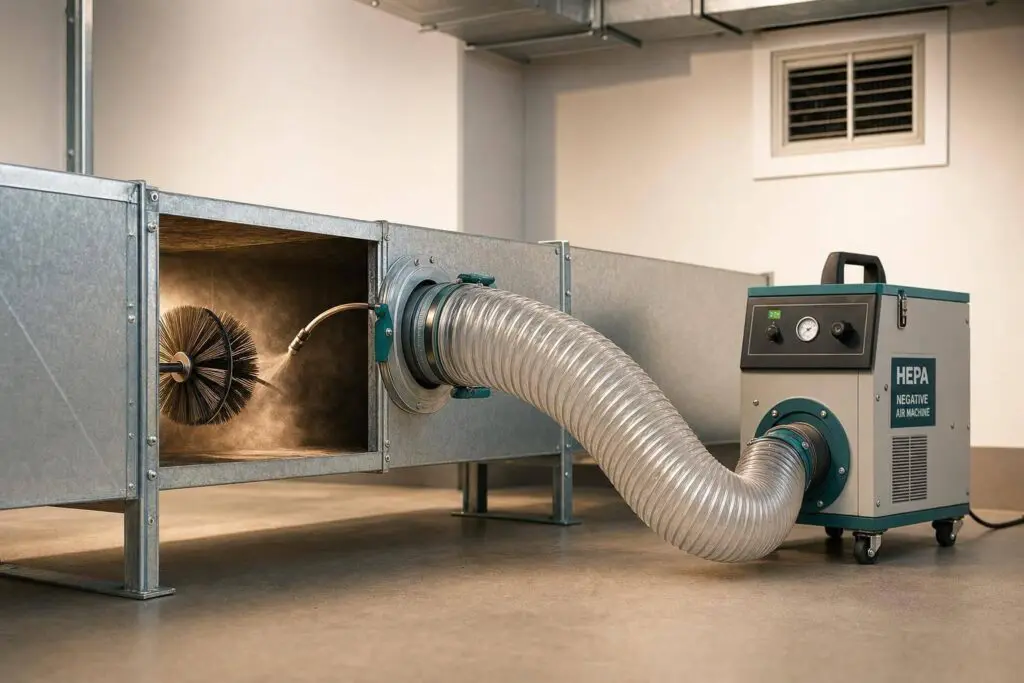
This is the source-removal method NADCA treats as the baseline for professional duct cleaning. The setup is pretty straightforward: technicians seal the system, place it under negative pressure, and use tools like brushes, air whips, or air nozzles to knock debris loose so the vacuum can pull it out. Because of that, this method works as the main point of comparison for the other cleaning options.
Debris Removal Effectiveness
Negative pressure alone doesn’t get the job done. NADCA’s ACR standard says mechanical agitation is needed to remove debris stuck to duct surfaces, while the vacuum keeps that loosened material from spreading through the system again.
When source-removal cleaning is done the right way, HEPA-filtered containment captures loosened debris before it can drift back into the ductwork or the occupied space. In practice, that means it removes most loose dust and debris before redistribution becomes a problem.
Duct Material Safety
This method works on most duct types, but the tools need to fit the material. That’s the part that matters.
- Sheet metal ducts usually handle rotary brushes and air whips well.
- Flex duct calls for gentler agitation and careful pressure control so the liner doesn’t collapse.
- Fiberglass-lined ducts are more sensitive, so air-based tools are often a better choice than hard brushing, which can damage the liner or release fibers.
NADCA also says the system should be assessed before cleaning starts so the contractor can choose the right method for that duct material. So while the overall process stays the same, tool choice can change a lot from one system to another.
Best Use Cases
Mechanical agitation with negative pressure is a good fit for residential and commercial systems when the goal is full-system source removal. It’s often a strong option after renovations or in homes with heavy visible buildup.
Health and Standards Compliance
Keeping the system under continuous negative pressure helps move loosened dust toward the collector instead of letting it blow back into occupied rooms. Contractors should follow OSHA and EPA guidance and confirm cleanliness through visual inspection or, when needed, gravimetric testing.
Next comes truck-mounted source removal, which uses the same basic idea with a different vacuum source.
2. Truck-Mounted Power Vacuum Source Removal
Truck-mounted source removal uses the same negative-pressure approach, but the vacuum unit stays outside the building. A large hose links the truck to the main trunk line, so technicians get strong airflow while they loosen debris inside the ducts. That extra pull helps most when the system is packed with heavy dust or post-construction debris.
Debris Removal Effectiveness
These systems can move about 10,000–12,000 CFM at the unit and 4,500–6,000 CFM at the duct connection. They can also create about 10–15 inches of water column (in. w.c.) of negative pressure, which helps pull loosened dust, pet hair, and larger debris into the collection system outside the building. With proper agitation, this setup can remove nearly all settled debris from a system.
That’s the big draw here: more suction, more airflow, and better debris pickup when the mess is heavy. If a duct system has sawdust, drywall dust, or chunks left after a remodel, this method is often the better fit.
Duct Material Safety
Rigid galvanized steel ductwork usually handles truck-mounted suction and rotary brushes well. Flex duct and ductboard need softer tools and lower suction so the material doesn’t get torn, crushed, or worn down.
In plain terms, strong vacuum power helps, but the wrong brush can still cause problems. The machine may be strong, but the tool at the end still needs to match the duct material.
Best Use Cases
Truck-mounted source removal is a good fit for:
- Large homes
- Heavy buildup
- Post-construction cleanup
- Restoration work with lots of debris
- HVAC duct services for commercial or light industrial systems with long trunk runs and many branches
Parking access matters more than people think. If the truck has to sit too far from the building, the long hose run can cut performance at the duct connection. Tool choice matters too, since some brushes and air tools can harm certain duct materials even when the vacuum side is doing its job.
Health and Standards Compliance
Because debris is captured in the truck’s outside collection system – often with HEPA or high-efficiency filtration – contaminants are less likely to blow back into the home during cleaning. Gas-powered trucks can create exhaust problems if windows, air intakes, or makeup-air paths aren’t controlled. When done the right way, the method lines up with NADCA’s ACR source-removal standard and EPA source-removal guidance.
The next method depends more on direct-contact tools, so material sensitivity becomes a bigger issue.
3. Rotary Brush and Contact Vacuum Cleaning
This method uses a rotating brush with a vacuum built into the head, so it loosens and removes debris in the same pass. The brush head is sized to the duct, which lets the bristles reach the full inside surface. Most rotary brush systems run at about 300–1,200 RPM, enough to scrub off stuck dust without extra wear when the right tool is used. A flexible shaft also helps the brush move through bends and short duct runs without major access cuts or a truck-mounted unit. It works best when dust is stuck to the duct wall instead of sitting loose.
Debris Removal Effectiveness
Unlike vacuum-only cleaning, this method adds direct surface contact. That makes it a good fit for packed dust, pet hair, and other debris that has bonded to duct surfaces.
There is a catch, though. Some brush-and-vac systems use a small vacuum opening at the brush head, around 2 inches, so they may not pull large debris as well as a truck-mounted system. That can reduce performance on post-construction debris.
Duct Material Safety
The duct material matters a lot here because it determines how much contact the surface can handle. Rigid sheet metal can usually handle standard rotary brushes without much trouble. Fiberglass-lined ducts need softer bristles and a lighter touch to avoid damage, and guidance for lined ducts says to keep at least –0.5 in. w.c. of negative pressure at the vacuum connection during contact cleaning.
Flexible ducts need the most care. Hard brushing can damage the inner liner or the spiral wire frame. And if the liner is already loose or worn down, brushing may stir up more particulate instead of making the duct cleaner.
Best Use Cases
Rotary brush cleaning makes sense when buildup is stuck to the surface and the duct material can handle contact. It works well in typical residential and light commercial systems with moderate dust, pet dander, and uneven buildup.
For larger systems or heavier debris loads, pairing rotary brush agitation with a truck-mounted negative-air vacuum can improve debris capture. If the ducts are more delicate, air-based agitation is usually the safer option.
Health and Standards Compliance
When proper negative pressure is maintained, debris gets captured right where the brush makes contact. That means rotary brush and contact vacuum cleaning works as a source-removal method, not just a way to stir dust around.
4. Compressed-Air Whip and Air Sweep Cleaning
When rotary brushes are too rough, compressed air gives you a lower-contact option.
This method uses compressed-air whips and air sweeps pushed into the ductwork to loosen debris stuck to the inner walls. But there’s a catch: these tools only work when they’re paired with negative-pressure vacuuming. Without that vacuum pull, you’re just stirring dust around.
That setup works well for fine post-renodelation dust and drywall debris.
Duct Material Safety
Rigid sheet metal ducts usually handle this method well. Short bursts of air can clear heavier buildup without hard contact, so there’s less wear on the surface.
Fiberglass duct board and flexible ducts need a lighter touch. Fiberglass duct board can tear and release fibers into the airstream. Flexible ducts have their own weak point: the inner liner can be punctured or pulled loose if the air tools are used too aggressively.
In mixed-material systems, that’s a big reason air tools are often chosen over hard brushing. You still need care, but the lower-contact approach helps avoid damage.
Best Use Cases
In rigid systems, this method is a good fit for moderate to heavy buildup, especially after remodeling. If the ductwork is metal and packed with construction dust, air whips and sweeps can do the job without the harder contact that brushes bring.
Health and Standards Compliance
Use source removal, negative pressure, and HEPA filtration, and follow OSHA and EPA requirements. That physical cleaning step comes before any chemical treatment.
5. Chemical and Wet-Cleaning Treatments
Once physical cleaning is done, contractors may use EPA-registered antimicrobial agents, detergent-based cleaners, or encapsulant coatings on duct surfaces that can handle them. The key point is simple: these products come after debris removal, not before. Their use depends on label limits and whether the surface material is a fit.
Debris Removal Effectiveness
Chemicals don’t remove dust. Physical cleaning has to happen first.
NADCA’s ACR standard says ducts must pass a cleanliness check before any chemical is introduced. After surfaces are physically clean, targeted antimicrobials may help reduce active mold growth, but only as an add-on.
Duct Material Safety
This is where things get tight. Not every duct material can handle chemical treatment.
EPA-registered antimicrobials may be used on uninsulated, hard metal duct surfaces when applied according to label directions. But the EPA has not registered any biocide for use on fiberglass duct board or fiberglass-lined ducts.
If fiberglass liner has mold contamination, replacement is the recommended fix. Flexible ducts need care too, since too much moisture can damage the inner liner or lead to delamination.
Best Use Cases
Chemical treatment has a narrow role. It’s not part of routine maintenance.
It may make sense in cases like these:
- Confirmed mold or microbial growth on accessible metal duct surfaces, verified visually or through testing
- Water damage or flood restoration, where NADCA ACR or IICRC S520 protocols support antimicrobial use after mechanical cleaning
- Healthcare or institutional settings where sanitation rules call for documented treatment after a cleanliness check
For routine dust buildup, chemical treatment adds little. In most systems, that’s why mechanical cleaning stays the main method.
Health and Standards Compliance
Because these products have a limited role, following the rules matters even more. Use only label-approved products on approved surfaces, after cleaning, with proper PPE. If a biocide is used in a way that goes against its label, that violates federal law under FIFRA.
The next section compares these narrow-use treatments with mechanical methods side by side.
Pros and Cons Side by Side
There isn’t one method that wins every time. The right pick depends on what the ducts are made of, what’s inside them, and whether the system stays under strong negative pressure during the whole job.
Here’s the side-by-side view of the five main methods, based on debris removal, material safety, and the chance that particles get back into the air.
| Method | Heavy debris removal | Sheet Metal | Flex Duct | Fiberglass-Lined | Damage Risk | Particle re-release risk if vacuum is weak | EPA/NADCA fit |
|---|---|---|---|---|---|---|---|
| Mechanical agitation + negative pressure vacuum | High | Good | Moderate, use caution | Good with soft, non-abrasive tools | Low to moderate | Low when containment is strong; high when it is not | Strong |
| Truck-mounted power vacuum | High when paired with agitation | Good | Moderate, depending on duct support | Good with appropriate tool selection | Moderate if suction or handling is excessive | Low when negative pressure holds; higher if sealing is poor | Strong when used as source removal under containment |
| Rotary brush + contact vacuum | High on durable ducts | Very good | Lower; can distort or tear the inner liner | Moderate; must stay gentle | Moderate to high on delicate materials | Moderate to high if debris is not captured under vacuum | Good for rigid ducts; more limited on fragile materials |
| Compressed-air whip / air sweep | Moderate to high for loose debris | Good | Moderate with care | Moderate; gentler than hard brushing | Low to moderate depending on pressure | High if containment is weak | Good when paired with negative pressure |
| Chemical / wet-cleaning | Low for dry debris; best reserved for contamination control | Only after mechanical cleaning | Limited | Often not recommended or restricted | High if the material is porous or moisture-sensitive | High if used without prior mechanical removal | Limited; only for specialized cases |
One point matters more than it may seem at first: mechanical source removal works best only when loosened debris is captured right away. If containment is weak, agitation can move dust around instead of pulling it out. That’s the whole game.
The next table makes the chemical and wet-cleaning question much simpler. Sheet metal can handle more aggressive cleaning. Flex duct and fiberglass-lined ductwork need a lighter touch, and in some cases, replacement makes more sense than trying to clean them.
| Contamination Scenario | Preferred Approach | Key Limitation |
|---|---|---|
| Hard-surface sheet metal with dust or debris | Mechanical agitation + vacuum | Chemicals are usually unnecessary |
| Accessible flex duct with contamination | Gentle cleaning or replacement | Replacement may be more economical than aggressive cleaning |
| Wet or damaged fiberglass duct board | Replacement, not cleaning | No biocides are registered for fiberglass duct board or fiberglass-lined ducts, and wet contamination is difficult to remediate effectively |
| Confirmed mold on accessible hard metal surfaces | Mechanical cleaning first, then targeted sanitation | Must follow label directions and only after source removal is complete |
Eco Temp HVAC uses source-removal methods with HEPA-filtered vacuum capture and limits chemical use to cases where the contamination and duct material justify it. That approach lines up with EPA and NADCA guidance.
Use this comparison to match the cleaning method to the duct material and the level of contamination.
How to Choose the Right Cleaning Method for Your Duct System
Use the comparison above to match the cleaning method to your duct material and the amount of buildup.
Start with a visual inspection of the air handler, blower, coils, and a few supply and return runs. That gives you two key answers: what the ducts are made of, and what kind of contamination is inside.
The duct material comes first because it limits how aggressive you can be. Sheet metal can handle stronger source-removal methods. Flex duct needs a lighter touch with controlled suction. Fiberglass-lined ductwork is more delicate and often needs soft-contact cleaning. If that liner is wet or damaged, replacement is usually the better move.
Once you know the material, look at the debris. That tells you how hard the cleaning method should work. Light dust usually calls for standard mechanical agitation plus negative pressure. Post-construction debris is a different beast. It often needs truck-mounted or high-volume negative-air cleaning, with stronger agitation on metal sections.
The three things that matter most are:
- duct material
- debris load
- whether the system can stay under negative pressure
| Condition | Duct Type | Recommended Approach |
|---|---|---|
| Light routine dust | Sheet metal | Mechanical agitation + standard negative-pressure vacuum |
| Heavy post-construction debris | Sheet metal trunks + flex branches | Truck-mounted vacuum + rotary brushes (sheet metal); soft pneumatic agitation (flex) |
| Suspected microbial growth | Sheet metal | Mechanical source removal first; EPA-registered disinfectant only after cleaning, on nonporous surfaces |
| Wet or damaged liner | Fiberglass-lined or flex | Replacement, not cleaning |
Biological contamination changes the order, not the clean-first rule. If mold is suspected, start with mechanical cleaning. Use EPA-registered antimicrobials only after source removal, and only on approved nonporous surfaces.
If ducts are leaking or damaged, repair comes before cleaning if you want to fix recurring dust. In plain terms: match the method to the duct material and the type of buildup.
Conclusion
The comparison leads to a pretty clear takeaway: for most HVAC systems, source-removal cleaning works best. It loosens debris, then pulls it out under negative pressure. That’s the basis of Eco Temp HVAC’s source-removal approach.
Rotary brushes and air whips make the most sense as agitation tools inside a vacuum-based source-removal process. Chemical treatments should be kept for verified contamination on approved surfaces, and only after physical cleaning.
The method matters. But proof that the job was done right matters too. When you hire a provider, ask for:
- a full system inspection before work starts
- sealed access points
- HEPA-grade filtration
- compliance with NADCA’s ACR guidelines
- before-and-after documentation
Match the method to the duct material and the level of contamination, use chemicals only as the last step, and choose a contractor that shows the result.
FAQs
How do I know what type of ductwork I have?
You can start with a simple visual check. Use a flashlight and look inside your supply registers. You may spot dust or debris, which gives you a basic sense of what’s going on. But that quick look won’t tell you the full layout of your ductwork or how it’s holding up overall.
For a clear assessment, it’s best to bring in a pro. Eco Temp HVAC technicians inspect your ductwork first to evaluate the system, find any issues, and figure out what kind of cleaning is needed.
Can air duct cleaning damage my ducts?
Yes. Cleaning air ducts on your own can damage your HVAC system.
Air duct cleaning isn’t a simple DIY job. It takes specialized, high-powered equipment and the know-how to use it the right way. Use the wrong tools or cleaning method, and you can end up damaging the ductwork instead of cleaning it.
Eco Temp HVAC uses professional equipment and proven techniques to clean ducts thoroughly and safely.
When should ducts be cleaned rather than replaced?
Clean ducts when there’s a heavy buildup of dust and debris, visible mold, or signs of pests. A cleaning every 3 to 5 years can help your system run better and may improve indoor air quality.
Replacement is the right move when the ductwork’s internal insulation is wet or moldy. Once porous material gets damaged like that, it can’t be saved. Before replacing anything, fix the source of the moisture or other damage first.