
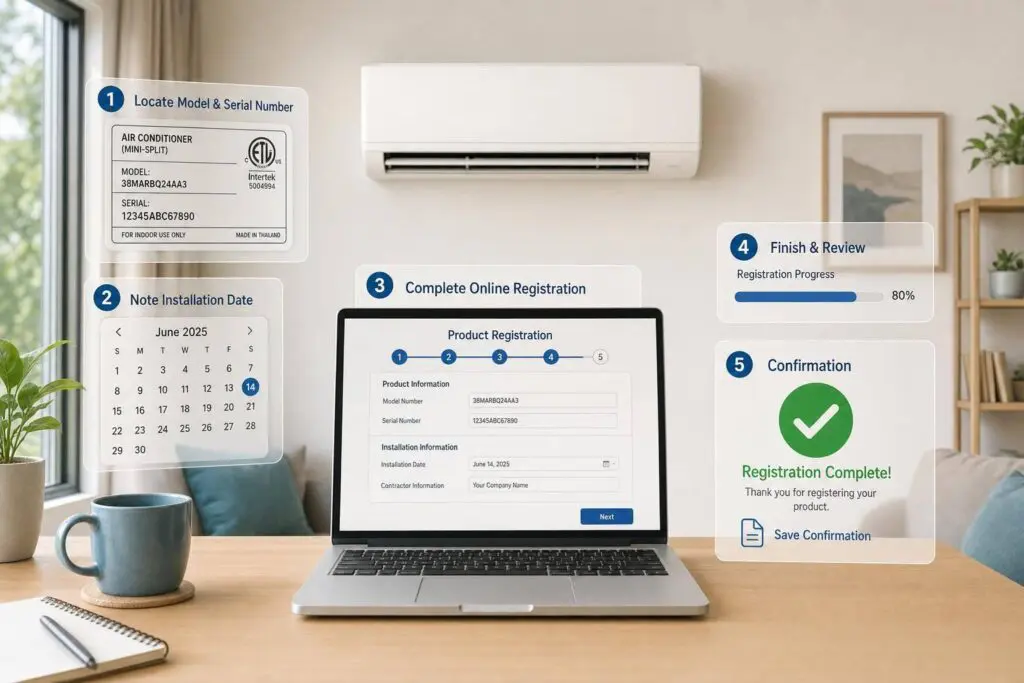
Miss Carrier’s 90-day registration window and your parts warranty may stay at 5 years instead of 10. So if I want the best shot at full coverage, I need to register soon after installation and save proof that I did it.
Here’s the short version:
- I find the model number, serial number, and installation date
- I collect my name, address, email, phone, and the installer’s business info
- I go to productregistration.carrier.com
- I enter each detail exactly as shown on my unit labels and invoice
- I save the confirmation email and registration number
A few details matter more than anything else:
- Use the installation date, not the purchase or manufacture date
- Enter dates as MM/DD/YYYY
- For multi-zone systems, I list each indoor unit
- I check that I’m on an official carrier.com page
- I keep four records together: model number, serial number, installation date, and confirmation number
The main goal is simple: register the right equipment, at the right address, with the right install date, before the deadline. That helps with later warranty checks and service calls.
If I keep it simple and double-check each field before I submit, the process is usually straightforward.
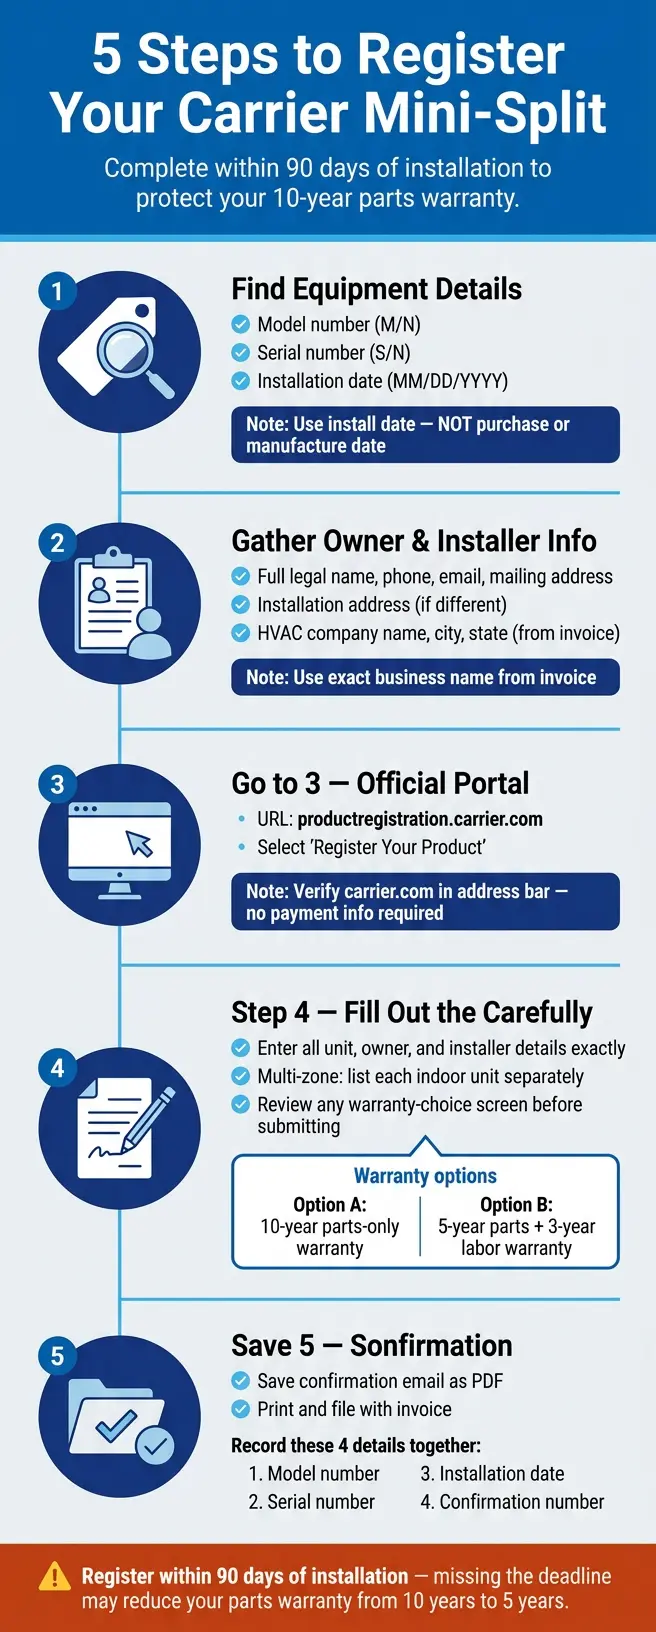
5 Steps to Register Your Carrier Mini-Split (And Keep Your 10-Year Warranty)
How to Register Carrier AC for Warranty – Online Registration & Warranty Activation Guide
Step 1: Find the Model Number, Serial Number, and Installation Date
Start with the equipment labels. If the model or serial number is off by even one character, the portal may reject the registration. So before you open any registration page, pull the exact details from the equipment itself.
Where to Find Labels on Indoor and Outdoor Units
On the outdoor condenser, look for the data plate on a side or back panel. You’ll often find it near the electrical access panel or the refrigerant line connections. It should be marked with MODEL or M/N and SERIAL or S/N.
On the indoor wall-mounted unit, check inside the front cover or near the blower area. If you have a ceiling cassette, the label is usually inside the access panel or on the side of the housing above the ceiling line.
Copy the model and serial numbers exactly as printed. A photo helps a lot here. Take a clear shot of each label so you can double-check the numbers later.
How to Confirm the Installation Date
Use the completion date, not the manufacture date or purchase date. The best place to find it is on the installer’s invoice, work order, or completion report.
Write the date as MM/DD/YYYY. If you can’t find the paperwork, check:
- Email confirmations from your contractor
- Payment records
- Permit documents
Build a Quick Registration Checklist
Before you go online, put everything in one place. For a single-zone ductless mini split, note the indoor and outdoor model and serial numbers, the installation date, and the system type.
For multi-zone systems, list each indoor head on its own line. That small step can save you from mixing up the numbers later.
It also helps to keep the label photos with your invoice and registration notes. Once you have the unit details and install date ready, you can move on to the owner and installer information.
Step 2: Gather Owner, Property, and Installer Information
Now that you have the unit details, pull together the owner and installer info Carrier needs to finish the registration. These details should match your invoice and equipment record exactly.
Owner and Installation Address Details
The form will ask for your full legal name, primary phone number, email address, and mailing address. Use the phone number and email you check most often so confirmation messages and service records go to the right place.
For the address fields, enter the street, city, state abbreviation, and ZIP code. If the ductless mini split is installed at a rental property, vacation home, or another address that’s different from where you get mail, enter the mailing address and installation address separately.
The installation address should match the physical location of the equipment and the address shown on your invoice or permit paperwork.
Installer Information to Have Ready
You’ll also need your HVAC contractor’s:
- Company name
- City and state
- Confirmed installation date
Use the exact company name from the invoice, not a technician’s name or nickname.
If Eco Temp HVAC installed your system, enter "Eco Temp HVAC" as the company name, along with the city and state listed on your invoice.
Accurate entries reduce the risk of warranty disputes and help technicians quickly locate the correct system during future service calls.
Do not enter the technician’s name in the installer field. Use the business name exactly as it appears on the invoice.
Once you have these details in front of you, you’re ready to move to Carrier’s online registration form.
Steps 3 and 4: Access Carrier’s Online Registration Portal and Fill Out the Form
Open the Official Carrier Registration Page
Go to Carrier’s official registration portal at productregistration.carrier.com through Carrier’s Homeowners or Residential section, then select Register Your Product.
Use Register Your Product only for a new registration. The other choices are for viewing, editing, or reprinting an existing record.
Before you type anything in, do a quick gut check. Make sure the address bar shows carrier.com and that the page does not ask for payment details.
Once the portal opens, go right to the form and enter the unit details you gathered earlier.
Enter Product and Owner Details Carefully
This part is simple, but it needs a steady hand. Enter the model number, serial number, installation date, owner details, installation address, and installer information exactly as they appear on your records.
For multi-zone systems, each indoor unit may need to be entered separately.
The installer section asks for:
- Company name
- Address
- Phone number
- License number or dealer ID
Pull those details straight from the installer’s invoice.
Before you submit, double-check the serial number, installation date, email address, and equipment location. A small typo here can turn into a headache later.
After you finish the fields, look over any warranty-choice screen that appears before submitting the form.
Review Any Warranty Option Selections Shown
If a warranty-choice screen appears, read it carefully before you submit. That choice may affect your coverage and must be selected within 90 days of installation.
For some Carrier systems, the screen offers:
- A 10-year parts-only warranty
- A 5-year parts + 3-year labor warranty
If no warranty-choice screen appears, submit the form under Carrier’s standard limited warranty.
When you’re done, save both the on-screen confirmation and the email copy. Also save the confirmation number right away, since you may need it later for service or warranty checks.
Step 5 and Conclusion: Save Your Confirmation and Store Records for Future Service
Save the Confirmation Email or Registration Number
Save the confirmation email as a PDF, print a copy, and file both with your invoice and warranty paperwork.
That small step can save you a headache later. If the system ever needs repair, you’ll have the records service teams usually ask for right away.
Keep Registration Details Ready for Service Calls
For future service calls, keep your registration details together and easy to access.
Keep these four details together for future service calls:
- model number
- serial number
- installation date
- confirmation number
A simple card near the unit or control panel works well. When service is needed, you won’t have to dig through folders or emails to find the basics.
Key Takeaways from the 5 Registration Steps
These five steps protect your registration and warranty records.
| Step | Core Action | Why It Matters |
|---|---|---|
| 1 | Locate model number, serial number, and install date | Exact data prevents registration errors |
| 2 | Gather owner, property, and installer details | Warranty coverage is tied to a specific address and installation |
| 3 & 4 | Access the portal and fill out the form carefully | Accurate entries help preserve full 10-year parts warranty eligibility and any available coverage options |
| 5 | Save confirmation and organize records | Proof of registration speeds up future warranty claims and service visits |
That last records check is what turns a finished registration into proof you can actually use.
Register within Carrier’s required window, usually 90 days, and store the confirmation with your HVAC records and maintenance checklist.
Once the confirmation is saved, the registration process is complete.
FAQs
What if I miss the 90-day deadline?
If you don’t register your mini-split within the required 60 to 90 days, you could lose extended warranty coverage.
That can be a costly mistake. Instead of getting the full 12-year warranty, your coverage may drop to just 5 or 6 years.
Registering on time helps protect your investment and keeps the manufacturer’s full warranty terms in place.
Do I need to register every indoor unit?
Yes. You should register every indoor unit connected to your mini-split system, along with the outdoor condenser.
That helps make sure the full, matched system is on file for warranty coverage. It can also help prevent problems with parts coverage later. Check your manufacturer’s documentation for the exact rules for your model.
How can I verify my registration went through?
Once you finish the online registration, you should get a confirmation that shows your warranty registration details and terms. That confirmation is your main proof that the registration was completed.
Store it with your startup and commissioning records, permit sign-offs, and equipment serial numbers. If you need service later, having all of that in one place can save time and cut down on back-and-forth.