
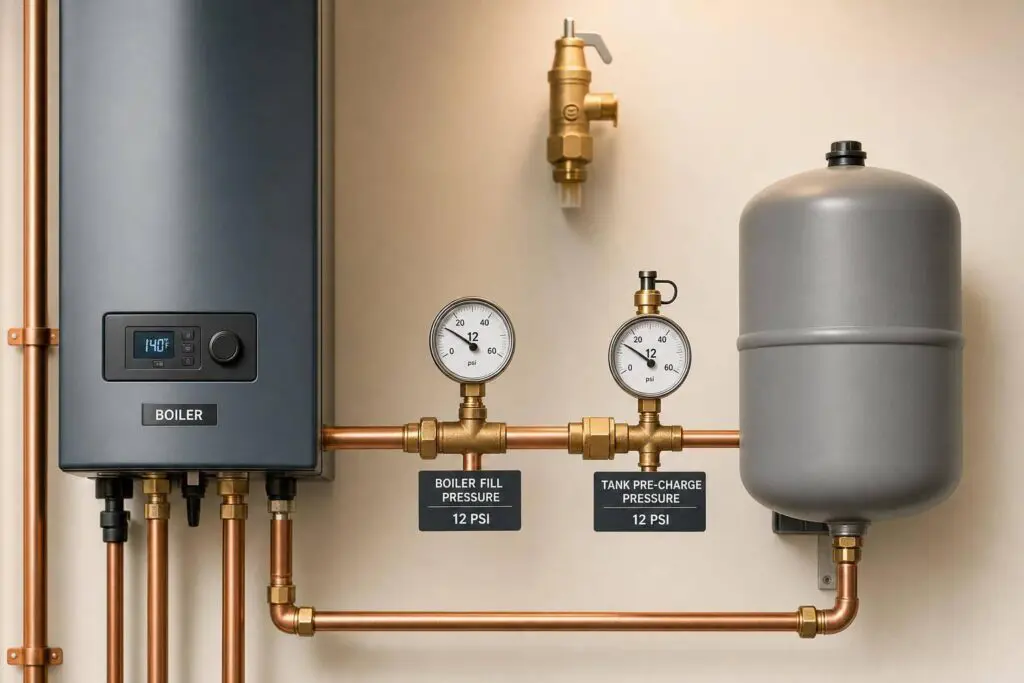
If these two pressure settings don’t line up, your boiler can air-lock upstairs or dump water from the relief valve.
Here’s the short answer: I set the boiler cold fill pressure high enough to keep the top of the system under positive pressure, and I set the expansion tank pre-charge to match the cold pressure at the tank connection. In many 1- to 2-story homes, that lands around 12 to 15 psi for fill pressure, with many tanks set near 12 psi. In a 3-story building, cold fill often moves closer to 17 to 18 psi.
What I want you to know:
- Fill pressure is the system’s cold starting pressure.
- Tank pre-charge controls how much pressure changes when water heats up.
- A common rule is 1 psi for every 2.31 feet of height.
- Installers often add 4 to 5 psi so the top floor stays under positive pressure.
- Most home boilers use a 30 psi relief valve, and some start leaking near 27 psi.
- If hot pressure goes much above 25 psi, I would check the tank charge or tank size.
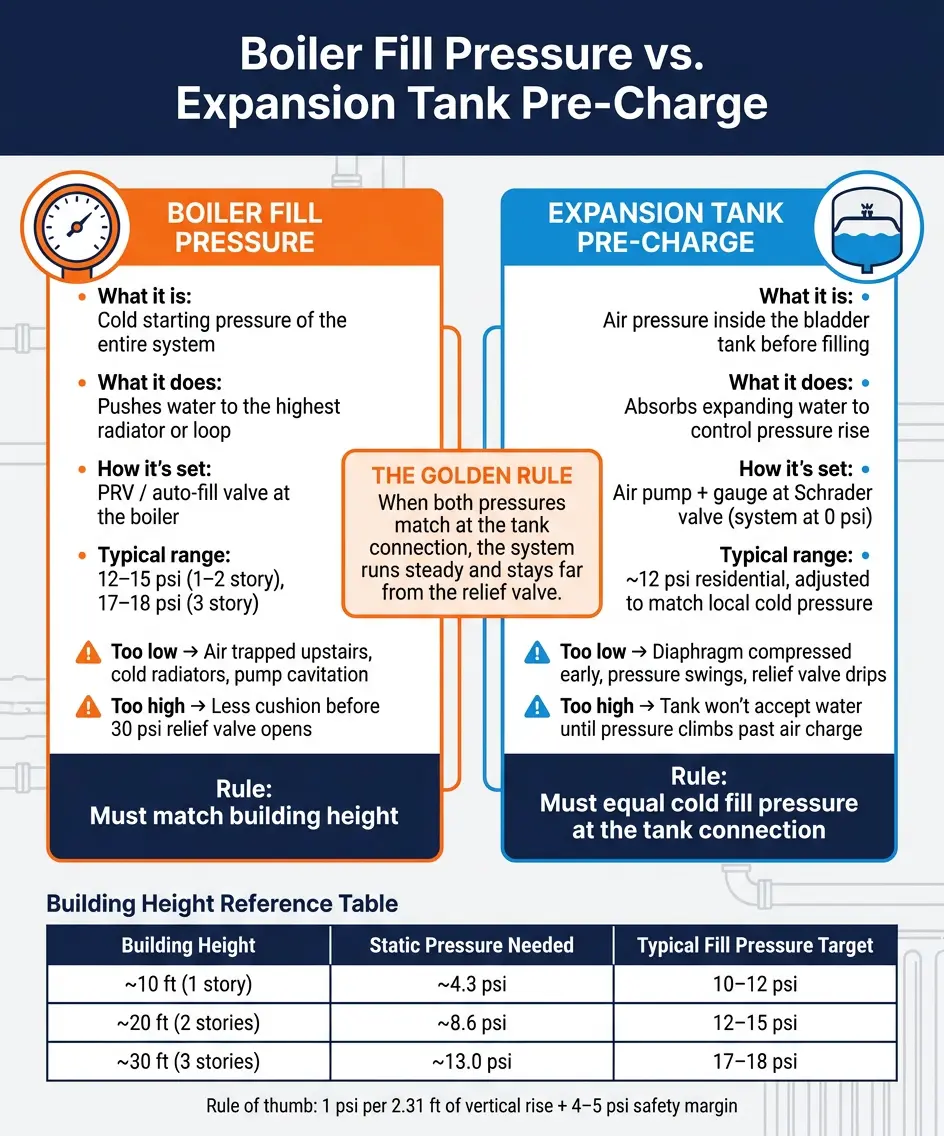
Boiler Fill Pressure vs Expansion Tank Pre-Charge: Side-by-Side Guide
Expansion Tank: Preparation, Pressure and Installation
Quick Comparison
| Item | Boiler Fill Pressure | Tank Pre-Charge |
|---|---|---|
| What it is | Water pressure in the system when cold | Air pressure inside the expansion tank before filling |
| What it does | Gets water to the highest radiator or loop | Takes in expanded water as it heats |
| Common home range | 12 to 15 psi | Often 12 psi, then adjusted to match local cold pressure |
| How to set it | PRV/auto-fill valve | Air gauge and pump at the Schrader valve |
| Wrong if too low | Top-floor heat problems, trapped air | Less air cushion, big pressure swings |
| Wrong if too high | Less room before relief valve opens | Tank won’t accept water until pressure climbs |
| Main rule | Must fit building height | Must match cold pressure at tank location |
So in plain English: I treat fill pressure as the starting point, and pre-charge as the pressure-control tool. When both are set to the same cold pressure at the tank, the system usually runs smoother, vents air better, and stays farther from the relief valve.
Boiler Fill Pressure: What It Sets and Why It Matters
Cold fill pressure is the pressure inside the boiler and piping when the water is cold and the heat is off. It sets the starting pressure for the whole hydronic system.
Its job is simple: make sure water reaches every emitter in the building, from the lowest baseboard to the highest radiator or air handler coil. If static pressure is too low, water may not make it to the top of the system. Fill pressure sets that cold starting point. The expansion tank pre-charge then affects how pressure changes as the water heats up and expands.
As a building gets taller, the target fill pressure has to go up too. Why? Because the highest emitter still needs to stay under positive pressure. Installers usually add a 4–5 psi margin so the top of the system stays positive and automatic air vents can work as intended.
How Installers Calculate Cold Fill Pressure
Installers figure out the minimum cold fill pressure based on building height. The rule is straightforward: every 2.31 feet of vertical rise equals 1 psi. They measure from the boiler gauge to the highest point in the system, usually the top radiator or air handler coil, and divide that height by 2.31. That gives the minimum static pressure the system needs. Then they add a few extra psi so the top of the loop stays under positive pressure for air vent operation.
Taller systems need more cold fill pressure so the top of the loop stays above zero. Here’s how common building heights usually translate:
| Building Height (ft) | Static Pressure Needed (psi) | Typical Target Fill Pressure (psi) |
|---|---|---|
| ~10 (1 story) | ~4.3 | 10–12 |
| ~20 (2 stories) | ~8.6 | 12–15 |
| ~30 (3 stories) | ~13.0 | 17–18 |
A pressure-reducing valve (PRV), often called an auto-fill valve, keeps system pressure at the set point. It adds water from the domestic supply whenever pressure drops below that setting. Most residential PRVs come factory-set to 12 psi, though installers can adjust them for taller buildings. If that setting stays too low in a taller home, upper floors can end up with trapped air and uneven heat.
What Happens When Fill Pressure Is Too Low or Too High
When fill pressure is too low, the top of the system usually shows trouble first. Upper-floor radiators may stay cold. The circulator pump may also cavitate, which can sound like rattling or grinding, because inlet pressure falls below a safe level. At the highest emitter, pressure can drop close to zero. When that happens, automatic air vents can’t work properly, and air stays stuck in the system.
When fill pressure is too high, the issue shifts. If the cold fill pressure already starts high, say above 20 psi in a standard two-story home, the expansion tank has less room to absorb the pressure increase that comes when the boiler fires. With a standard 30 psi relief valve – which can start weeping around 27 psi – there isn’t much cushion left before the valve opens. That can lead to a relief valve that opens during each heating cycle, plus mineral buildup on the valve over time.
Put another way, fill pressure sets the starting line. The tank pre-charge affects how far pressure climbs once the boiler heats the water.
Expansion Tank Pre-Charge: How It Controls Pressure Rise
Once cold fill pressure is set, the next piece is the pre-charge. The expansion tank pre-charge is the air pressure on the air side of a diaphragm or bladder tank. That air space gives heated water somewhere to go, so pressure doesn’t jump all at once.
Here’s the basic idea: when boiler water heats from about 70–80°F to around 180°F, it expands. The air side of the tank compresses and takes in that extra volume. That helps keep system pressure from drifting up toward the relief valve setting. So before you compare tank pressure to fill pressure, the tank needs to be checked as part of regular boiler maintenance.
How to Measure and Set Pre-Charge Correctly
The pre-charge has to be checked with zero system pressure at the tank. If the system is still pressurized, the reading will show higher than the actual air charge because water pressure is pushing against the diaphragm.
Isolate the tank, reduce water pressure at the tank connection to 0 psi, then read or adjust the air charge at the Schrader valve with a low-range gauge. Set the pre-charge to match the cold fill pressure at the tank connection. If the system is taller, that setting needs to be higher too. Some manufacturer instructions say the pre-charge can be within about ±2 psi of the target pressure.
What Happens When Pre-Charge Is Out of Range
When the charge is off, the pressure pattern changes fast.
Too high: If the pre-charge is above the cold fill pressure, boiler water can’t enter the tank until system pressure climbs past that air pressure. That cuts down the tank’s usable capacity. The result? Pressure can rise fast as the boiler heats and may get close to the relief valve setpoint.
Too low: If the pre-charge is below the fill pressure, the diaphragm starts out partly pushed over and the tank loses part of its air cushion. Water enters the tank sooner, but the smaller air space still lets pressure climb too much as the boiler reaches operating temperature. That can lead to repeated pressure swings and relief valve dripping or opening.
In a typical two-story home, cold pressure is about 12 psi. Hot pressure should stay well below the relief valve setting. If pressure keeps spiking, that usually points to a pre-charge problem or a tank that’s too small. Persistent issues may require professional boiler repair to prevent damage to the relief valve or system piping.
Direct Comparison: When Fill Pressure and Pre-Charge Should Match
Once you set each pressure on its own, the next step is simple: where should they be the same?
Cold fill pressure sets the starting pressure for the whole hydronic system. Pre-charge sets the air pressure inside the expansion tank before water pushes into it. When those two pressures match at the tank connection, the tank can accept the most expanded water. That’s the sweet spot.
Here’s the side-by-side view:
| Parameter | What It Controls | Typical Residential Value | How It Is Set | Key Comparison |
|---|---|---|---|---|
| Boiler cold fill pressure | Minimum static pressure across the whole system | 12–15 psi for most 1–2 story homes | Automatic feed valve or pressure-reducing valve at the boiler | Sets the target the pre-charge must match |
| Expansion tank pre-charge | How much system pressure rises as water heats; usable tank capacity | Usually 12 psi on residential diaphragm tanks, adjusted to match the cold static pressure at the tank location | Air pump and gauge at the Schrader valve with the system at 0 psi | Must equal cold fill pressure at the tank connection to preserve full capacity |
When Matching Both Settings Is the Right Call
In most 1- to 2-story homes, the usual starting point is 12 psi fill pressure and 12 psi pre-charge when the tank sits at the same elevation as the boiler.
That setup works because the pressure the boiler sees and the pressure at the tank connection are basically the same. No extra math. No hidden pressure drop from height. The tank starts in the right position to take in expanding water without wasting capacity.
When Building Height Changes the Target
Building height changes things fast.
If the boiler is in a basement and the expansion tank is mounted on another floor, the static pressure at the tank shifts with elevation. That means the pre-charge should match the actual cold static pressure at the tank location, not just whatever the boiler gauge says.
For a small three-story mixed-use building, the boiler cold fill may need to land around 18–20 psi to keep positive pressure at the top-floor radiators. In that case, you don’t just copy the boiler gauge reading onto the tank. You set the tank pre-charge to the cold static pressure where the tank is connected.
Put another way: the boiler gauge gives you one data point, but the tank needs its own local match. Installers check pressure at the tank connection first, then fine-tune from there.
Installer Setup Checks and Key Takeaways
Commissioning turns the pressure comparison into a field check instead of a guess. After the fill pressure and tank pre-charge are set, the job isn’t done yet. Commissioning shows whether those two settings work together under actual operating conditions. The point is to confirm the relationship between the numbers, not just to check each one by itself.
What Technicians Check During Commissioning
Technicians start by measuring the boiler-to-high-point height, setting the fill target, and then matching the tank pre-charge to the pressure at the tank connection. That creates the target. From there, they verify the tank charge against that target with the system isolated.
Next, they isolate the tank, check the air charge at the Schrader valve, and adjust the air pressure until it matches the target at the tank connection.
Once the system is filled, the technician checks how the tank and boiler respond as air is purged. They purge air, confirm that pressure stays steady, and cross-check the gauge reading before final sign-off.
The last step is a full heat cycle. Hot pressure should stay well below 30 psi, and it usually stays under 25 psi. If hot pressure climbs too close to the relief setting, the technician should recheck the tank charge or the tank size. That step can catch a pre-charge mismatch before it turns into relief-valve discharge.
Conclusion: Fill Pressure vs. Pre-Charge in Plain Terms
Fill pressure sets the cold starting point. Pre-charge controls how much pressure climbs as the system heats up. If those two settings don’t line up, the tank can take on water too early or not enough, which pushes system pressure toward the relief valve. When both are set to work together, the system stays steady.
FAQs
Why should tank pre-charge match cold pressure?
The expansion tank pre-charge should match the boiler’s cold fill pressure. That keeps system pressure steady as the water heats up and cools down.
When those two settings line up, the diaphragm can absorb water expansion the way it should. That helps prevent relief valve discharge when pressure climbs and low-pressure lockouts when the system is cold.
How do I know if my fill pressure is too low?
Check the pressure gauge on the front or underside of your boiler. On most residential hot-water systems, normal cold pressure sits at 12–15 psi. If the gauge shows less than 12 psi, the fill pressure is probably too low.
That matters because low pressure can trip a safety lockout and stop the boiler from igniting. If you spot a low reading, look for leaks or think back to any recent radiator bleeding before you restore pressure.
What causes boiler pressure to rise near 30 psi?
Boiler pressure rising near 30 psi usually points to a failed or waterlogged expansion tank. When that tank stops doing its job, it can’t absorb the extra water volume that builds during the heating cycle. The result is simple: pressure climbs.
There are other possible causes too, including a faulty automatic fill valve or poor system maintenance. Once pressure reaches 30 psi, the pressure relief valve is designed to open and protect the system.