If a boiler vent is sealed the wrong way, exhaust can leak, condensate can eat through parts, and repair costs can jump from a small fix to $500 or even $5,000.
I’d sum it up like this: match the seal to the vent category, use only listed vent parts, keep the right slope and clearances, and inspect joints before small leaks turn into corrosion or carbon monoxide risk. Category I vents are draft-based, while Category III and IV vents run under positive pressure and need tighter joints. Category IV also deals with acidic condensate, which means the vent must be both gas-tight and liquid-tight.
Here’s the short version I’d want right away:
- Start with the boiler vent category: I, III, or IV
- Use the vent system listed for that category
- Do not swap in random caulk, tape, or foam
- Seal the flue collar and first joint the way the maker says
- Protect wall, ceiling, and roof penetrations with listed parts
- Pitch condensing vent runs back toward the boiler
- Keep vent clearances and insulation gaps in place
- Watch for rust, white residue, stains, soot, sagging pipe, and color changes in the flame
- Have a pro inspect the vent at least once a year
A quick side-by-side view makes this easier:
| Vent Category | Pressure | Condensing | What matters most |
|---|---|---|---|
| Category I | Non-positive | No | Tight mechanical joints, draft, clearances |
| Category III | Positive | No | Listed vent parts and gas-tight joints |
| Category IV | Positive | Yes | Gas-tight and liquid-tight joints, slope, condensate control |
Bottom line: I’d treat vent sealing as a safety job first and a life-span job second, because one bad joint can affect both.
How Professionals Seal a Boiler Flue #asmr #diy #plumbing #howto #foryou
Boiler Vent Types and Matching Sealing Methods
Boiler Vent Categories: Sealing Methods, Materials & Requirements
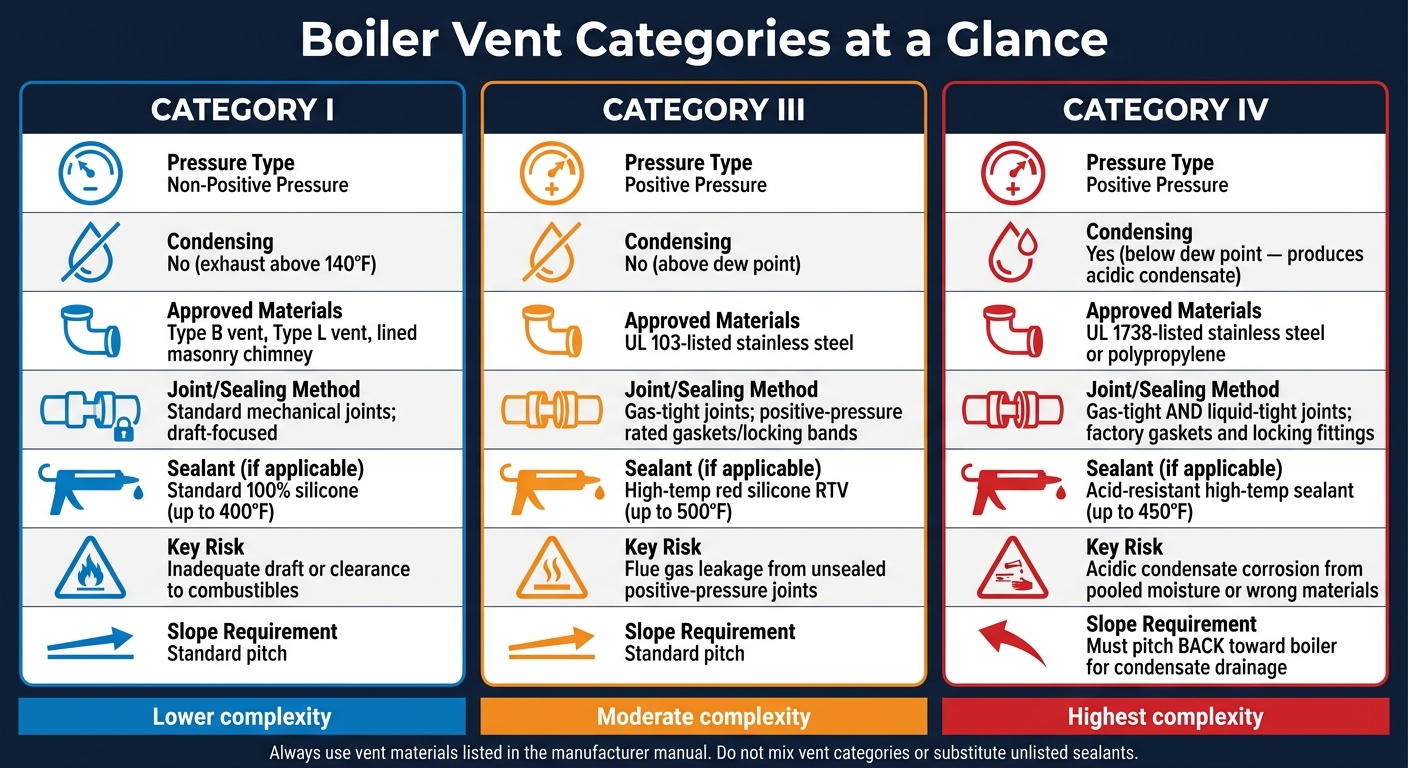
Boiler vents fall into a few main categories, and each category uses a different way to seal joints. The job is simple in theory: identify the vent category first, then use the joint method that fits that system.
Single-Wall, Type B, and Lined Chimney Systems
Category I systems include single-wall metal, Type B vent, Type L vent, and lined masonry chimneys. These systems run at non-positive vent pressure and exhaust temperatures above 140°F. That means they depend on natural draft, not pressure, to move flue gases out.
Because of that, the goal is to keep joints snug and maintain the required clearances to combustibles. Those clearances matter. They help keep the vent safe and keep the system steady over time. Type B vent has its own clearance ratings, and those ratings should never be cut just to make the install easier.
Positive-pressure systems play by different rules.
Category III and Category IV Vent Systems
Category III systems run at positive pressure with exhaust temperatures above the dew point. Since the vent is under pressure, flue gas can leak into the building if the joints are not sealed the right way. That’s why these systems need UL 103-listed vent products rated for positive pressure. Depending on the vent product, the system may need mechanical locking, gaskets, or liquid-tight joints.
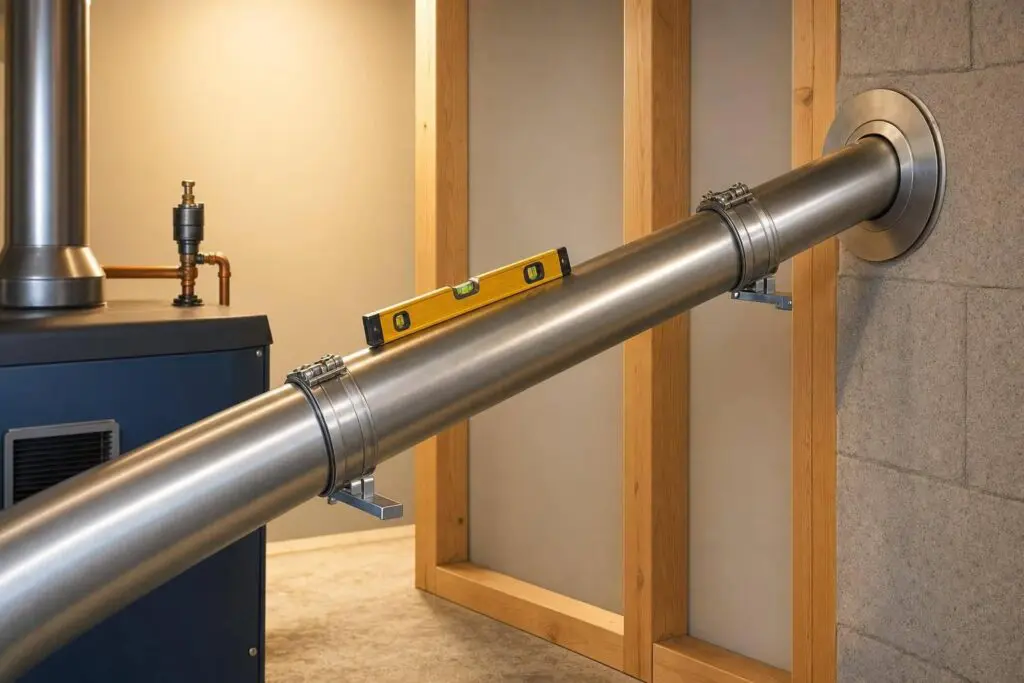
Category IV systems also run at positive pressure, but they condense because exhaust temperatures are below the dew point. That creates acidic condensate, which can eat away at the wrong material over time. These systems need UL 1738-listed materials, usually stainless steel or polypropylene, that are both gas-tight and liquid-tight. Horizontal runs should pitch back toward the boiler and be fully supported so condensate doesn’t sit in the vent and cause corrosion.
| Category | Pressure | Condensing? | Approved Materials | Joint Method |
|---|---|---|---|---|
| Category I | Non-positive | No | Type B, Type L, lined masonry | Standard mechanical joints; draft-focused |
| Category III | Positive | No | UL 103 stainless steel | Gas-tight; positive pressure rated |
| Category IV | Positive | Yes | UL 1738 stainless steel or polypropylene | Gas-tight and liquid-tight |
When to Use Sealant vs. Mechanical Joints
For most positive-pressure systems, factory-installed gaskets, locking bands, and listed mechanical fittings do the main sealing work. In plain English, the vent system is meant to seal with its own parts, not with jobsite-applied sealant.
High-temperature silicone or furnace cement should only be used when the manufacturer manual clearly allows it for that exact product. If the manual doesn’t say yes, treat that as a no.
Stick with the vent materials and sealants listed in the manufacturer manual. Mixing vent categories or using unlisted parts can lead to flue-gas leakage and a shorter vent life.
Next, focus on the flue collar, joints, and penetrations.
How to Seal Joints and Building Penetrations
Once you’ve chosen the vent type, seal the three main leak points: the flue collar, penetrations, and termination.
The Flue Collar and First Vent Connection
Start at the flue collar. Follow the listed joint method and use the vent material the manufacturer calls for. Secure the first joint mechanically before you apply any listed sealant.
If the joint needs sealant, put it inside the swaged end so condensate stays in the vent. That detail matters. If condensate slips out at the joint, it can create a mess fast.
Use only a sealant rated for the flue temperature, and don’t fire the boiler until the sealant has fully cured.
After that, check every wall, ceiling, and roof penetration before the system goes into service.
Sealing Around Walls, Ceilings, and Fire-Rated Assemblies
At walls, ceilings, and fire-rated assemblies, use a listed firestop or penetration seal that keeps the required clearance to combustibles. Don’t use expanding foam or standard acrylic or latex caulk right against hot vent parts. They’re simply not made for that kind of heat.
If you’re sealing a masonry transition between a metal connector and a lined chimney, use refractory furnace cement to bridge the gap. And if condensate is acidic, use a sealant rated for corrosive exhaust conditions.
Finish at the termination. That’s usually where weather and condensate put the most stress on the seal.
Roof and Sidewall Terminations
At the roof, use flashing that matches both the vent and the roof type. Install it so it laps in the direction of water runoff. It’s the same basic idea as shingles: water should move over the layers, not into them.
At sidewalls, keep the termination at least 12 inches above expected snow level. Also pitch the run back toward the boiler so condensate drains away from the outlet.
sbb-itb-b5c10b1
Materials, Clearances, and Common Failure Points
Once the joints and terminations are sealed, the next problem is simpler than it sounds: using the wrong product or packing insulation too close to the vent.
Approved Materials for Boiler Vent Sealing
The sealant needs to match the vent category, flue gas temperature, and the kind of condensate the system produces.
| Sealant Type | Continuous Temp Rating | Boiler Vent Use |
|---|---|---|
| Standard 100% Silicone | Up to 400°F | Category I non-condensing vent joints |
| High-Temp Red Silicone (RTV) | Up to 500°F | Category III positive-pressure vent joints |
| Acid-resistant high-temperature sealant | Up to 450°F | Category IV condensing boiler vents with acidic exhaust |
| Refractory Cement | Above 600°F | Masonry-to-metal transitions at lined chimney connections |
For condensing boilers, standard RTV silicone is often not enough. Acidic condensate can make it brittle over time. An acid-resistant high-temperature sealant is a better choice where exhaust moisture is more acidic.
And that’s only half the job. Even the right sealant can fail if the vent runs too close to insulation or framing.
Clearance to Combustibles and Insulation Control
Use the clearance listed on the vent label and in the manufacturer instructions. Those minimum distances need to stay in place at walls, ceilings, and every penetration.
In attics, loose-fill or batt insulation should never touch the vent surface. Insulation dams or shields are needed to hold that gap. If they’re missing, heat can collect around the vent and create a fire hazard.
Warning Signs That Vent Seals Are Failing
The first trouble spots are usually the same joints and penetrations where sealant was applied.
Seal failure often shows up through residue, rust, or staining. White powdery residue near joints usually means acidic condensate is leaking through a failed seal. Rust streaks on the vent pipe point to the same issue. Stained ceilings near roof penetrations often mean the storm collar has pulled apart or the flashing is no longer sealing as it should.
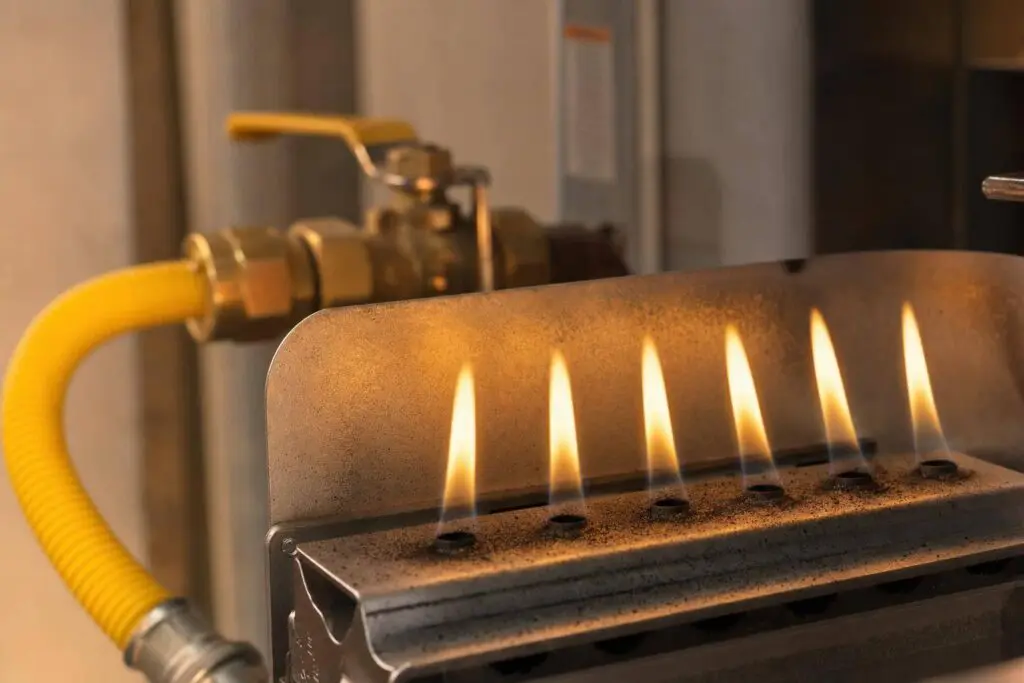
Corrosion at low spots usually points to a drainage or pitch issue. A yellow or orange flame can also point to venting or intake trouble.
Inspection, Maintenance, and When to Call a Professional
Spotting warning signs only helps if you make a habit of checking for them. A steady inspection routine can stop a small vent issue from turning into a $500 or $5,000 repair. Use the warning signs above as your working checklist.
Visual Checks Property Owners Can Do Safely
During heating season, look over joints, collars, penetrations, flashing, and terminations for anything that looks different. Loose clamps, visible gaps at joints, or sagging pipe sections are all easy to notice and worth fixing fast. Check around vent collars and nearby surfaces for soot smudges, dark streaks, or moisture. Those marks can mean exhaust is leaking where it shouldn’t.
Focus first on the joints, collars, and terminations that tend to fail most often. During humid months, inspect accessible flue sections for new residue. After heavy snowfall or severe weather, make sure sidewall or roof terminations are clear and that flashing is still in good shape. If the flame turns yellow or orange instead of blue, shut the boiler off and call a technician right away.
What a Professional Boiler Vent Inspection Should Cover
If you notice any sign of a leak, don’t stop at a visual check. Book a full service visit. Annual professional maintenance in early fall is a smart schedule. Older boilers, multi-zone systems, and hard-water setups should be checked every 6 to 9 months.
A qualified technician should:
- Verify that the vent material matches the boiler category
- Check draft pressure and combustion quality
- Test for carbon monoxide
- Confirm proper vent pitch and condensate drainage
- Inspect all clearances to combustibles
- Make sure the vent has proper support so it doesn’t sag
Roof flashing and outdoor terminations should also be checked for watertightness and blockages.
Conclusion: Sealing Details That Protect Your Boiler
Getting boiler venting right comes down to a few basics: use the vent system rated for your boiler category, keep joints sealed the right way, protect every wall and roof penetration from water entry, and maintain required clearances at all times. For condensing boilers, proper condensate drainage matters because pooled moisture can lead to early corrosion.
Keep a record of every inspection and repair so seal issues are easier to catch early. A simple log with dates, findings, and completed work can help you spot patterns and gives any future technician a clear view of the system’s history.
FAQs
How do I know my boiler vent category?
Check your boiler’s rating plate. If you have a gas-fired, low-pressure steam or hot water boiler certified to ANSI Z21.13, the vent category – I, II, III, or IV – should be printed right on it.
If the plate is missing or you can’t read it, look up the manufacturer’s installation and operation manual for your exact model.
Can I reseal a leaking vent joint myself?
It depends on the leak and on what you feel okay handling. A simple repair, like swapping out an automatic air vent on a hydronic system, may be fine for DIY. But resealing flue pipe joints or fixing roof flashing is harder work, and it can be risky.
A leaking flue joint can let carbon monoxide into your home. If you notice soot, strange odors, odd appliance behavior, heavy corrosion, or a leak that keeps coming back, call a professional.
What are the first signs of vent seal failure?
Early signs of boiler vent seal failure are often easy to spot if you know where to look. Check the vent joints for visible rust, white residue, or water stains. You might also notice soot streaks, black dust, oily black marks, or condensation dripping from the vents.
Some clues show up in how the boiler runs, too. A metallic or smoky odor, frequent pilot light outages, yellow or orange burner flames, or boiler error codes tied to combustion can all point to a vent seal problem.
If you notice any of these symptoms, contact Eco Temp HVAC for a professional inspection.