
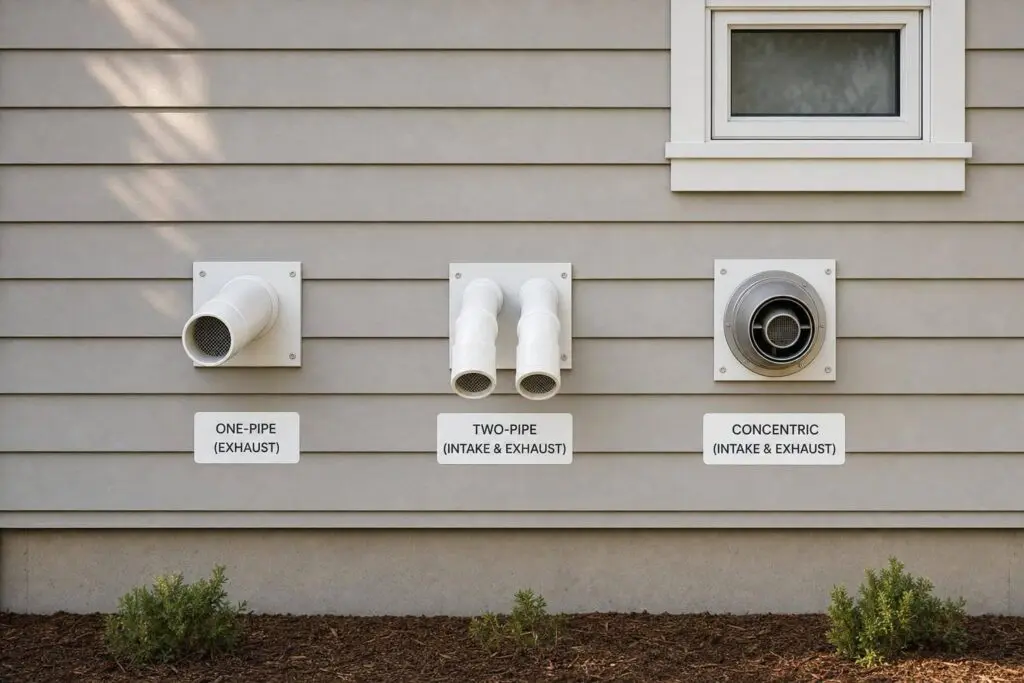
A furnace vent setup is safe only when the furnace type, pipe material, slope, and outdoor clearances all match. If one part is wrong, you can end up with lockouts, frozen condensate, exhaust recirculation, or carbon monoxide risk.
Here’s the short version:
- One-pipe systems use indoor air for combustion and send exhaust outside through one vent.
- Two-pipe direct vent systems bring combustion air from outdoors and send exhaust outdoors through a second pipe.
- Concentric kits do the same job as two-pipe systems, but both paths end at one wall or roof opening.
- High-efficiency furnaces in the 90%–98% AFUE range usually use plastic venting like PVC, CPVC, ABS, or polypropylene, based on the maker’s rules.
- Standard-efficiency furnaces around 80% AFUE often vent through B-vent or a chimney.
- Horizontal exhaust piping on condensing furnaces usually needs a slope of 1/4 inch per foot back to the furnace for condensate drainage.
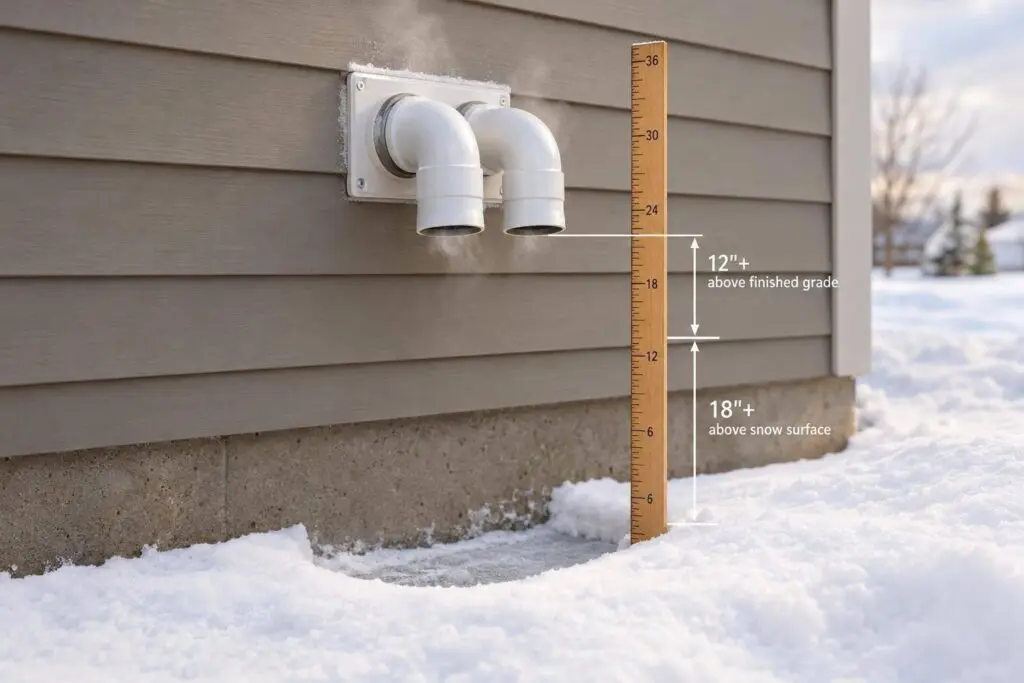
- Sidewall terminations should stay at least 12 inches above expected snow level, not just above grade.
- Tight homes, bath fans, range hoods, and winter snow can all affect vent safety.
If I had to boil it down to one point, it’s this: the furnace manual comes first, then local code, then the pipe route. That order matters.
Building the Backbone: How I Vent a Lennox High-Efficiency Furnace
Quick Comparison
| Setup | Combustion air source | Exhaust path | Best fit | Main risk |
|---|---|---|---|---|
| One-pipe | Indoor space | One vent to outdoors | Older homes or rooms with code-allowed combustion air | Negative pressure and backdrafting |
| Two-pipe direct vent | Outdoors | Separate vent to outdoors | Tight homes and most 90%+ AFUE furnaces | Bad spacing, bad slope, or wrong pipe length |
| Concentric kit | Outdoors | Shared termination assembly | When one wall/roof opening is preferred | Added vent resistance and shorter allowed run |
A few setup rules stand out:
- Match the vent layout to the furnace rating and design
- Count total equivalent length, not just straight pipe
- Support horizontal runs every 4 to 6 feet
- Keep intake openings away from dirty air sources
- Never bypass pressure switches or reset a locking-out furnace over and over
This guide explains how I’d look at the three vent options, what can go wrong, and what to check before any install or replacement starts.
Choose the Right Venting Layout
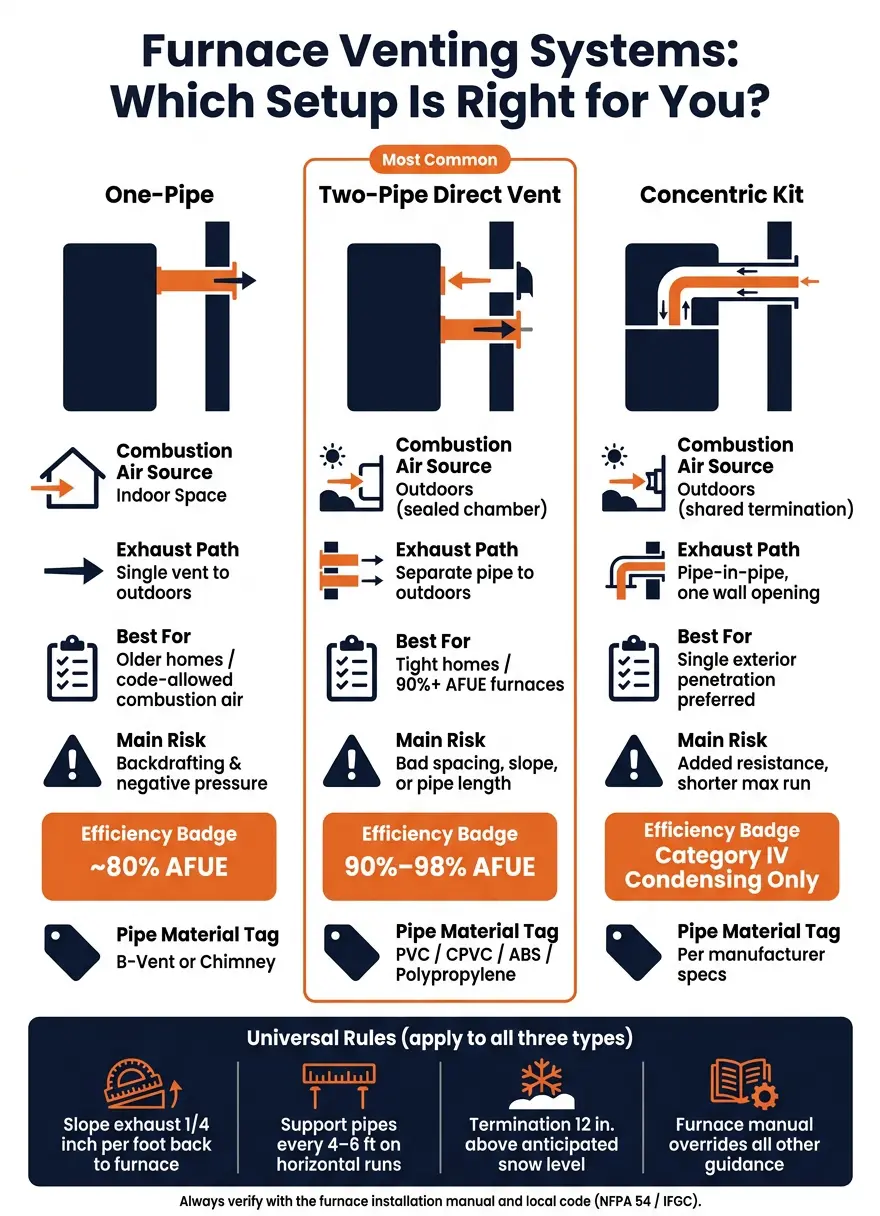
Furnace Venting Types Compared: One-Pipe vs Two-Pipe vs Concentric
The venting layout affects three big things: combustion air, exhaust path, and pressure inside the space. Once you know the main vent types, the next step is picking the layout that fits both the furnace and the building.
One-Pipe Venting With Indoor Combustion Air
In a one-pipe setup, the furnace vents exhaust outdoors through one flue and pulls combustion air from the mechanical room or nearby indoor space. This layout shows up more often in older homes and in areas where code allows indoor air for combustion.
If the furnace uses room air, code requires enough combustion air for the appliance load, often through dedicated openings. In tight homes, though, this setup is often a bad match. When the furnace runs, it can pull makeup air through gaps and cracks in the building shell. If bath fans, range hoods, or other exhaust devices are running at the same time, the mechanical room can go negative, which increases the risk of backdrafting.
That’s why code tends to steer tight construction toward outdoor combustion air or direct-vent equipment.
Two-Pipe Direct Vent and Paired Pipe Systems
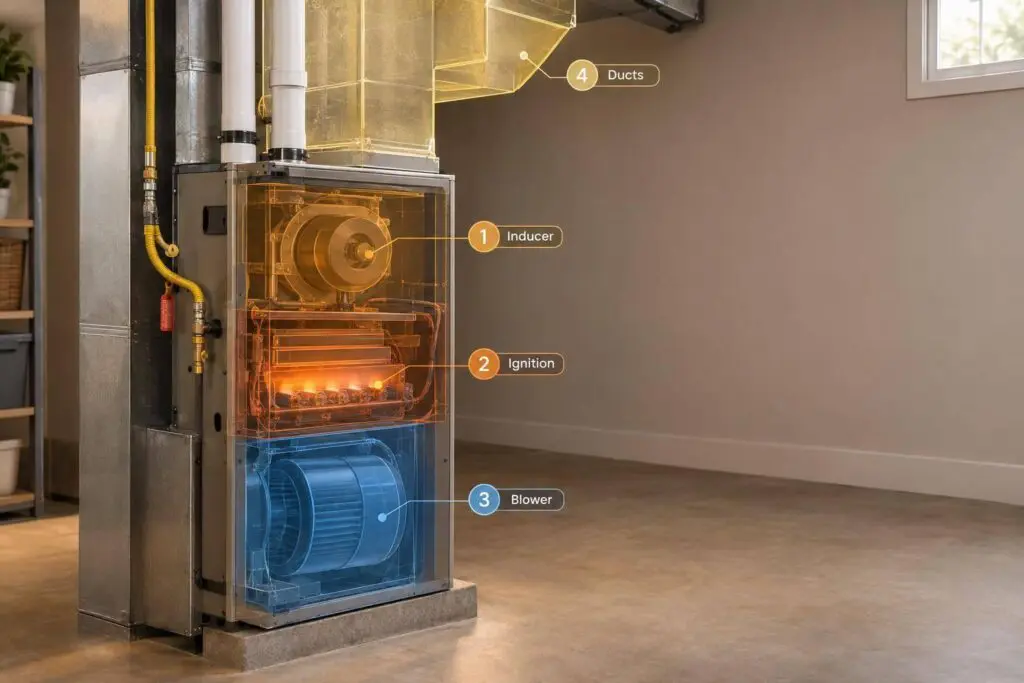
Two-pipe direct vent is the standard sealed-combustion layout for furnaces rated at 90% AFUE and higher. One pipe brings outdoor combustion air into a sealed chamber, and the second pipe carries flue gases outside.
Because the furnace is sealed off from indoor air, the system is less affected by exhaust fans and other appliances. It can also help cut drafts near doors and windows.
This layout also helps keep pressure in the mechanical room more stable because the furnace is not pulling combustion air from the house. In tight homes and small businesses with several exhaust devices, two-pipe direct vent is usually the most dependable choice for steady combustion and indoor comfort.
Concentric Vent Kits as a Two-Pipe Option
A concentric vent kit is a pipe-in-pipe termination accessory that allows both intake and exhaust to pass through one wall or roof penetration while staying separate inside the assembly. One passage handles exhaust, and the other brings in combustion air.
The main upside is simple: one exterior penetration instead of two. That can help when appearance matters or when framing limits your options.
These kits are approved only for Category IV condensing, direct-vent furnaces and should not be used with standard-efficiency appliances. They also add resistance to the vent system, so manufacturers often reduce the allowed vent length when a concentric kit is used. Check the furnace manual before going this route. Then match pipe size, material, slope, and termination location to the manufacturer’s instructions.
Plan Pipe Routing, Materials, and Termination Clearances
Once you’ve picked the vent layout, the next step is to lock down the pipe size, route, and termination location. Before you cut anything, check the furnace installation manual and your local code. In most cases, that means NFPA 54 and the International Fuel Gas Code (IFGC), along with any local amendments used in Chicago and nearby suburbs.
Match Pipe Size, Material, and Length to the Furnace
The installation manual should drive every call you make on vent material and sizing. Most high-efficiency condensing furnaces allow Schedule 40 PVC, CPVC, or polypropylene (PP) for venting, but only within stated temperature limits.
Here’s the catch: those limits matter. PVC is usually rated for continuous exhaust temperatures of about 140–150°F. CPVC is usually rated to around 194°F. Listed polypropylene vent systems can often handle up to about 230°F. If the material doesn’t match the furnace’s flue gas temperature, you’ve got a code problem and a safety problem at the same time.
Vent size also has to match the furnace model’s vent tables and the total equivalent length of the run. And this is where people get tripped up. A route may look short on paper, but elbows and fittings add length fast. Manufacturer tables assign an equivalent length to each fitting, so count every elbow before you settle on the route.
Slope and Support the Pipes for Condensate Control
Condensing furnaces make a lot of moisture. If the vent line isn’t pitched the right way, that water can sit in the pipe and cause trouble.
Horizontal exhaust piping needs to slope back toward the furnace at a minimum of 1/4 inch per foot. That pitch lets condensate drain to the internal drain or trap instead of pooling inside the vent.
The pipe also needs solid support. Use rigid hangers or straps fastened to framing, usually every 4 ft to 6 ft on horizontal runs. The goal is simple: no sags, no dips, no low spots. Joints need to be cleaned, primed with an approved PVC primer, and solvent-welded with the right cement for the material in use.
Next comes the part you don’t want to guess on: the outdoor termination point.
Set Safe Termination Locations Outdoors
After you’ve worked out sizing and slope, mark the outdoor exit point before drilling. Sidewall vent terminations need to stay clear of nearby openings, equipment, and walking areas. Exact distances depend on the furnace model and local code, so verify them in the installation manual and the code book for your area.
Check clearance from:
- Operable windows and doors – minimum horizontal and vertical separation
- Finished grade and snow level – at least 12 inches above anticipated snow accumulation, not just finished grade
- Gas meters and regulators – minimum horizontal distance
- Soffit vents and roof overhangs – enough space to keep exhaust from getting pulled back into the attic or building
- Building corners – enough distance to cut down on wind-driven recirculation into the intake
- Mechanical air intakes – separation to avoid cross-contamination between systems
- Property lines – minimum setback required by local code
- Sidewalks and pedestrian areas – enough height and horizontal spacing for pedestrian safety
In Chicagoland, winter changes the game. Snow and ice can block vents or create unsafe buildup. Don’t place terminations under roof drip lines where icicles can form, and don’t tuck them into recessed alcoves where exhaust can hang in place.
For two-pipe systems, keep the intake and exhaust terminations separated by the distances listed by the manufacturer. If they’re too close, exhaust can get pulled right back into the combustion air intake. That’s called exhaust recirculation, and it can lead to poor furnace operation.
Install the Intake and Exhaust Step by Step
A qualified HVAC technician should do and verify this work. Gas furnace venting is not a DIY job. That matters even more when you’re replacing an older furnace, because the vent route, condensate handling, and approved pipe materials may not match the old setup. Once the layout is set and clearances are marked, the work moves to assembly and testing.
Connect the Furnace and Dry-Fit the Route
First, confirm cabinet clearances and make sure the furnace is level so it can drain as intended and still be easy to service. After the unit is in place, connect the factory vent collars or adapters at the furnace connections.
Before you glue or cement anything, dry-fit the entire route. This lets you check the full length, any offsets, clearances, and the wall or roof penetration point before the setup becomes permanent.
Assemble the Exhaust and Intake Runs
Once the dry fit lines up with the plan, start permanent assembly.
Assemble the exhaust run first. If condensate sits in the pipe, it can lead to gurgling, corrosion, and pressure-switch issues. Then route the intake so it stays away from dryer vents, vehicle exhaust, garages, trash, pool chemicals, and other dirty air sources.
You also need to keep the intake and exhaust terminations separated by the distance the manufacturer calls for. When the manufacturer says to do so, place the exhaust above the intake.
Run Startup and Safety Checks
After both runs are assembled, check the system while it’s operating. Run a full heating cycle and watch for pressure-switch faults, water at joints, delayed ignition, odd noise, or exhaust recirculation.
Exhaust drifting near the intake or staining at the terminations is an immediate warning sign.
Install CO alarms on every level of the home and near sleeping areas. Place them at least 5–20 feet from fuel-burning appliances.
Comfort, Safety, and Professional Service in Chicagoland
Once the furnace is installed and started up, the next thing that matters is simple: how the vent system holds up when Chicago weather gets rough.
How Venting Choices Affect Comfort and Reliability
The venting layout plays a big part in how steadily a furnace runs. Sealed direct-vent systems are less sensitive to indoor pressure shifts. One-pipe systems, on the other hand, are more likely to run into trouble in tight homes.
You’ll often notice that gap first during cold snaps or after heavy snowfall. If snow piles up, check that both terminations are clear. If the furnace keeps locking out, that’s a sign of a venting issue that needs service.
When to Call a Technician for Furnace Venting
If the furnace starts locking out or shows signs of vent-related damage, stop trying to troubleshoot it yourself and move straight to service.
Call an HVAC technician for:
- any new install, replacement, reroute, or one-pipe-to-two-pipe conversion
- repeated lockouts
- water pooling around the vent piping
- visible corrosion or cracked PVC
- unusual exhaust staining near terminations
- any CO alarm activation
Do not keep resetting the furnace.
Eco Temp HVAC provides furnace venting, installation, maintenance, and emergency service across Chicagoland.
Key Setup Rules to Remember
In most cases, these issues come back to a small number of setup mistakes. A few rules apply to every furnace venting job, no matter the system type or building.
- Match the vent configuration to the furnace model. Condensing, noncondensing, and sealed-combustion units each have their own pipe material, size, and layout rules. The wrong setup can lead to pressure-switch errors, shorten equipment life, or create carbon monoxide hazards.
- Size and slope the pipes the right way. If the slope is off, condensate can collect in the vent. That can lead to short-cycling, corrosion, and lockouts.
- Follow outdoor termination clearances exactly. In Chicago, forced-draft venting requires at least 12 inches of clearance from openings where combustion products could re-enter the building. Illinois mechanical regulations also require outdoor air intakes to be at least 15 feet from exhaust outlets and at least 6 feet above grade.
- Never bypass a pressure switch or safety lockout. These safety devices are there to prevent unsafe combustion conditions.
The final routing and validation need to match the furnace installation manual and local mechanical code.
FAQs
How do I know if my furnace should use one pipe or two?
It depends on your furnace design and how much combustion air your home needs. High-efficiency condensing furnaces usually use sealed combustion, so a two-pipe setup pulls in outdoor air and sends exhaust outside.
A one-pipe setup uses indoor air for combustion. Check your furnace installation manual, or have a professional confirm the right setup for your furnace and home.
What happens if the vent pipe slope is wrong?
On a high-efficiency condensing furnace, the vent pipe slope matters more than it might seem. If the slope is off, condensate may not drain the way it should. Instead, it can sit in the pipe.
That standing condensate can hurt performance, cause moisture-related issues, and increase the risk of corrosion.
For horizontal runs, slope the pipe back toward the furnace at 1/4 inch per foot so condensate drains the right way.
How can snow or wind affect a furnace vent?
Snow and wind can interfere with a furnace vent by causing blockages or ice buildup that throws off normal operation.
During winter, check outdoor exhaust pipes and keep them clear of snow and ice. Vents should be installed at least 12 inches above the expected snow level, and the right vent termination placement can help cut down on dangerous icing at the exhaust point.