Installing an AC system can be risky if proper safety measures aren’t followed. From handling high-voltage systems to managing refrigerants and ensuring structural stability, mistakes during installation can lead to electrical fires, carbon monoxide leaks, or system inefficiencies. This guide focuses on key safety protocols to protect both technicians and homeowners while ensuring optimal system performance.
Key Takeaways:
- Wear Proper PPE: Use hard hats, safety glasses, insulated gloves, and arc-rated clothing for electrical tasks.
- Pre-Installation Checks: Assess structural integrity, clear hazards, and ensure proper ventilation.
- Electrical Safety: Follow Lockout/Tagout procedures, double-check voltage, and handle capacitors with care.
- Refrigerant Handling: Use EPA-certified tools, avoid venting, and prevent cross-contamination.
- Secure Mounting: Use sturdy brackets, ensure level installation, and inspect annually for stability.
- Post-Installation Testing: Verify refrigerant charge, airflow, and electrical connections for safe operation.
By following these steps, you can avoid hazards, reduce energy costs, and ensure your AC system operates safely and efficiently with professional HVAC services.
Safety Basics for HVAC Technicians | Part 2
sbb-itb-b5c10b1
Personal Protective Equipment (PPE) for AC Installation
Wearing the right protective gear is crucial for staying safe during AC installation. As OSHA explains, "Personal protective equipment, commonly referred to as ‘PPE’, is equipment worn to minimize exposure to hazards that cause serious workplace injuries and illnesses". They also emphasize that poorly fitting PPE can leave workers vulnerable: "If the personal protective equipment does not fit properly, it can make the difference between being safely covered or dangerously exposed". Always ensure your gear fits well and is thoroughly inspected before starting any job.
Head, Eye, and Hand Protection
Hard hats are a must when working in areas where falling debris is a risk, such as near structural elements or on rooftops. For eye protection, ANSI Z87.1-compliant safety glasses with side shields are recommended to shield against flying debris. If you’re brazing copper lines, a face shield is critical to protect from UV radiation and molten metal splashes.
When it comes to hand protection, the type of gloves you choose depends on the task:
- Cut-resistant gloves: Protect against sharp metal edges.
- Electrical insulated gloves: Essential for wiring tasks.
- Chemical-resistant gloves: Prevent frostbite caused by refrigerants like R-410A.
- Heat-resistant gloves: Necessary when brazing or soldering.
Additionally, always verify your voltage meter on a known live circuit before and after use to confirm it’s functioning properly. Beyond head, eye, and hand gear, don’t overlook the importance of proper clothing and footwear for full-body safety.
Footwear and Clothing
Steel-toed, non-slip boots are essential to protect your feet from heavy equipment and slippery surfaces. For electrical work, arc-rated (AR) clothing is mandatory. For 208–240V single-phase systems, Category 1, 4 cal/cm² AR clothing is sufficient. However, for 480V three-phase systems, higher-rated clothing (Categories 2–4) with protection ranging from 8 to 40 cal/cm² may be needed. This specialized clothing helps reduce the risk of severe burns caused by arc flashes.
Respiratory Protection
Airborne hazards like dust, fiberglass insulation, and other particles require at least an N95 mask. However, if you’re working with refrigerants or in areas with toxic fumes, you’ll need a half-face or full-face respirator. Keep in mind that oxygen levels below 19.5% are unsafe, particularly in confined spaces like attics or crawl spaces, where ambient oxygen is typically around 20.9%. To ensure effectiveness, all respirators require professional fit testing.
During the pandemic, the Air Conditioning Contractors of America advised technicians to wear face masks, disposable gloves, and shoe coverings on-site. To further enhance safety, keep a well-stocked safety pack on hand, including emergency plans and additional PPE, to quickly address unexpected hazards.
Pre-Installation Site Assessment and Hazard Identification
Before installing an AC system, it’s crucial to evaluate the site for potential hazards. This step helps pinpoint structural issues, electrical risks, and workspace challenges. As Ryan Mayes, Senior Digital Brand Marketing Manager at Carrier, explains: "Proper HVAC installation ensures your heating and cooling system operates safely, efficiently, and reliably for years to come". These checks lay the groundwork for a safe and efficient installation process.
Inspecting Structural Integrity
Start by ensuring the mounting wall for the indoor split AC unit is strong enough to handle the load. It should be at least 6 inches thick. If it doesn’t meet this requirement, reinforce it with 19mm thick plywood paneling before attaching brackets. Additionally, confirm that the sill is at least 36 inches off the floor. Watch for moisture on mounting surfaces, as damp conditions can weaken the structure and reduce the unit’s lifespan.
For outdoor units, a solid, level foundation is key. A concrete pad is ideal, as it prevents settling or misalignment over time. Ensure there’s at least 2 feet of clearance around the condenser to allow for proper airflow. Indoors, mount the unit 7 to 8 feet above the floor, leaving 12 to 18 inches of space around it for optimal air circulation. If the window frame is metal, use wooden shims to minimize vibrations, as wood naturally absorbs them better than metal.
Once structural conditions are confirmed, shift your attention to electrical safety and cooling services.
Identifying Electrical Hazards
Check for loose wires, improper grounding, or live circuits that could pose risks like shocks or arc flashes. Inspect the electrical panel to determine if a dedicated circuit or a new breaker is required for the unit’s load. Use a multimeter to assess the condition of existing wiring before beginning any work. High-voltage components, such as compressors and motors, can be dangerous, so wear insulated gloves and safety goggles during your inspection. If you find an electrical hazard, shut off power at the main breaker and apply Lock-out/Tag-out procedures to ensure circuits remain de-energized during the installation.
Clearing the Installation Area
Prepare the workspace by removing obstacles and securing access to critical areas, such as the electrical panel and attic. For outdoor units, trim vegetation to maintain a 2-foot clearance around the condenser. Secure the area to minimize accidents during the movement of heavy components. When transporting equipment through finished living spaces, protect furniture and floors with drop cloths. In tight spaces, check for harmful gases and ensure proper ventilation.
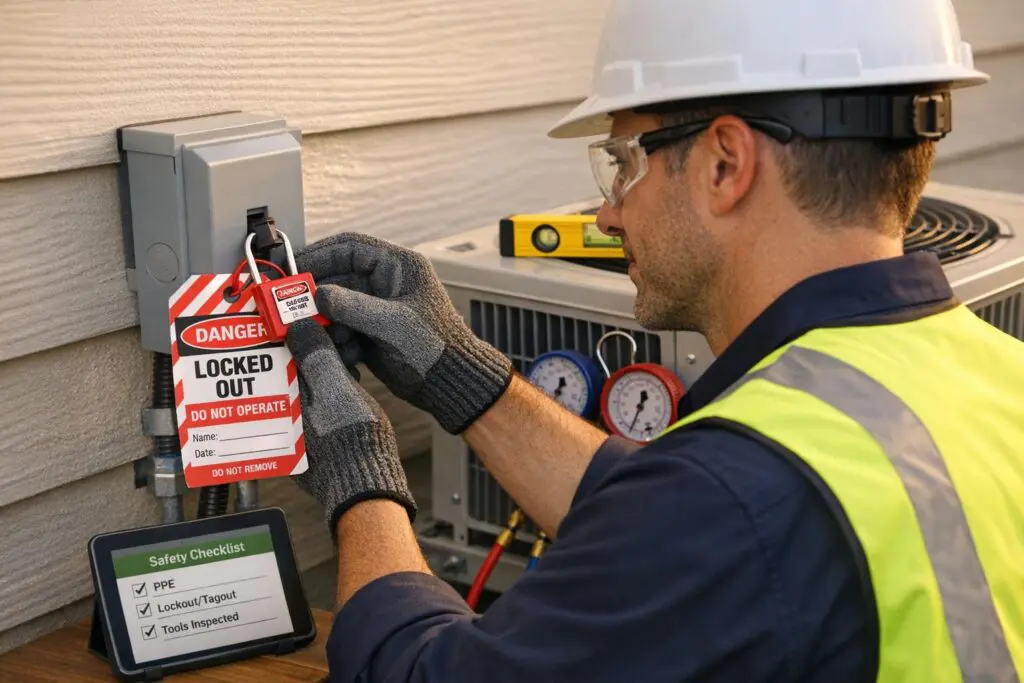
Electrical Safety and Lockout/Tagout Procedures
6-Step Lockout/Tagout Procedure for AC Installation Safety
Working with electrical systems during AC installation demands strict safety measures. Without proper protocols, there’s a serious risk of electrocution, severe burns, or even fatal injuries from live voltage. One essential safety practice is Lockout/Tagout (LOTO), which involves securing energy-isolating devices – like circuit breakers – to ensure they cannot be accidentally turned back on.
"The standard creates a preference for the use of lockout devices if the energy isolating devices are ‘capable of being locked out.’" – Richard E. Fairfax, Director of Enforcement Programs, OSHA
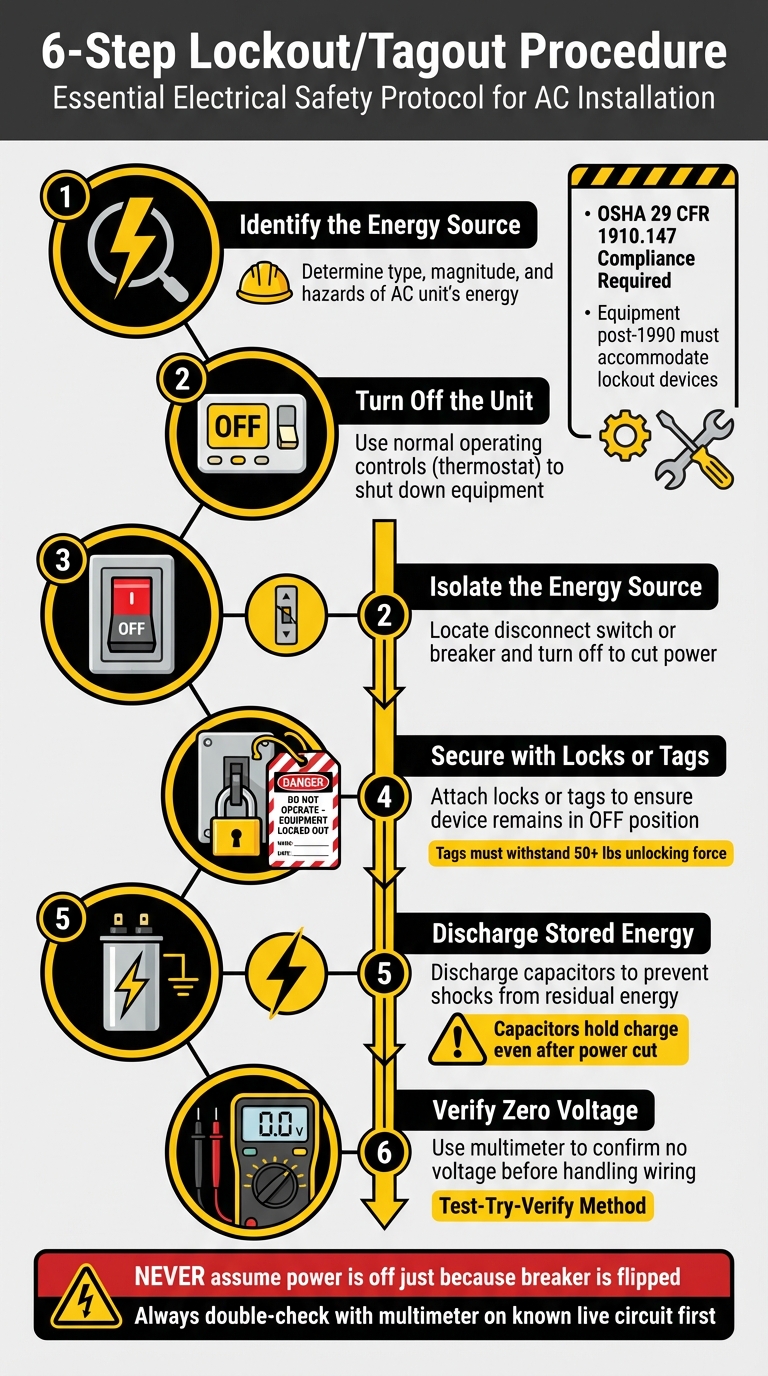
OSHA’s 29 CFR 1910.147 standard mandates that all equipment designed or updated after January 2, 1990, must accommodate lockout devices. Physical locks are the preferred method for securing devices. If a device cannot be locked, a "Tags Plus" system must be used, which includes additional safety measures like removing a fuse.
Understanding Lockout/Tagout Procedures
The LOTO process involves six essential steps:
- Identify the energy source: Determine the type, magnitude, and hazards of the AC unit’s energy.
- Turn off the unit: Use the usual operating controls, like the thermostat, to shut down the equipment.
- Isolate the energy source: Locate the disconnect switch or breaker and turn it off to cut power.
- Secure with locks or tags: Attach locks or tags to ensure the device remains in the "off" position.
- Discharge stored energy: Capacitors can hold residual energy even after the power is cut, so discharge them to prevent shocks.
- Verify zero voltage: Use a multimeter to confirm there’s no voltage before handling any wiring.
Never assume the power is off just because a breaker is flipped. Residential AC units often use two-pole breakers rated between 15 and 60 amps. Even if the thermostat is in the "OFF" position, the outdoor unit’s line terminals may still be live. Always double-check with a multimeter, first on a known live circuit and then on the AC unit itself. Additionally, notify everyone on-site that the circuit is locked and not to be energized.
Tagout devices must meet specific criteria: they should be single-use, attachable by hand, and withstand at least 50 pounds of unlocking force. They must also endure harsh environmental factors like weather, moisture, and chemicals. Keep in mind that push buttons, selector switches, and interlocks are not considered energy-isolating devices because they don’t physically block hazardous energy.
Once the system is secured, you can safely proceed with managing electrical connections.
Handling Electrical Connections
When working with electrical connections, follow the "Test-Try-Verify" method: test the voltage with a meter, try to start the equipment to confirm isolation, and verify zero energy before touching any wiring.
Capacitors are especially dangerous because they can retain a charge even after the main power is disconnected. Use an insulated tool equipped with a resistor to safely discharge them, and avoid direct contact with capacitor terminals. To further reduce risk, work with one hand whenever possible, keeping the other hand in your pocket to prevent creating a current path through your chest.
| Voltage Level | PPE Category | Arc Rating (cal/cm²) | Required Equipment |
|---|---|---|---|
| 208-240V (1 Phase) | Category 1 | 4 | Arc-rated shirt and pants, face shield |
| 208-240V (3 Phase) | Category 2 | 8 | Arc-rated coveralls, hood, gloves |
| 480V (3 Phase) | Category 2-4 | 8-40 | Full arc flash suit |
Before disconnecting any wiring, take a photo of the setup to ensure proper reassembly. If your meter detects voltage after the breaker is off, stop immediately – this could indicate miswiring or a double-fed circuit. Lastly, always close the weatherproof disconnect box after switching it off to protect the contacts from environmental damage during installation.
Safe Handling of Refrigerant Lines and Connections
Handling refrigerants demands strict compliance with federal laws and safety protocols. Technicians working with refrigerants in residential and commercial AC systems must hold EPA Section 608 certification, specifically Type II or Universal certification. This requirement, mandated by the Clean Air Act, ensures that only qualified individuals service or dispose of refrigerant-containing equipment.
Refrigerant Safety Guidelines
When working with refrigerants, safety gear is non-negotiable. Always wear safety goggles, chemical-resistant nitrile or neoprene gloves, and long-sleeved clothing made from non-synthetic materials. Liquid refrigerants can cause frostbite and even melt synthetic fabrics. With modern refrigerants like R-410A, which operate at much higher pressures than older R-22 systems, it’s essential to use pressure-rated hoses, gauges, and manifold sets designed for these applications.
Never intentionally vent refrigerants. The Clean Air Act prohibits releasing ozone-depleting substances (ODS) and their substitutes, such as hydrofluorocarbons (HFCs). When charging a system, follow these steps:
- Add liquid refrigerant to the high-pressure side while the system is off.
- Charge the low-pressure side with vapor during operation.
Avoid charging liquid refrigerant into a running compressor’s suction line, as this can cause severe damage. Always confirm the refrigerant type and quantity specified by the manufacturer before starting work – don’t rely on the unit’s age as a guide.
Proper ventilation is crucial, especially in confined spaces like basements or mechanical rooms. Refrigerant vapors are heavier than air and can settle in low-lying areas, displacing oxygen and creating a suffocation risk. For leak detection, start with an electronic detector and verify findings with a commercial soap bubble solution – household soap can contaminate the system.
Avoiding Cross-Contamination
To prevent contamination, keep refrigerant types strictly separate. Mixing refrigerants in the same recovery cylinder makes reclamation impossible and creates costly disposal issues. Use dedicated recovery equipment for each refrigerant type and maintain detailed records, including refrigerant types, quantities added or removed, and system specifications, to meet regulatory requirements.
During oil changes, ensure system pressure does not exceed 5 psig, as refrigerant oil can contain large amounts of dissolved refrigerant. For pressure testing and purging lines before charging, use nitrogen regulators and hoses instead of refrigerants.
When recovering refrigerants from small appliances (those with 5 pounds or less of refrigerant), you must recover at least 90% if using equipment manufactured after November 15, 1993, and if the compressor is functional. Recovered refrigerants can only be reused in systems owned by the same individual. If ownership changes, the refrigerant must be processed by an EPA-certified reclaimer.
| Type of Appliance | Required Vacuum (Post-1993 Equipment) |
|---|---|
| Very high-pressure appliance | 0" Hg |
| High-pressure (< 200 lbs charge) | 0" Hg |
| High-pressure (200+ lbs charge) | 10" Hg |
| Medium-pressure (< 200 lbs charge) | 10" Hg |
| Medium-pressure (200+ lbs charge) | 15" Hg |
| Low-pressure appliance | 25 mm Hg absolute |
Unit Mounting, Anchoring, and Structural Safety
Properly securing an AC unit is crucial – not just for the equipment’s performance but also for the safety of those nearby. Residential units typically weigh anywhere from 20 to 100 lbs, and poor mounting practices are one of the most common causes of installation failures. Before installation, always inspect the mounting surface for signs of rot, damage, or structural weakness. This is especially important when deciding between ductless mini split vs. traditional central HVAC systems, as mounting requirements vary. Never install an AC unit on a compromised surface.
Proper Mounting Techniques
When choosing brackets, opt for ones rated to support 15–20% more than the unit’s weight. For example, a 75-lb unit should use brackets rated for at least 90 lbs. Materials like stainless steel or powder-coated aluminum are excellent choices, especially in humid or coastal areas, as they resist corrosion.
The type of wall you’re working with determines the installation method. For drywall, use a stud finder to locate solid anchor points – hollow walls alone cannot support the weight of an AC unit without reinforcement. Masonry walls, on the other hand, can handle heavier loads but require heavy-duty masonry anchors and the right drill bits for the job. When securing the brackets, follow standard torque specifications, which for residential AC units typically range between 20–30 lbs-ft.
"Supporting metal brackets, interior angles, etc. should be structurally fastened to the building and must be strong enough for the size and weight of the AC unit."
Avoid makeshift supports like bricks, wood blocks, or cans, as these can shift due to vibrations or wind. If leveling shims are necessary, ensure they are firmly secured to prevent movement. For optimal cooling performance, install the unit at least 7–8 feet above the ground.
Once the unit is mounted, double-check the overall structural stability to ensure everything is secure.
Ensuring Structural Stability
After mounting, test the installation’s stability by carefully lifting the unit with a helper and applying force to the brackets to confirm they hold securely. The unit must sit level to avoid issues like excessive noise, vibration, or drain pan overflow. However, some units may require a slight outward tilt for proper water drainage – consult the manufacturer’s guidelines for the correct angle.
Make it a habit to inspect the installation annually, ideally each spring. Look for loose fasteners, signs of metal fatigue, or corrosion. Most brackets last between 8–12 years, but exposure to elements like salt air or extreme temperatures can shorten their lifespan. For rooftop air conditioner installation or other exterior setups, use an exterior-grade sealant around anchor points to block moisture and prevent wall rot. Lastly, ensure the unit does not block fire escapes or emergency exits, as this creates a serious safety hazard.
Ventilation, Emergency Planning, and Post-Installation Testing
Ensuring Adequate Ventilation
Good airflow isn’t just about comfort – it’s a key factor in keeping your system running efficiently and lasting longer. Poor ventilation forces the unit to work harder, which increases energy use and causes more frequent cycling. Over time, this extra strain can shorten the system’s lifespan. Before wrapping up an installation, it’s critical to confirm that the airflow aligns with the manufacturer’s guidelines.
Check the ductwork for any leaks and conduct a formal leakage test. Even small gaps can waste energy and disrupt airflow. Fix any issues promptly to help maintain indoor air quality and manage humidity levels effectively. The Air Conditioning Contractors of America (ACCA) offers the Quality Assured Residential Services & Installation (RSI) program, which outlines standards for verifying airflow and system performance. Additionally, make sure the equipment is sized correctly for the specific home rather than relying on generalized rules – this step is vital for long-term reliability.
Once ventilation is optimized, the next step is to shift focus to emergency planning to address any potential risks during installation.
Emergency Preparedness
Having a detailed emergency plan in place is essential before starting any work. Mark the locations of critical components like main electrical breakers, refrigerant line cutoffs, and gas shut-off valves. Establish clear communication protocols for notifying team members and contacting emergency services (911) or local utilities. In the case of a gas leak, evacuate immediately and call for help from a safe location. Avoid flipping light switches or using phones indoors, as even small sparks can ignite the gas.
"Develop a detailed emergency plan specific to AC installation worksites. Outline responsibilities for each worker, safe zones within the job site, and procedures to ensure everyone’s safety during accidents, injuries, equipment malfunctions, or severe weather."
- SafetyDocs by SafetyCulture
Keep a waterproof emergency kit on-site stocked with essentials like first aid supplies, electrical tape, waterproof tarps, and a Class C fire extinguisher for electrical fires. Place laminated copies of the emergency plan near key areas and keep a copy in your vehicle for quick access. Regular professional maintenance plans can prevent up to 85% of HVAC-related emergencies. When issues do arise, technicians trained through regular emergency drills are better equipped to respond effectively. These precautions, combined with earlier checks on airflow and electrical isolation, create a safer work environment.
Post-Installation Safety Testing
Once emergency procedures are set, it’s time to verify that the system operates safely and efficiently with detailed post-installation tests. Start by ensuring the refrigerant charge is correctly adjusted for the specific site. Proper charging not only reduces energy use but also lowers the risk of system failure. Make sure the contractor demonstrates that the airflow meets the manufacturer’s exact specifications, rather than relying on general benchmarks.
Inspect all electrical connections and torque them to the recommended settings. Test the startup sequence, thermostat responsiveness, and drainage system. This comprehensive checklist not only confirms the quality of the installation but also provides a reference point for future maintenance.
Conclusion
Proper safety protocols during AC installation aren’t just a formality – they directly affect how well the system performs, how long it lasts, and, most importantly, user safety. Mistakes like installing the wrong size unit or failing to seal ductwork can lead to skyrocketing utility bills, constant repairs, and a shorter lifespan for the equipment. On the flip side, when certified professionals handle the job, air conditioners and heat pumps can achieve energy savings between 18% and 36%.
This highlights the importance of thorough, professional installations.
"Quality installation – that is, installation by certified professionals who follow industry standards and manufacturers’ recommendations – will save energy, improve equipment performance and safety, and ensure the system’s longevity." – Building Science Education, U.S. Department of Energy
Skipping essential steps during installation has led to serious hazards like attic fires, carbon monoxide poisoning, gas leaks, and even electrocution. Even the most advanced systems lose their value if they’re installed incorrectly. This is why hiring certified professionals who adhere to ACCA standards and perform detailed post-installation testing is crucial.
For areas with specific climate needs, relying on local experts is critical. Homeowners in the Chicagoland area can count on Eco Temp HVAC for installations tailored to local challenges. With certifications like the Mitsubishi Diamond Elite Contractor designation and 24/7 service across Chicago, St Charles, Bartlett, Lemont, Downers Grove, and Palatine, their technicians ensure every installation meets stringent safety and performance standards.
From using proper PPE to conducting post-installation tests, every step in the process contributes to a system that delivers dependable comfort, reduced energy costs, and peace of mind. By following the practices outlined in this guide – covering PPE, electrical safety, refrigerant handling, and emergency planning – you can ensure your AC system operates safely and efficiently for years to come.
FAQs
When should I hire a licensed HVAC pro instead of DIY?
Hiring a licensed HVAC professional is essential when dealing with central air systems or complex HVAC setups. These systems involve working with high-voltage electricity, refrigerants, and precise airflow calculations – tasks that require specialized expertise and the proper permits. Attempting a DIY installation can lead to safety hazards, inefficiency, or even code violations.
Professionals bring the knowledge and skills needed to ensure the system is properly sized, installed correctly, and compliant with all regulations. This not only optimizes performance but also minimizes the risk of costly repairs or safety issues down the road. For both safety and efficiency, leaving the job to a licensed expert is the best choice.
What EPA certification is required to handle refrigerant?
Technicians are required to have the Section 608 Technician Certification to work with refrigerants. This certification is granted after successfully passing an EPA-approved exam, ensuring adherence to the Clean Air Act regulations.
What tests should be done before turning on an AC system?
Before you fire up a new AC system, there are a few key tests you should run to make sure everything is set for safe and efficient operation. These include:
- Refrigerant checks: Assess superheat and subcooling levels to confirm the refrigerant is within the proper range.
- Airflow verification: Ensure airflow rates meet the system’s requirements.
- Electrical inspection: Look over all electrical connections to rule out potential faults.
- System startup: Confirm that components like the fans and compressor are functioning correctly.
It’s also important to test safety controls and cooling performance to ensure they align with the manufacturer’s specifications. Skipping these steps could lead to problems like refrigerant leaks, improper charge levels, or electrical issues. A thorough check at the start helps the system run smoothly right from day one.