
Weak mini-split airflow? I’d start with the fan settings, filters, and blocked openings – not assume the system needs a repair. Turn off Quiet or Eco mode and test a higher fan speed. Before removing filters or inspecting inside, turn the unit off and disconnect power.
Here are the 7 causes I’d check:
- Clogged filters: Dust limits air entering the unit.
- Dirty blower wheels: Buildup reduces how much air the fan moves.
- Blocked coils or air paths: Dirt, curtains, or furniture can restrict airflow.
- Fan motor or control faults: The fan may run slowly or ignore speed changes.
- Closed or stuck vanes: Air may be blocked or sent away from where you need it.
- Frozen coils: Ice blocks airflow and needs time to thaw.
- Sizing or installation problems: Poor placement can restrict air, while incorrect sizing can leave a room uncomfortable even with normal airflow.
<u>My rule: keep homeowner checks simple.</u> Follow the manual for filter care, clear intake and outlet openings, and leave internal cleaning, electrical testing, and refrigerant work to a technician. Stop testing if you find ice, burning smells, severe noise, or water near electrical parts. If airflow stays weak after basic checks, schedule service.
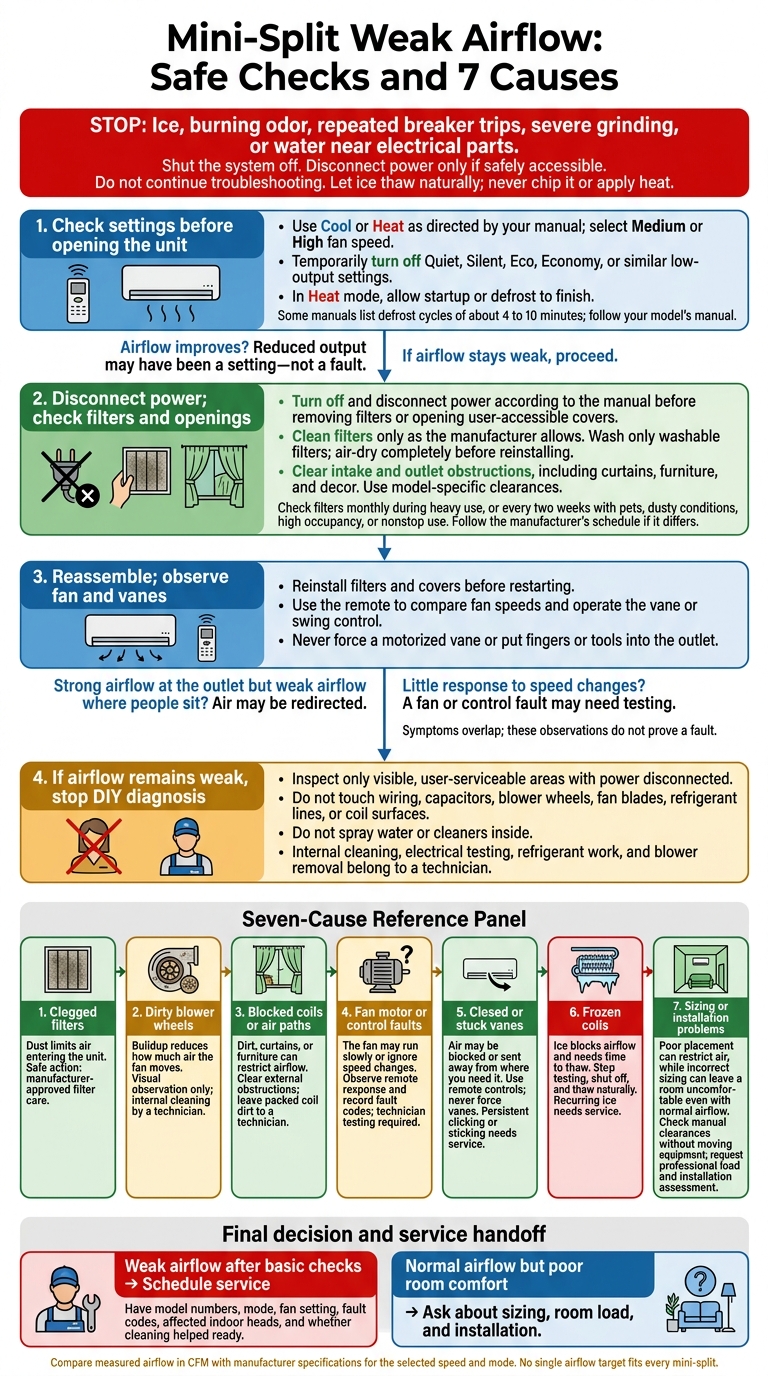
Mini-Split Weak Airflow: Safe Checks and 7 Causes
Mini-Split Weak Airflow: Clean Filters, Filthy Blower
sbb-itb-b5c10b1
Check Settings and Shut Off Power Before Inspection
Check the settings before opening the indoor unit. Compare the remote and indoor display with the manual. Dry mode may reduce fan speed, Fan mode only circulates air, and Auto adjusts speed as needed. To test airflow, select Cool or Heat as directed in the manual. Set the temperature a few degrees below room temperature for cooling or above it for heating, then choose Medium or High fan speed.
Temporarily turn off Quiet, Silent, Eco, Economy, and similar low-output settings. These modes can lower fan speed, limit compressor output, or redirect air to reduce noise and energy use. If airflow improves, the reduced output may be part of the setting – not a fault.
In Heat mode, give startup or defrost several minutes to finish before checking airflow. A standby or defrost light may signal a temporary pause; some manuals list defrost cycles of about 4 to 10 minutes. If airflow remains weak afterward, continue troubleshooting.
Note whether the problem affects one indoor head or multiple heads, and whether airflow changes when you increase or decrease fan speed. Record the mode, fan setting, room and outdoor temperatures in °F, and time since startup. Check the manual for airflow in CFM, capacity in BTU/h, and required clearances in inches. These figures help you compare expected performance, but they don’t prove a fault. No single airflow target fits every mini-split.
Turn the unit off and disconnect power according to the manual before removing filters or opening a user-accessible cover. Inspect only user-serviceable parts. Don’t touch wiring, capacitors, blower wheels, fan blades, refrigerant lines, or coil surfaces. If you notice a burning smell, damaged wiring, water leakage, or abnormal noise, stop and arrange service. Professional AC repair is necessary for electrical or refrigerant issues. If the settings are correct but airflow is still weak, check the air filter first.
1. Clogged Air Filters
Recognizable Symptoms
Weak airflow, uneven temperatures, and longer run times can point to a clogged filter. Check the mesh for dust, pet hair, lint, or grease.
Safe Homeowner Checks
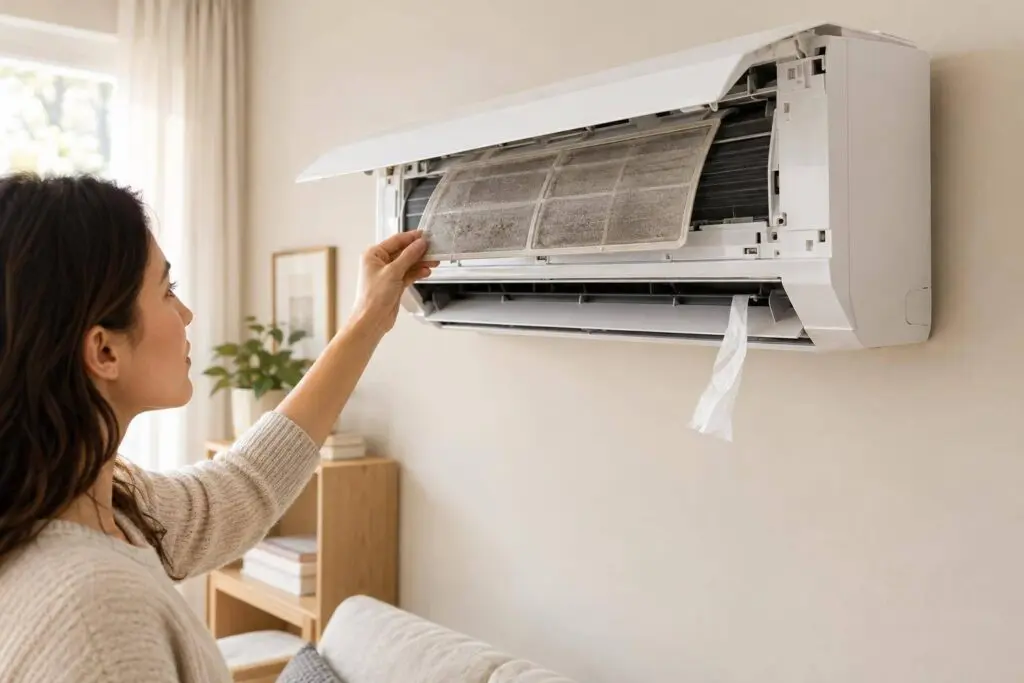
Turn off the power before removing filters, and follow the manual. On many ductless mini split vs. traditional central HVAC models, the filters sit behind the front panel and slide out of their tracks. Hold each one up to a light. If little light passes through or dust coats the mesh, the filter is restricting airflow.
Gently vacuum loose dust with a soft-brush attachment on low suction. Rinse only filters the manufacturer labels as washable, using lukewarm water. Add mild soap or neutral detergent only if the manufacturer allows it. Keep nonwashable inserts dry, and replace damaged filters with the manufacturer-specified part. Never add makeshift filter material.
Let washable filters air-dry completely in a shaded spot with good ventilation. Then reinstall them in their original tracks, facing the correct direction.
Check filters monthly during heavy use, or every two weeks with pets, dusty conditions, high occupancy, or nonstop use. Follow the manufacturer’s schedule if it differs.
Effect on Airflow
A clogged filter blocks return air. That makes the fan work harder while reducing airflow, heating and cooling output, and efficiency. Severe restriction can also contribute to coil icing.
Restart the unit and compare airflow at the same fan setting. If airflow improves noticeably, the filter was likely part of the problem.
When Professional Service Is Needed
If airflow remains weak with clean, dry, correctly seated filters, the blower wheel or coil may need professional attention. Call sooner if the indoor unit is icing, leaking water, giving off a burnt smell, making unusual noises, or displaying an error code.
Call Eco Temp HVAC for persistent airflow problems. Deeper cleaning requires disassembly.
If cleaning the filter doesn’t restore airflow, check the blower wheel next.
2. Dirty Blower Wheels
Recognizable Symptoms
Weak airflow despite clean filters, a muffled fan sound, or rattling may point to a dirty blower wheel. Uneven buildup can make the wheel vibrate, though noise may also come from loose parts or motor trouble.
If the wheel looks clean, the next likely restriction is in the coil or air path.
Safe Homeowner Checks
Disconnect power at the breaker or disconnect – not just with the remote. Open only user-accessible panels, then use a flashlight to check for hair, dust clumps, or a dark coating on the fan blades. Keep this a visual check: don’t reach inside or force any moving parts.
Don’t spray water, cleaners, or disinfectant into the indoor unit. Liquid can reach the motor and circuit board. Avoid compressed air and sharp tools, too – they can spread debris or damage the blades.
Effect on Airflow
Dust and sticky residue clog the gaps between blades, reducing airflow – sometimes sharply.
When Professional Service Is Needed
Schedule HVAC services with Eco Temp HVAC if buildup is thick or sticky, airflow stays weak after basic checks, or the unit keeps vibrating. Stop using the unit if it grinds, scrapes, or shakes severely.
A technician can clean the wheel and housing, check the motor and bearings, and verify airflow after reassembly.
If the wheel is clean but airflow is still weak, move on to the indoor coil and air path.
3. Blocked Indoor Coils or Air Paths
Recognizable Symptoms
If the settings and filters check out, look for a blocked coil or air path. Weak airflow – even at high fan speed – or gray dust on the coil behind the filters can point to a restriction. Curtains, tall cabinets, and shelving may block the intake or send supply air back toward the unit.
Safe Homeowner Checks
Disconnect power before opening the panel. Check the top or front air intake and the lower air outlet for obstructions. Tie back curtains and move furniture, shelves, or decor out of the air path. Use your model’s installation manual to check clearance requirements; one distance won’t work for every unit.
Open the filter-access panel and inspect the visible coil. Don’t touch the fins with a brush, vacuum nozzle, or tool. Bent fins can restrict airflow. If dirt is packed between the fins, leave the cleaning to a technician.
Effect on Airflow
A blocked intake limits how much air reaches the coil. A blocked outlet prevents conditioned air from spreading through the room. Dust packed into the coil narrows its air passages, reduces heat transfer, and can make the unit run longer.
When Professional Service Is Needed
Call for professional coil cleaning if buildup is heavy or airflow remains weak after you clear obstructions and clean the filters. Internal cleaning involves protecting electronics and controlling runoff, so don’t spray water or cleaner into the indoor unit yourself.
If the coil and air path are clear, the next likely problem is the fan motor or its controls.
4. Fan Motor or Control Faults
Recognizable Symptoms
Weak airflow at every speed – or little difference between Low, Medium, and High – can point to a fan motor or control fault. Humming, grinding, squealing, rattling, or vibration may also signal trouble. These sounds don’t prove the motor has failed, though. A loose blower part can cause similar symptoms.
Safe Homeowner Checks
Switch to fan-only mode, turn off Quiet or Sleep mode, and compare Low, Medium, and High. Photograph any fault code or blinking fault light, then check your model’s owner’s manual. Code meanings vary by model.
Note whether the problem affects one indoor head or several. Do not open electrical covers.
If fan speed changes normally but airflow remains weak, the restriction is likely elsewhere.
Effect on Airflow
A struggling motor may not reach the speed needed to move enough air. Faults in the wiring, motor feedback signal, or control board can also prevent speed changes or stop the fan unexpectedly.
If the fan barely responds when you change speeds, the motor or control system needs testing.
When Professional Service Is Needed
Shut the system off if it hums without moving air, grinds, squeals, vibrates severely, or smells like something is burning or melting. Persistent fault codes or weak airflow after the basic checks also call for service.
A qualified technician, such as those at Eco Temp HVAC, should test the motor, wiring, feedback signal, and control-board output. Capacitor testing, where applicable, should also be left to a technician.
5. Closed or Stuck Air Vanes
If the fan runs normally but airflow feels weak, check whether the outlet is blocking or redirecting the air.
Recognizable Symptoms
Closed, stuck, or misdirected vanes can make mini-split airflow feel weak even when the blower works. Look for a vane that stays shut, hangs unevenly, or clicks or sticks as it moves.
Check the vane’s position before blaming the blower. A stuck vane can produce the same weak-airflow symptoms.
Safe Homeowner Checks
Use the remote’s vane or swing control to open the vane, then let the swing cycle finish. Follow the control instructions in your manual. Never force a motorized vane by hand – you could damage its gears or linkage.
Before clearing an obstruction, turn the unit off and shut off the breaker. Move nearby curtains or decor out of the way, and use a soft, dry cloth to wipe only the outer surfaces you can reach. Don’t put fingers or tools into the outlet or remove cabinet covers.
Effect on Airflow
Restore power, then compare airflow at the outlet with airflow where people sit or work. If air feels strong at the outlet but weak in the occupied area, that points to redirected airflow rather than a blower problem.
When Professional Service Is Needed
Stop testing if the vane clicks repeatedly, grinds, sticks, or moves only partway. Have a technician inspect the vane motor, gears, linkage, and controls.
If the vane opens and works normally, the next check is for a frozen indoor coil.
6. Frozen Indoor Coils
If the vane is open but airflow is still weak, check the coil for ice.
Recognizable Symptoms
Watch for visible frost on the indoor coil or refrigerant line, airflow that gradually weakens, or weak or warm air while the fan runs. Water may also drip from the indoor head as the ice melts.
Low airflow, refrigerant leaks, slow fan speed, and sensor or control faults can cause icing.
Safe Homeowner Checks
Turn cooling off and let the coil thaw completely. Don’t chip away the ice or use a heat gun, flame, or boiling water.
Once the coil thaws, recheck the filters, intake, and outlet for any new blockages. Before restarting, confirm that the outdoor temperature falls within your model’s approved operating range.
Effect on Airflow
Ice narrows the coil’s air passages. That reduces airflow and makes the coil even colder.
When Professional Service Is Needed
Stop cooling and schedule service with Eco Temp HVAC if frost returns, fault codes repeat, the fan runs slowly, or water leakage is heavy. If water reaches electrical components, shut the system off and get prompt help. A qualified technician should handle refrigerant testing and leak repair; repeated resets or refrigerant top-offs won’t fix the cause.
If the coil thaws normally but airflow stays weak, check ductless mini split sizing or installation next.
7. Sizing or Installation Problems
Recognizable Symptoms
If airflow still feels weak after the basic checks, sizing or installation may be the cause. Poor comfort doesn’t always mean weak airflow. Normal airflow with poor temperature control points to a capacity or load issue. Weak airflow at every speed points to a restriction or equipment fault. Note whether comfort gets worse only when other indoor heads are running.
Safe Homeowner Checks
Compare mounting clearances with the installation manual, and check that the outdoor unit has the required space. Record the model numbers, selected fan speed, operating mode, room temperature, setpoint, and active zones. Don’t move equipment, alter piping, or change factory settings.
Effect on Airflow
Poor placement can restrict intake airflow or cause air to recirculate. Sizing problems affect capacity – not airflow. Room size, ceiling height, insulation, windows, occupancy, and appliances all affect the load. In a system with multiple heads, one room can remain uncomfortable even when airflow is normal.
When Professional Service Is Needed
If comfort problems persist or you suspect installation errors, ask Eco Temp HVAC for a room-by-room Manual J load calculation or equivalent room-load assessment. Request airflow measurements in CFM, compared with manufacturer specs for the selected speed and mode – not a hand test. A technician should also check clearances, piping, and whether the indoor/outdoor equipment combination is approved.
If clearance and load checks don’t explain the problem, compare airflow, fan speed, and sizing next.
Compare Airflow, Fan, and Sizing Problems
After the seven causes above, this quick comparison helps you tell airflow restrictions, fan faults, and sizing or installation issues apart.
| Problem category | Typical symptom | Safe check | Technician follow-up |
|---|---|---|---|
| Airflow restrictions | Weak airflow, dust buildup, uneven discharge, or ice while the fan runs. | Check filters, vanes, and visible openings. | Clean the blower wheel and indoor coil; investigate ice that keeps returning. |
| Fan or control faults | The fan won’t start, stops intermittently, ignores speed commands, or hums or scrapes. | Test fan-only mode, cycle through available speeds, and note any error codes. | Test the motor, wiring, sensors, and control board. |
| Sizing or installation concerns | Normal discharge but persistent room-to-room discomfort, often present since installation. | Check for blocked discharge paths and note whether one room stays uncomfortable. | Review room load, airflow layout, equipment match, and installation clearances. |
Symptoms overlap, so look at the pattern – not just one sign – to narrow down the cause.
Use the safe troubleshooting checklist below to confirm what you can inspect yourself.
Safe Troubleshooting Checklist
Use this checklist to separate checks you can do yourself from airflow problems that need service.
Stop immediately if you see ice, water on or near electrical parts, smell a burning odor, notice repeated breaker trips, or hear severe grinding. Shut the system off. Disconnect power only if you can safely reach the breaker or disconnect. Do not continue troubleshooting.
Confirm the settings. Make sure the unit is in the correct mode and isn’t set to Quiet, Sleep, or Eco. Check the fan speed, and record any flashing lights or error codes. Don’t keep resetting the unit. If the settings are correct, check the filters and openings next.
Check filters and clear openings. Turn the unit off before checking the filters and clearing the intake and outlet. If you can safely reach the outdoor unit, remove nearby leaves, snow, or stored items. Follow the manual’s instructions for filter care and required clearances. If airflow is still weak, check how the vanes and fan respond.
Observe the vanes and fan. Reinstall filters and covers before restarting. Stand clear, then use the remote to change the fan speed and vane position. Check that the discharge louvers respond. Stop testing if the fan hums without turning or makes severe mechanical noise.
Disconnect power before looking inside. Turn the unit off, wait for moving parts to stop, and disconnect power before opening any cover beyond the filter-access panel. Check only accessible, user-serviceable areas for obvious dust or ice. Don’t remove electrical covers, handle wiring, take apart the blower, or spray water inside. If the coil is iced over, stop and let it thaw before testing again.
Look for ice. If you see frost or ice, leave the system off and let it thaw naturally.
Request service if problems remain. Call Eco Temp HVAC for burning smells, repeated breaker trips, electrical symptoms, recurring icing, suspected refrigerant leaks, severe vibration, a fan that won’t start, or airflow that stays weak after basic checks. Suspected sizing or installation problems need a load and performance check. Have the model number, error codes, and your observations ready.
When to Call for Mini-Split Service
Schedule cooling services if basic checks of settings, filters, and clear openings don’t restore airflow. Stop there and leave further diagnosis to a technician.
Grinding, squealing, repeated vane clicking, recurring ice, water leaks, and persistent fault codes also call for professional attention. A vane that clicks and stops partway may have a failed actuator or stripped gear. Don’t force it open.
If ice or leaks keep coming back, arrange service and leave the unit off until any ice thaws naturally.
Refrigerant work, leak diagnosis, electrical testing, and blower-wheel removal require a technician. If the problem began after installation or remodeling, request a room-load or sizing assessment.
When booking, explain whether one indoor head or several are affected, whether the issue happens in heating, cooling, or both, and whether it’s new or long-standing. For a business, include operating hours and which rooms or equipment are affected.
Conclusion: Start With Settings, Filters, and Clear Openings
After checking the seven common causes above, start with the basics: select Cool or Heat, increase the fan speed, disconnect power before cleaning approved filters, and clear the indoor return and discharge openings.
If airflow improves, you’ve likely found the restriction. If airflow feels normal but the room still doesn’t reach the set temperature, sizing or installation may be the problem – not another airflow blockage. Persistent weak airflow, recurring ice, unusual noises, water leaks, frequent shutdowns, or error codes call for professional diagnosis.
Before calling for service, note the mode, fan speed, fault code, and whether cleaning helped. Chicagoland homeowners and businesses can share these details with Eco Temp HVAC when scheduling service.
FAQs
Why is airflow weak in only one mini-split head?
Weak airflow from one mini-split head often comes down to a clogged air filter. It limits airflow and makes the system work harder. Furniture or decorations blocking the intake or outlet vents can also cause trouble, as can dirty evaporator coils or a dirty blower wheel.
Low refrigerant can cause the coils to freeze, blocking airflow. If basic checks don’t solve the problem, a failing fan motor or improper system sizing may be to blame.
How long should I let a frozen mini-split thaw?
Frozen evaporator coils need 1 to 6 hours to thaw naturally. Turn off cooling and set the fan to ON to help melt the ice. Don’t scrape or chip it away – you could damage the delicate aluminum fins.
If the coils freeze again after you clean the filters, a refrigerant leak or another mechanical issue may need professional attention from Eco Temp HVAC.
How often does my mini-split need professional cleaning?
Experts recommend professional mini-split maintenance twice a year: once in spring before cooling season and once in fall before heating season.
During each visit, a technician deep-cleans the blower wheels and coils, checks refrigerant levels, inspects electrical components, and flushes drain lines. This routine care helps your system run efficiently and avoid costly repairs.