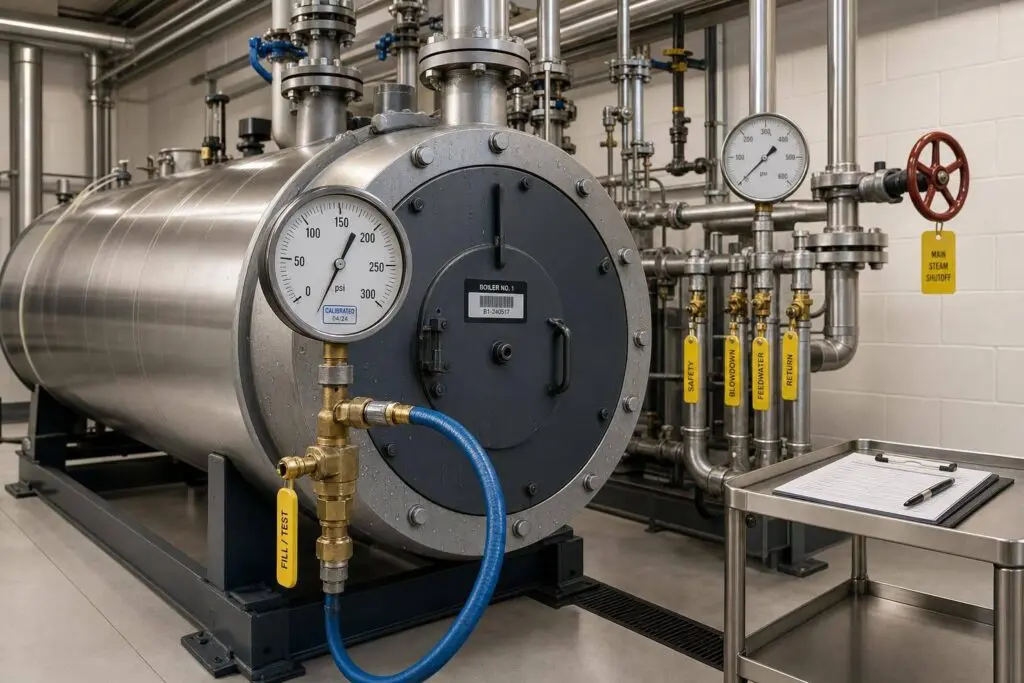
A hydrostatic test checks whether a commercial boiler can safely hold pressure before it goes back into use. In most cases, that means filling the boiler with water and testing it at 1.5 times its MAWP. The article explains when that test is used, who must witness or approve it, how the test is done, what safety steps matter, and what records you need to keep.
Here’s the short version:
- Hydrostatic testing uses water, not air, because water stores less force if something fails.
- Post-repair tests often require a 30-minute hold under code rules.
- State and city rules can change the pressure limit or approval steps, especially in places like Illinois and Chicago.
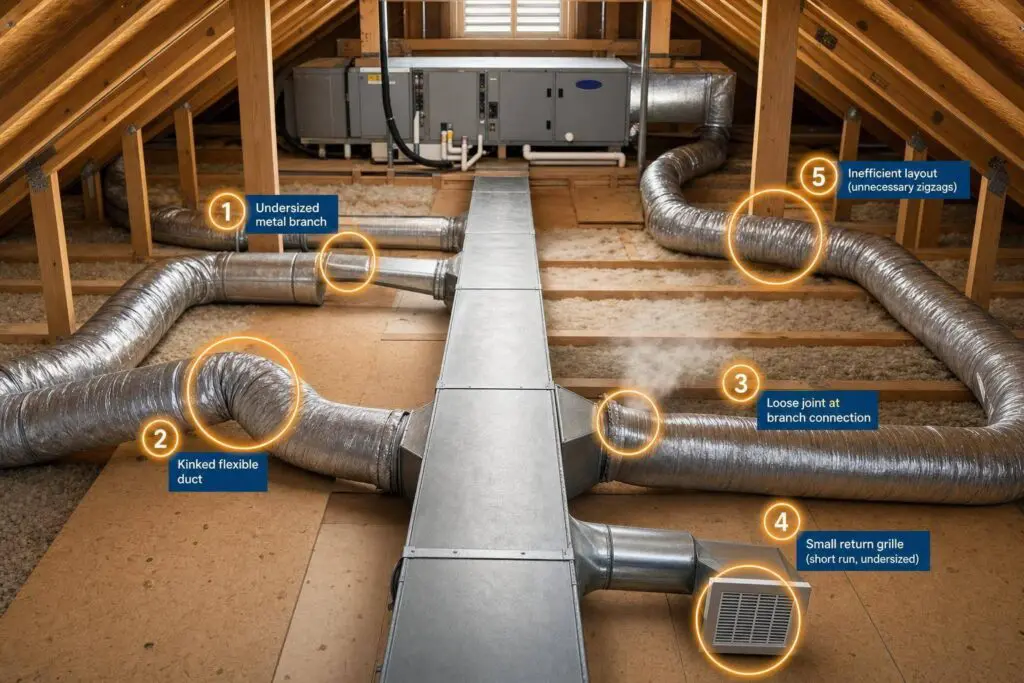
- Prep matters just as much as the test itself: isolate the boiler, vent trapped air, use calibrated gauges, and control fill and pressurization.
- Water temperature and pressure rate matter: the article points to about 70°F to 120°F water and less than 50 psi per minute during pressurization.
- Common problems found during testing include leaking gaskets, valve packing, threaded joints, tube ends, and welds.
- Finding a defect during a planned test can cost about $2,500, while a failure in service can run $15,000+, a gap of about 83%.
- Paperwork is part of the job: boiler ID, MAWP, test pressure, hold time, gauge data, leak notes, repairs, date, and inspector approval all need to be recorded.
If you need one takeaway, it’s this: a hydrostatic test is not just a pressure check. It is a code-driven process tied to safety, inspection approval, and whether the boiler can return to service.
| Topic | What the article covers |
|---|---|
| What the test is | Water-filled pressure test, often at 1.5x MAWP |
| How it differs from other tests | Hydrostatic vs. pneumatic vs. normal operating checks |
| Code rules | ASME, NBIC, OSHA basics, plus local AHJ and insurer rules |
| Who signs off | Qualified repair firm, inspector, and local approval where required |
| How to perform it | Isolation, filling, venting, staged pressurization, hold, inspection, drain-down |
| Safety steps | Restricted access, gauge watch, drain planning, cold-weather drain care |
| What defects show up | Gaskets, welds, tube joints, threads, valves, handholes, manways |
| What to document | Pressure, temperature, hold time, leaks, repairs, and approvals |
If you own or manage a boiler in a U.S. commercial building, this article gives you a plain-language map of what to check before, during, and after the test.
How to Perform a Hydrostatic Test Without Damaging Your Boiler Shell
sbb-itb-b5c10b1
Code and Compliance Requirements for Commercial Boiler Hydrostatic Tests
Once you know the test pressure, the next piece is just as important: who is allowed to do the test, who has to witness it, and who signs off on it. Commercial boiler hydrostatic testing sits under a mix of code rules and local enforcement. If you miss that part, you can run into safety problems, coverage issues, or trouble getting the boiler approved for use.
ASME Section I, National Board, and OSHA Basics
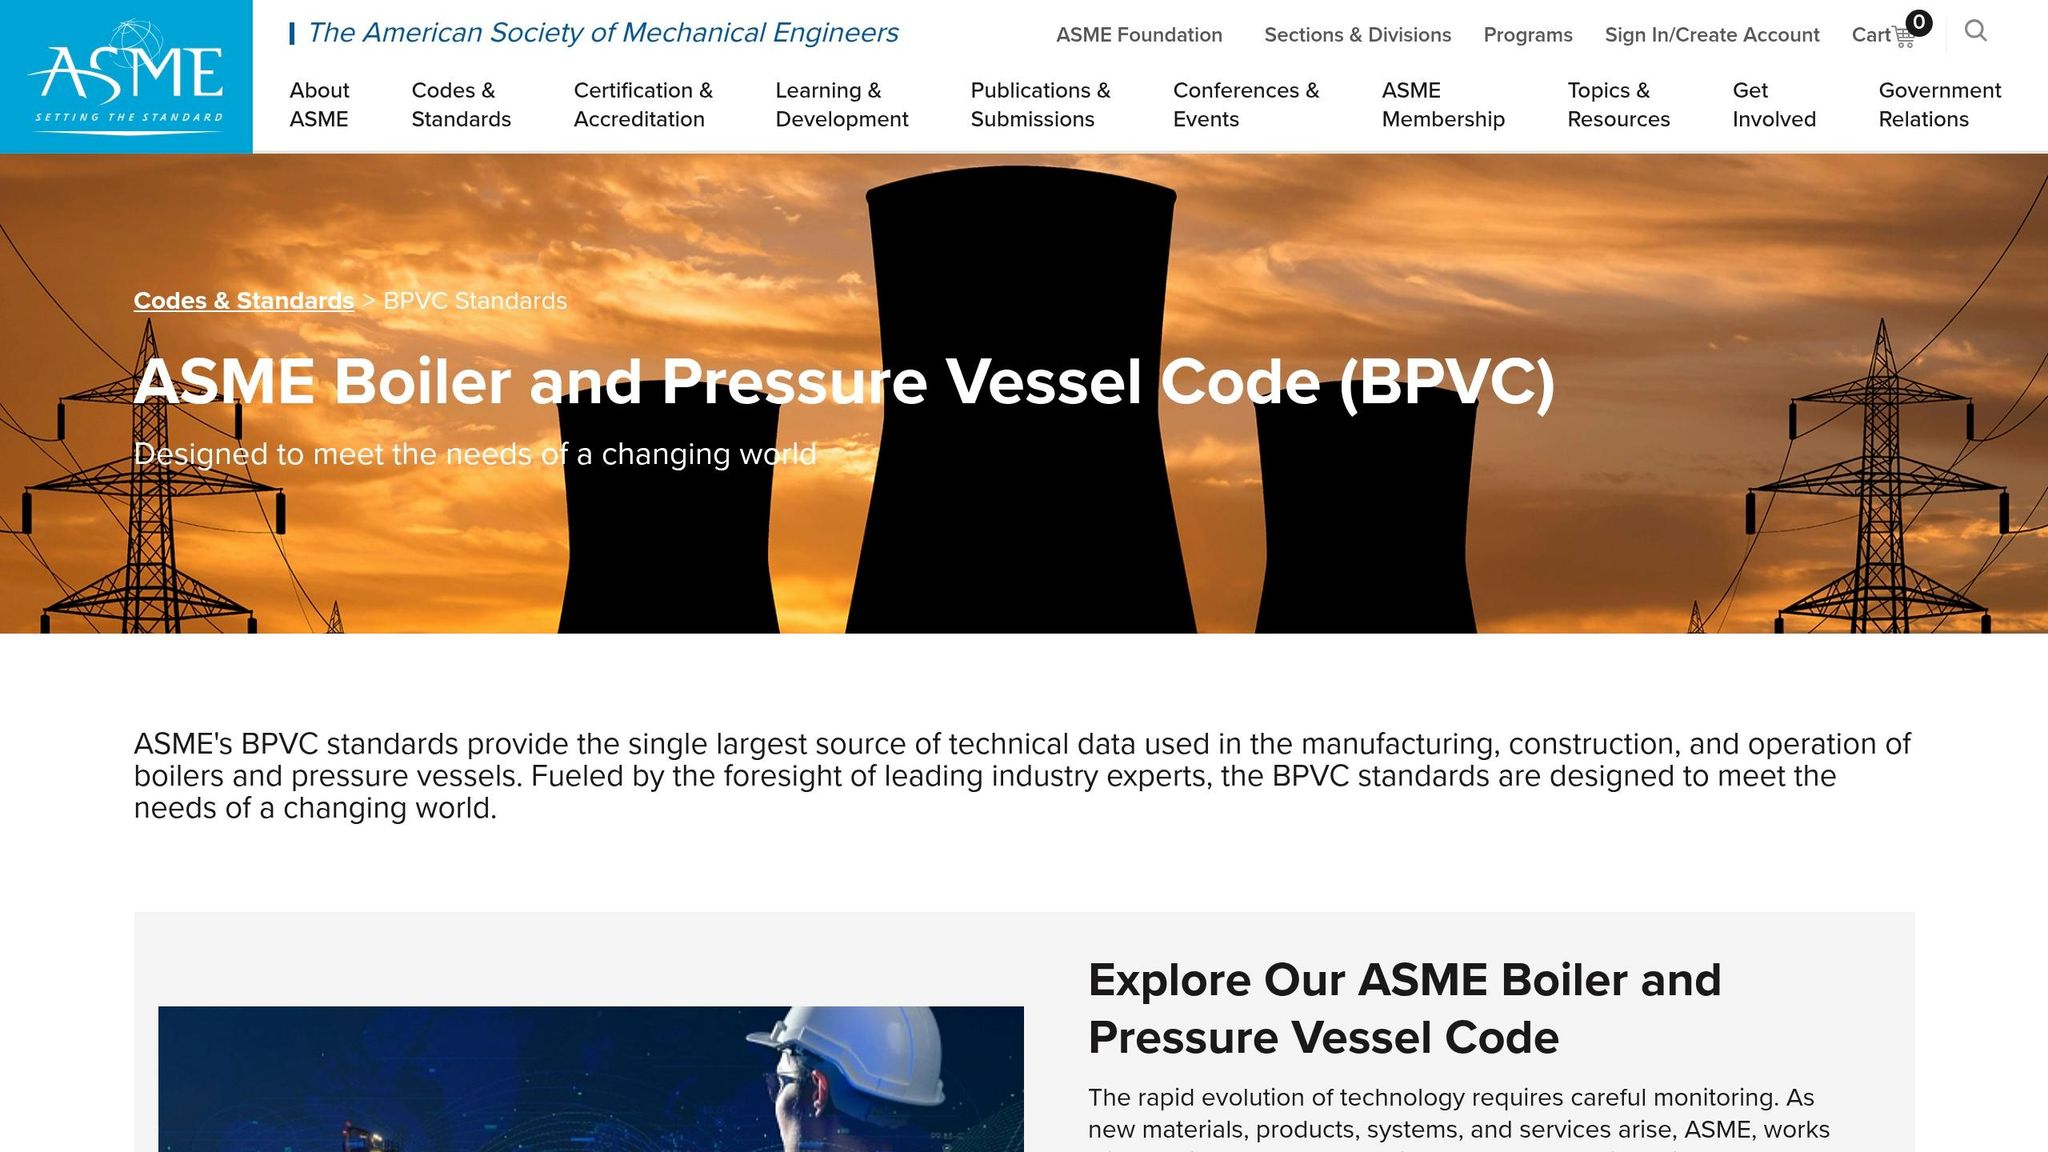
The ASME BPV Code sets the base rules for boiler construction and certification. Section I applies to power boilers. Section IV applies to heating boilers. When a boiler is already in service and needs repair or alteration, the National Board Inspection Code (NBIC) controls that work – Part RC for repairs and Part RA for alterations.
For post-repair testing, NBIC commonly calls for 1.5 times MAWP with a 30-minute hold. If the work involves welded repairs on an ASME code-stamped boiler, the repair must be done by an organization with a National Board "R" Certificate of Authorization, often called an R-Stamp. After the repair, the hydro test is used to confirm the work before final sign-off.
How State and Local Rules Affect Test Pressure and Sign-Off
Federal code gives you the floor. State and local rules can add more limits on top of that.
In Illinois, all first-time boiler inspections must be done by the Chief Inspector or a Deputy Inspector employed by the Division of Boiler and Pressure Vessel Safety. After that, inspections on insured equipment can be handled by a commissioned insurance company inspector, but only if that company actually insures the equipment.
Chicago adds its own city-level rules:
"The hydrostatic pressures used in such test shall not exceed the maximum working pressure of the apparatus being tested by more than 50 percent and a careful external and internal examination of the apparatus shall be made prior to administering the test." – Chicago Municipal Code
Chicago also requires an internal exam after the test is done. On top of that, the Building Commissioner can require a hydrostatic test whenever it is considered needed. For historical boilers in Illinois, the test pressure must fall between 100% and 125% of the calculated MAWP.
That’s a good reminder that the AHJ can tighten pressure limits and approval steps beyond the federal code.
| Jurisdiction | Test Pressure Ratio | Notable Requirement |
|---|---|---|
| General NBIC | Post-repair hydrotest standard | 30-minute minimum hold |
| City of Chicago | Max 1.5x MAWP | Internal exam required after the test |
| Illinois (Historical Boilers) | 1.0x to 1.25x MAWP | Certificate inspection includes a hydro test |
Always check current rules with your local Authority Having Jurisdiction (AHJ), your insurance carrier, and the Illinois Division before you put a test on the schedule.
Records, Reports, and Inspector Approval
A hydro test is not just a field task. It has to be documented in a way the inspector can verify. In Illinois, facility managers are required to keep a maintenance log for each registered boiler. Once a Certificate of Inspection is issued, it must be framed and posted in the boiler room.
When the jurisdiction rules are clear, record the test exactly the way the AHJ and inspector want it recorded. A complete test file should include:
- Boiler ID: manufacturer, serial number, and National Board number
- MAWP and code section
- Target and actual test pressure
- Water temperature: 70°F to 122°F (21°C to 50°C)
- Gauge calibration: scale graduated between 1.5 and 4 times the maximum test pressure
- Hold time: minimum 30 minutes
- Observed leaks or sweating
- Repairs and retest results, if needed
- Date and signatures from qualified personnel and the Authorized Inspector
Good records make life a lot easier during state inspections, insurer reviews, and later repair work.
Step-by-Step Hydrostatic Testing Procedure for Commercial Boilers
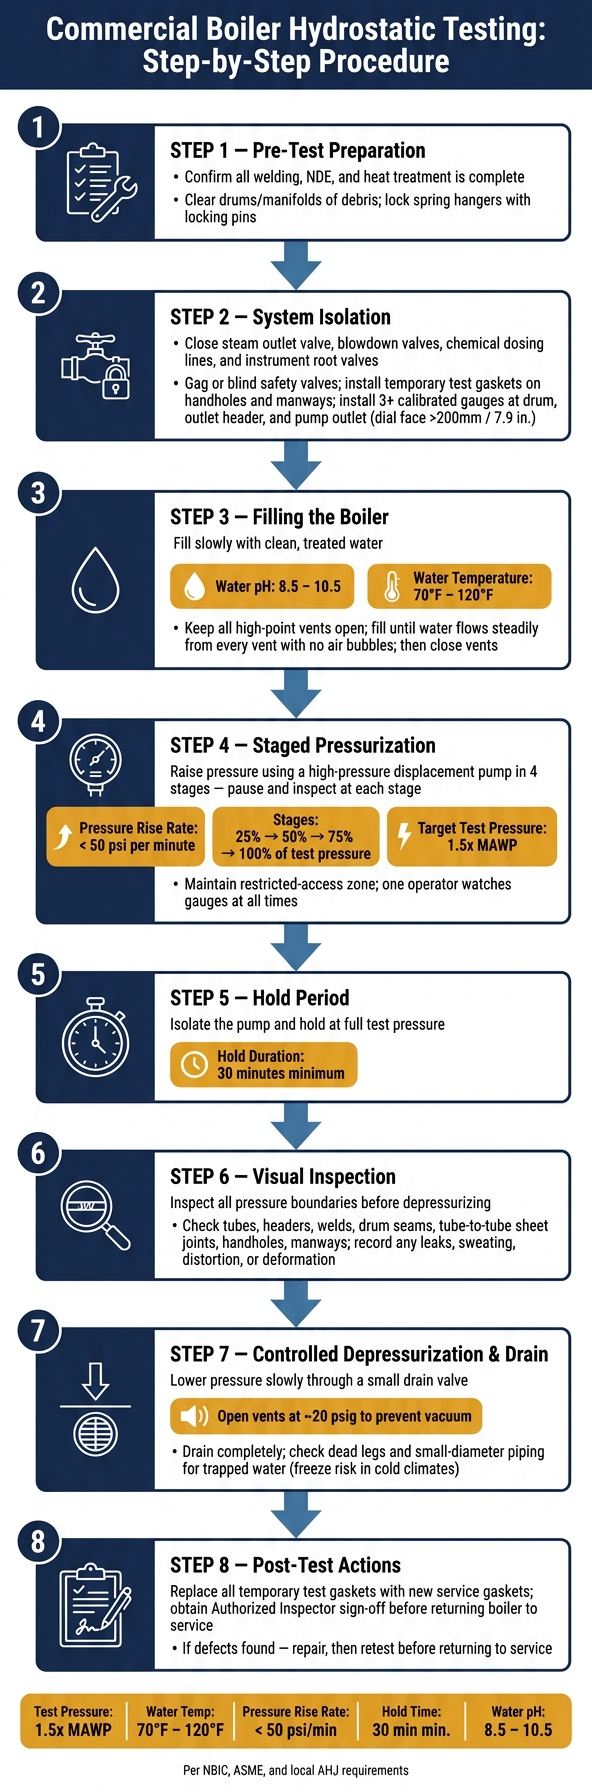
Commercial Boiler Hydrostatic Testing: Step-by-Step Procedure
Once the code side is set, the job shifts to prep and execution. And this part matters a lot. A hydrostatic test is only as good as the work that happens before pressure ever goes on the boiler.
Pre-Test Preparation and System Isolation
Start by confirming that all pressure-part erection, welding, nondestructive testing, and heat treatment work is fully finished. Then clear out drums and manifolds. That means removing tools, loose parts, and any debris left behind. Lock constant-load and spring-loaded hangers in place with locking pins so they can carry the added weight of a water-filled system.
Isolation is one of the most important parts of the test. Close the steam outlet valve so the boiler is separated from the main steam line. Shut all blowdown valves, chemical dosing lines, and instrument root valves to protect sensors and switches. Safety valves must be gagged based on manufacturer guidance or swapped out for blind flanges or plugs so they don’t lift at test pressure.
Use temporary test gaskets on handholes and manways. After the test, those should be replaced with new service gaskets before the boiler goes back into operation. Install at least three calibrated gauges at separate points, usually the steam drum, outlet header, and pump outlet. The gauge dial faces should be over 200 mm (7.9 in.).
Once the boiler is isolated and the gauges are in place, fill it slowly and vent air the whole time.
Filling, Pressurizing, and Holding the Test Pressure
Fill the boiler with clean, treated water. Demineralized water is preferred, with a pH between 8.5 and 10.5, to help limit internal corrosion. Keep the water temperature between 70°F and 120°F. That range helps avoid brittle fracture and also cuts down on condensation that can hide small leaks.
Leave all high-point vents open during filling, including drum vents, superheater vents, and other air-release points. Air trapped inside can throw off pressure readings and add risk, since air compresses in a way water does not. When water flows steadily from every vent with no air bubbles, close the vents and start pressurizing.
Raise pressure with a high-pressure displacement pump at less than 50 psi per minute. Bring it up in stages:
- 25%
- 50%
- 75%
- 100%
Pause at each stage and check for leaks or movement. Once the target test pressure is reached, isolate the pump and hold the pressure for at least 30 minutes.
| Parameter | Recommended Value |
|---|---|
| Test Pressure | 1.5x MAWP |
| Water Temperature | 70°F – 120°F |
| Pressure Rise Rate | < 50 psi per minute |
| Hold Duration | 30 minutes minimum |
| Water pH | 8.5 – 10.5 |
After the hold period, move straight into a full visual inspection before depressurizing.
Inspection, Depressurization, and Post-Test Actions
After the hold period, inspect all pressure boundaries before starting a controlled drain-down. Work through the boiler in a steady, methodical way. Pay close attention to tubes, headers, pipes, welded joints, drum seams, tube-to-tube sheet joints, and connection points such as handholes and manways. Record any leak, sweating, distortion, or deformation before clearance.
When the inspection is done, lower pressure slowly through a small drain valve. At about 20 psig, open the vents to stop a vacuum from forming during drain-down. Drain the system all the way and check that no water remains in dead legs or small-diameter piping. In cold climates, trapped water can freeze and damage the system before the next startup.
After draining, replace all temporary test gaskets with new service gaskets before reassembly. The boiler should return to service only after the Authorized Inspector clears it. If defects are found, repair them and retest before putting the boiler back in service.
Safety Controls, Common Defects, and Best Practices
Safety Precautions Required During Boiler Pressure Testing
After the boiler is isolated and filled, the next job is managing risk during the pressure test.
A hydrostatic test pushes a commercial boiler well past its normal operating range, usually to 1.5 times its Maximum Allowable Working Pressure (MAWP). In an occupied building, that can turn into a serious hazard if the test is not handled with care.
Keep all personnel out of the furnace and away from the pressure boundary during pressurization. Set up a restricted-access zone around the boiler room for the full test period, and mark the test boundary clearly. One operator should watch the gauges at all times while pressure is being applied. It also helps to schedule testing during low-occupancy periods, ideally in spring or fall, so you avoid peak heating demand and lower the chance of freeze damage in dead legs after draining.
Before testing starts, make sure the facility’s floor drains can handle the discharge water. If that step gets skipped, you can end up with localized flooding or water damage. Water temperature should also stay stable enough to prevent condensate and keep leaks easy to spot.
Defects Commonly Found During Hydrostatic Tests
Once the area is secured, the test starts telling you what the boiler is hiding.
Hydro-test defects usually come from thermal cycling, corrosion, or simple wear. Finding a problem during a planned hydrostatic test can cost about $2,500, while an unplanned operating failure can cost $15,000. That’s an 83% drop in repair costs when testing is done ahead of failure.
| Common Defect | Likely Cause | Visible Test Signs | Usual Corrective Action |
|---|---|---|---|
| Gaskets and Flanges | Age, compression loss, or corrosion | Water seepage or spraying at joints | Replace gasket; resurface flange if pitted |
| Valve Packing | Wear or thermal cycling damage | Wetting or dripping at the valve stem | Repack or replace the valve |
| Tube-to-Tube Sheet | Corrosion or expansion stress | Water exiting tube ends or sheet face | Re-roll tubes or replace as needed |
| Threaded Connections | Loosening over time or corrosion | Active dripping at threads | Disassemble, clean, and reseal/retape |
| Weld Joints | Gross defects or incomplete repairs | Pinholes, cracks, or weeping at weld seams | Grind out defect and re-weld per code |
| Handholes/Manways | Improper seating or old gaskets | Leakage around the cover plate | Clean surfaces and install new gaskets |
These findings help you decide what comes next: repair now, retest, or bring in a deeper inspection. Weld defects and tube-to-tube sheet failures usually need code-compliant repair and another test before the boiler goes back into service.
How Hydrostatic Testing Fits into Ongoing Boiler Maintenance
Test results should move straight into the next maintenance cycle.
A hydrostatic test is not a one-off task. It should shape what happens next in your boiler program. The defects found during the test show where the system is weakest and what needs attention before the next inspection cycle. Use those results to set repair priorities and schedule the next jurisdiction-required inspection. They also help with capital budgeting and with the hard call on older equipment: repair it again or replace it.
Inspection and test intervals vary by jurisdiction and boiler type. Using hydro-test results to build a forward-looking maintenance schedule, instead of waiting for failures to force the issue, helps keep the boiler compliant and cuts the risk of unplanned shutdowns during heating season.
For Chicagoland facilities, coordinated testing, repair, and follow-up maintenance help keep boilers compliant and reliable.
Conclusion: Key Takeaways for Commercial Boiler Owners and Managers
A hydrostatic test is a code-required proof test that checks whether a boiler’s pressure boundary is sound and leak-tight. Its biggest job is simple: it helps stop hidden failures, failed inspections, and avoidable downtime before they turn into bigger problems.
Use hydrostatic testing after welded repairs, tube replacement, or relocation. And before the boiler goes back into service, make sure the inspector signs off.
Before the test, handle the setup with care:
- Isolate sensitive components
- Vent all air
- Control the pressure rise
- Replace handhole and manhole gaskets afterward
After the boiler passes, finish the job with complete records. Write down the boiler ID, test pressure, hold time, attendees, and inspector signature for permanent compliance documentation. That test record also helps shape the next inspection cycle and future repair planning.
For Chicagoland facilities, Eco Temp HVAC can help with boiler service and maintenance.
FAQs
When is a hydrostatic test required?
A hydrostatic test is usually required for new boilers and after major repairs, such as welded pressure-vessel work or tube replacement. In some cases, it may also be required after an annual overhaul, relocation, or a long stretch out of service.
Some jurisdictions also require periodic testing. Since rules vary by location and by equipment, check with your local inspector to make sure you’re in compliance.
Who must witness or approve the test?
Hydrostatic testing for commercial boilers usually has to be witnessed and approved by an Authorized Inspector acting on behalf of the state, local municipality, or the installation’s insurance company.
For boiler external piping, the owner has to use an Authorized Inspection Agency to oversee the test, confirm the pressure readings, and sign the Manufacturer’s Data Report.
What happens if the boiler fails the hydro test?
If a commercial boiler fails a hydrostatic test due to leaks or structural deformation, the system needs to be safely depressurized immediately and fully drained.
From there, any leaks or mechanical damage must be repaired by a qualified professional. Once those repairs are complete, the entire hydrostatic test must be repeated to verify that the pressure boundary is sound before the boiler goes back into service.