A new AC can still cool badly if the ductwork is wrong. In many homes, ducts lose 20% to 30% of conditioned air, and the average system works at only about 60% efficiency. If I want a new system to cool the house the way it should, I need to look past the equipment and check the ducts too.
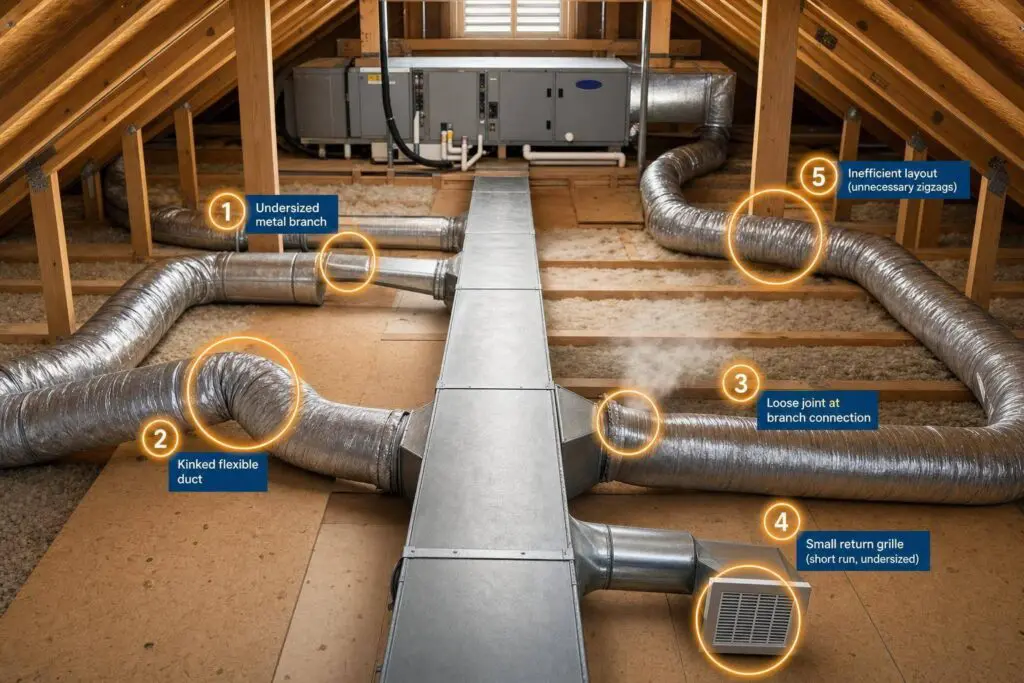
Here’s the short version: most AC duct problems come down to five issues:
- Ducts that are too small or sized wrong
- Leaky duct joints
- Flex duct that is too long, kinked, or bent too hard
- A weak return air path
- Poor duct layout, bad register placement, or low insulation
These problems can lead to high static pressure, weak airflow, hot rooms, longer run times, more dust, and higher energy bills. In places like Chicagoland, where summers are hot and humid, those issues show up fast.
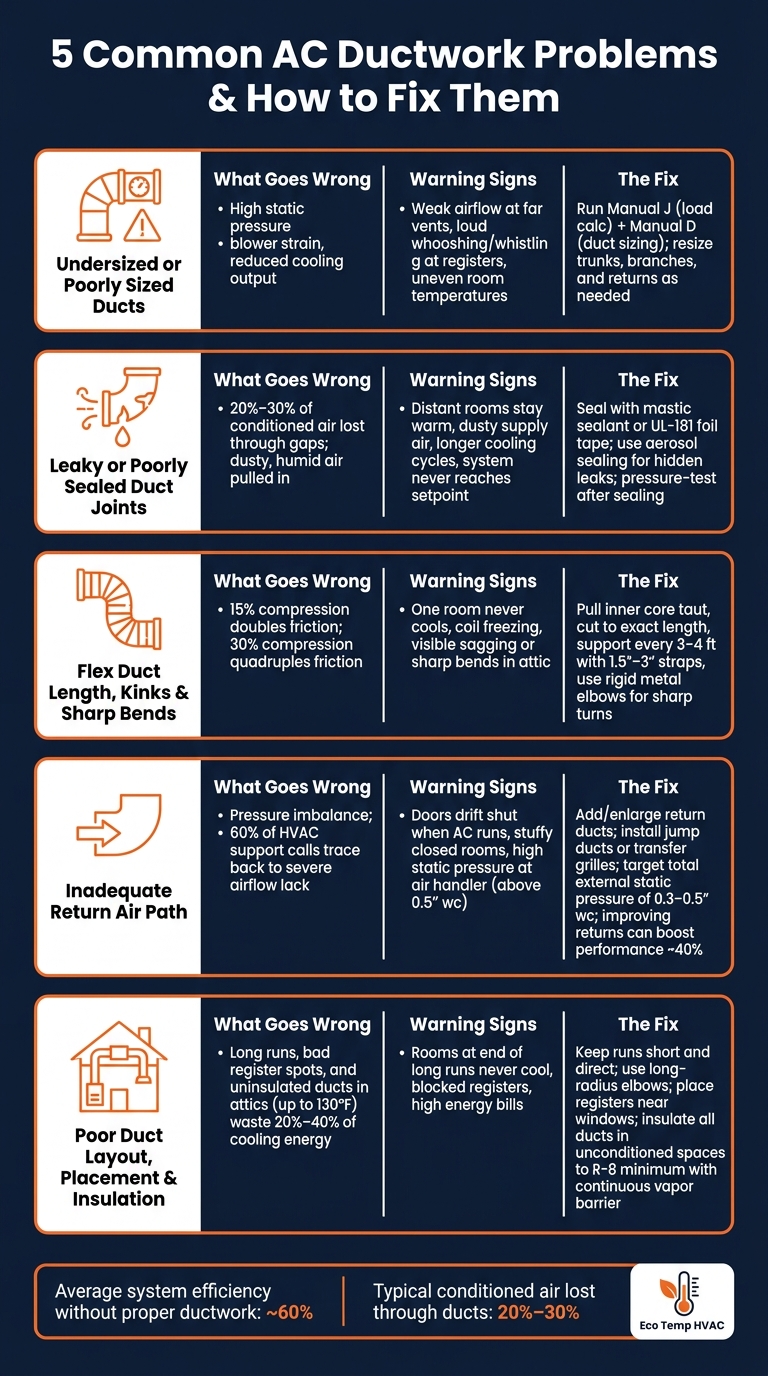
5 Common AC Ductwork Problems: Causes, Symptoms & Fixes
3 HVAC Ductwork ISSUES Homeowners NEED To Know!
sbb-itb-b5c10b1
Quick Comparison
| Issue | What usually happens | Main fix |
|---|---|---|
| Poor duct sizing | Weak airflow, noisy vents, uneven cooling | Use Manual J and Manual D, then resize ducts as needed |
| Leaky joints | Air loss, dusty air, longer cycles | Seal with mastic or UL-181 foil tape, then test |
| Bad flex duct routing | Restricted airflow, high friction, comfort problems | Shorten runs, pull flex tight, support it, use metal elbows for turns |
| Weak return air | Pressure imbalance, stuffy rooms, high static | Add or enlarge returns, use jump ducts or transfer grilles |
| Poor layout or insulation | Cooling loss in long runs or hot spaces | Shorten runs, fix register placement, insulate ducts in unconditioned areas |
If I’m installing a new AC, this is the checklist that helps me avoid comfort problems from day one.
1. Undersized or Poorly Sized Ducts
When supply or return ducts are too small for the AC, airflow drops and static pressure climbs. That condition is called high static pressure. It can wear out the blower sooner, use more energy, and cut cooling output.
This issue shows up a lot in older Chicagoland homes and small commercial buildings that were built for smaller equipment.
How to Spot Airflow Problems Early
The warning signs often appear soon after installation. One of the first things people notice is weak airflow in rooms farther from the air handler. The system may be running hard, but the vent barely pushes air. Loud whooshing or whistling at the registers is another clear sign. That usually happens when air is being forced through ductwork that’s too tight.
Some rooms may never hit the thermostat setting. Cooling may feel uneven from one floor to another. In some buildings, one side stays warmer than the other no matter what you do. Different symptom, same root issue: the ducts can’t move enough air where it needs to go.
Fixes for Static Pressure and Comfort
Start with Manual J and Manual D. Manual J figures out the heating and cooling load for each room based on square footage, insulation, windows, and sun exposure. Manual D uses that data to size each duct run. Skip either one, and duct sizing can go off track.
The basic path is simple:
- Use Manual J to size the load
- Use Manual D to size the ducts
- Resize trunks, branches, or returns where airflow gets choked down
When Professional Testing Is Worth It
You can’t judge static pressure just by looking at the system. You need a manometer, which measures the actual pressure inside the ductwork, to tell if the ducts are restricting airflow. Eco Temp HVAC can test static pressure and confirm duct sizing during installation. That gives you a clear read on whether the duct design fits the new system and helps protect the money you put into it.
If airflow still feels weak after the sizing issue is fixed, check the joints next.
2. Leaky or Poorly Sealed Duct Joints
If the duct size is right but the AC still isn’t cooling well, the next thing to check is leakage at the joints. A duct system can be sized correctly and still lose performance when air escapes through gaps. Common trouble spots include plenums, seams, takeoffs, flex connections, and register boots. Those openings can also pull dusty, humid air into the system.
Signs Your New AC Is Losing Air Through the Ducts
One of the clearest signs is this: rooms farther from the air handler stay warmer than the rest of the building, even when the system seems to run all the time. You may also hear whistling or whooshing at the registers. If the supply air seems dustier than usual after a new AC installation, that’s another warning sign. In many cases, leaky ducts are pulling in attic air. Longer cooling cycles and a system that never quite reaches the thermostat setting also show up a lot.
Best Sealing Methods for New and Existing Ductwork
Standard cloth duct tape breaks down over time and should not be used on HVAC duct joints. The go-to options are mastic sealant and UL-listed foil tape. Mastic stays flexible, so it works well on uneven gaps. UL-181 foil tape is a better fit for flat metal seams. And when leaks are buried inside walls or ceilings, aerosol sealing can seal them from inside the duct, without opening up the house.
| Sealing Method | Best Use | Longevity | Application Area |
|---|---|---|---|
| Mastic Sealant | Sealing irregular gaps and large joints | Very high; remains flexible | Plenums, takeoffs, and boot-to-ceiling connections |
| UL-Listed Foil Tape | Sealing flat seams on rigid metal ducts | High; heat-resistant | Metal duct joints and longitudinal seams |
| Aerosol Sealing | Sealing small, inaccessible leaks from the inside | High; seals entire system | Existing ductwork and hidden wall cavities |
After sealing, pressure testing confirms the repair holds. On larger projects or full retrofits, it’s worth asking for this step. It takes the guesswork out and gives you a measurable result.
Why Sealing Matters in Chicagoland Homes and Small Buildings
In Chicagoland homes and small buildings, ducts often run through unconditioned basements, attics, and crawlspaces. During summer, those spaces can get hot enough that cooled air leaking into them is lost before it ever reaches the rooms you want to cool. That means longer run times, higher energy bills, and more wear on the blower motor and compressor.
Eco Temp HVAC provides duct leakage testing and sealing across Chicagoland.
Once the joints are sealed, the next step is to check flex duct routing for kinks and sharp bends.
3. Flex Duct Length, Kinks, and Sharp Bends
Once the ducts are sealed, the next thing to check is whether the flex runs are holding back airflow. Flex duct bends and shifts easily, which is handy during install. But that same trait also makes it easy to mess up. Sagging sections, tight bends, and extra length all add friction, so air slows down before it even gets to the register.
What Poor Flex Duct Routing Looks Like
You can spot most of these issues with a quick look in the attic or mechanical room. Watch for long runs that take the scenic route around framing. Check for sections that droop hard between supports or hang in a deep “U” shape. Sharp 90-degree bends are another big warning sign, especially where the duct wraps tightly around a joist or beam. That can kink the inner liner and choke airflow.
You may also see the inner core bunched up at the connection point because it wasn’t trimmed back first.
Flex duct should never be forced into a sharp 90-degree turn. These problems cut airflow to the room and, in bad cases, can freeze the coil.
How to Fix Flex Duct Restrictions
The numbers here are pretty stark: 15% compression doubles friction, and 30% compression quadruples it. That’s a huge penalty from a duct that just looks a little crushed.
Here’s what to do:
- Pull the inner core taut before securing it. Don’t leave slack or extra coils.
- Cut the duct to the exact measured length.
- For sharp turns, use rigid sheet metal elbows instead of forcing flex duct into a tight bend.
- Support the duct every 3 to 4 feet with 1.5- to 3-inch straps so it doesn’t sag or pinch the liner.
| Installation Defect | Impact | Fix |
|---|---|---|
| 15% compression | Friction doubles | Pull core tight; cut to exact length |
| 30% compression | Friction quadruples | Pull core tight; cut to exact length |
| Sharp 90° bend | Kinks liner; high static pressure | Use rigid metal elbows |
| Excessive sag | Airflow restriction | Support every 3–4 ft with 1.5"–3" straps |
Why Proper Installation Details Matter
HVAC Chicago attics and basements are often tight, so bad routing tends to get locked in during the install. Crews may have to snake flex duct around plumbing, electrical runs, and framing. That’s usually where the trouble starts, and it can stay hidden until the homeowner figures out that one room never cools down.
In tight Chicagoland attics and basements, routing, trimming, and supporting flex duct the right way helps stop hidden airflow loss. Next, check whether the return air path is keeping up with the supply side.
4. Inadequate Return Air Path and Airflow Imbalance
Once the supply ducts are sized, sealed, and routed the right way, the return side often becomes the next bottleneck. A supply system can’t do its job if air doesn’t have a clear way back to the air handler. When returns are blocked, too small, or missing, rooms become pressurized and airflow drops. About 60% of HVAC technical support interactions and job site visits point to severe lack of airflow as the root cause of system trouble.
Common Signs of Return Air Problems
The signs are often easy to spot once you know them. If a door drifts shut or suddenly feels tough to open when the AC turns on, that’s a classic warning sign. Pressure is building up in a room that doesn’t have a good return path.
Other clues show up in system readings. Return paths that are too small often lead to high return velocity and higher static pressure at the air handler. Closed rooms tend to feel stuffy, and rooms farther from the thermostat usually fall behind.
Fixes for Better Return Flow and Room Balance
The first fix is simple in theory: add or enlarge return ducts so the system can pull air back without working too hard. In rooms with closed doors and no dedicated return, jump ducts or transfer grilles give air a path around the door and back to the central hallway. Branch dampers should also be set the right way so more air reaches rooms at the far end of the system.
During installation, technicians should measure static pressure at the air handler. Total external static pressure should usually stay between 0.3 and 0.5 inches of water column (wc). If it’s above that range, the return side is too restrictive for the blower. According to the data, improving return air and filtration can improve system performance by an estimated 40%. Better return airflow lowers static pressure and helps the blower move air more evenly through the building.
Why Multi-Story Properties Need Extra Attention
Upper floors in two-story homes and small office buildings often run warmer. Heat rises, and that simple fact makes cooling the second floor harder than many people expect. In a lot of cases, the upper-level return path is too small or placed in the wrong spot, which leads to a clear temperature gap between floors.
If manual damper changes don’t fix that floor-to-floor imbalance, a zoning system with separate thermostats can be a better long-term answer.
With return air fixed, the next thing to check is whether layout, placement, and insulation are holding the system back.
5. Poor Duct Layout, Placement, and Insulation
Once return air issues are fixed, duct layout and insulation are often the last big sources of wasted cooling. And even if the ducts are sized right, sealed well, and routed without kinks, a poor layout can still drag the whole system down. Long duct runs, extra bends, and bad register placement all cut airflow.
You usually notice these issues in the hottest parts of the house and at the ends of the longest runs. The most common complaint is simple: one room never gets cool enough. That’s often the room farthest from the air handler, at the end of a long supply run. The reason is pretty straightforward. Longer runs create more friction, which reduces airflow, and every sharp 90-degree elbow adds even more resistance. Then there’s register placement. If a register sits behind a door or gets blocked by furniture, air can’t move the way it should, and dead spots form fast.
Duct location matters too. Ducts that pass through attics, crawl spaces, and garages lose more cooling on the way to the room. In summer, attic temperatures can hit 130°F or higher. If those ducts aren’t insulated well, the cool air inside picks up heat before it ever reaches the vent. That forces the AC to run longer just to make up the loss.
Design Changes That Improve Efficiency
The first move is to keep duct runs short and direct. When sharp turns can’t be avoided, long-radius elbows or turning vanes can help cut turbulence and pressure drop. Register placement matters just as much. Registers should serve window areas and help move air near the windows, not sit hidden in corners or behind furniture.
Insulation is also a must for any duct in an unconditioned space. Use at least R-8 insulation, along with a continuous vapor barrier, to limit heat gain and help stop condensation. Before insulating, seal all duct joints with mastic so the conditioned air stays inside the duct where it belongs.
| Location | Efficiency Risk | Recommended Insulation Approach |
|---|---|---|
| Unconditioned space (attics, crawl spaces, garages) | High; heat gain can sap 20%–40% of cooling energy | R-8 minimum insulation with a continuous vapor barrier |
| Basements/garages | Moderate; risk of pulling in dust, fumes, or damp air through leaks | Seal all joints with mastic; insulate if the space is not climate-controlled |
Conclusion
Poor layout and weak insulation waste cooling and leave rooms uneven. In plain terms, ductwork decides how much of your new AC’s output actually makes it into the rooms.
"How a residential HVAC system is installed is just as critical as what equipment is installed." – U.S. Department of Energy
For AC installation in Chicagoland, Eco Temp HVAC can inspect the ductwork and flag problem areas before the system goes in.
FAQs
How do I know if my ductwork is too small for a new AC?
Signs of undersized ductwork include weak airflow at the vents, loud whistling or whooshing noises, and uneven temperatures from room to room.
You might also notice short-cycling or extra strain on the blower motor. If you think your ducts may be too small, Eco Temp HVAC can check whether your system has the airflow balance it needs to run well.
Can bad ductwork make a new AC less efficient?
Yes. Poor ductwork can drag down a new AC system’s efficiency in a big way.
Leaks, bad sizing, and cramped duct layouts force the system to work harder and run longer. That means more energy use and higher utility bills.
Leaky ducts alone can waste 25% to 40% of cooling energy. On top of that, restricted airflow can lead to uneven temperatures from room to room, put extra strain on parts, and cause equipment to fail sooner than it should.
Should ductwork be inspected before AC installation?
Yes. Checking your ductwork before AC installation is a smart step.
Leaks, blockages, or sizing problems can make even a high-efficiency system work worse than it should. That can lead to higher energy bills, hot and cold spots around the house, and poor airflow.
A pre-installation check also helps make sure the new unit fits your current airflow capacity. If that match is off, you can run into issues like short cycling, which puts extra strain on the system and can hurt performance over time.
Eco Temp HVAC can inspect your ductwork and help set your new AC system up for steady, energy-efficient cooling.