
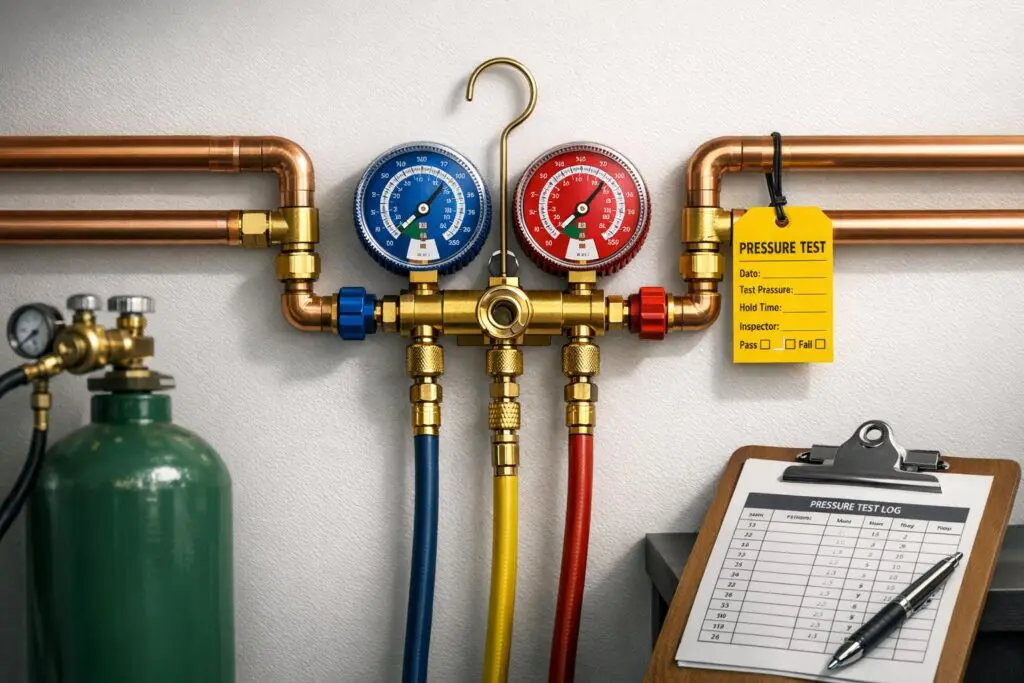
Pressure testing ensures refrigerant systems are leak-free and safe to operate by using dry nitrogen to pressurize the lines. A steady pressure confirms the system’s integrity, while drops indicate leaks that need fixing. Skipping this step risks refrigerant loss, reduced efficiency, and potential damage to components like compressors.
Key Takeaways:
- Use dry nitrogen as the test medium.
- Standard test pressures vary by refrigerant type (e.g., R-410A: 400 psig high side, 150 psig low side).
- Avoid prohibited gases like oxygen or compressed air, as they can create dangerous conditions.
- Ensure compliance with EPA Section 608, ASHRAE Standard 15, and IMC guidelines.
- Document pressures, test duration, and ambient conditions to meet legal requirements and support warranties.
Follow proper preparation, pressurization, and holding procedures, then finish with vacuum testing to confirm no leaks. Accurate records protect installers, customers, and manufacturers while maintaining system reliability.
Codes and Safety Requirements
Relevant Codes and Guidelines
Pressure testing in the United States is tightly regulated, with technicians required to adhere to several key standards. Among the most important are EPA Section 608 of the Clean Air Act, ASHRAE Standard 15, and the International Mechanical Code (IMC). These guidelines establish acceptable test media, define proper test pressures, and specify who is qualified to perform these tasks.
ASHRAE Standard 15 serves as the cornerstone safety standard for refrigeration systems. It lays out the minimum test pressure requirements and prohibits the use of certain gases as test media. The IMC complements this by ensuring consistency across local jurisdictions, whether you’re working in a large city like Chicago or a smaller municipality.
For systems containing over 55 pounds of refrigerant, technicians must provide a signed and dated declaration of the test. This document should include details like the refrigerant type and the pressures applied to both the high and low sides of the system.
"A dated declaration of test shall be provided for systems containing more than 55 pounds (24.9 kg) of refrigerant." – ASHRAE 15:10.2
Here’s a quick reference table showing standard field leak test pressures for commonly used refrigerants:
| Refrigerant | High-Side Test Pressure (psig) | Low-Side Test Pressure (psig) |
|---|---|---|
| R-22 | 360 | 230 |
| R-134a | 250 | 150 |
| R-410A | 400 | 150 |
| R-502 | 385 | 250 |
| R-717 (Ammonia) | 300 | 150 |
Note: Always verify the equipment nameplate and local codes, as pressures may vary depending on the manufacturer or jurisdiction.
With these codes in place, technicians must also adhere to strict safety protocols to ensure proper testing.
Safety Measures for Pressure Testing
Pressure testing should only be conducted by EPA 608-certified technicians, as working with high-pressure gases requires specialized training to avoid hazards.
Before starting, always check the unit’s nameplate to confirm the system’s maximum design pressure. Once the test begins, avoid adding gas mid-test, as this can invalidate results and obscure slow leaks. Additionally, keep in mind that temperature fluctuations can impact pressure readings – approximately 1 psig for every 10°F change – so account for this before concluding the test.
Use a pressure-limiting device with an outlet gauge during pressurization, and pair it with a pressure-relief device set slightly above the test pressure. This helps prevent damage to system components if pressures exceed safe limits.
Practices to Avoid
One of the most dangerous errors in pressure testing is using the wrong test gas. Oxygen, compressed air, or any mixtures containing them are strictly forbidden for refrigerant line testing. These gases can react with refrigerant oils, creating explosive conditions.
"Oxygen, air, or mixtures containing them shall not be used [for testing]." – ASHRAE 15:9.14.1.1
In factory settings, compressed air may be used only if the system has been evacuated to below 1,000 microns before charging. However, in field applications, dry nitrogen is the only acceptable choice.
Other common mistakes include failing to isolate the circuit before pressurization or skipping the nameplate check. These oversights can result in inaccurate readings or dangerous over-pressurization. Always double-check your setup, take your time, and stick to the proper procedures. By doing so, you ensure both safety and accuracy in pressure testing.
sbb-itb-b5c10b1
HVAC Pressure Testing a Refrigerant Line with Nitrogen!
Step-by-Step Pressure Testing Procedure
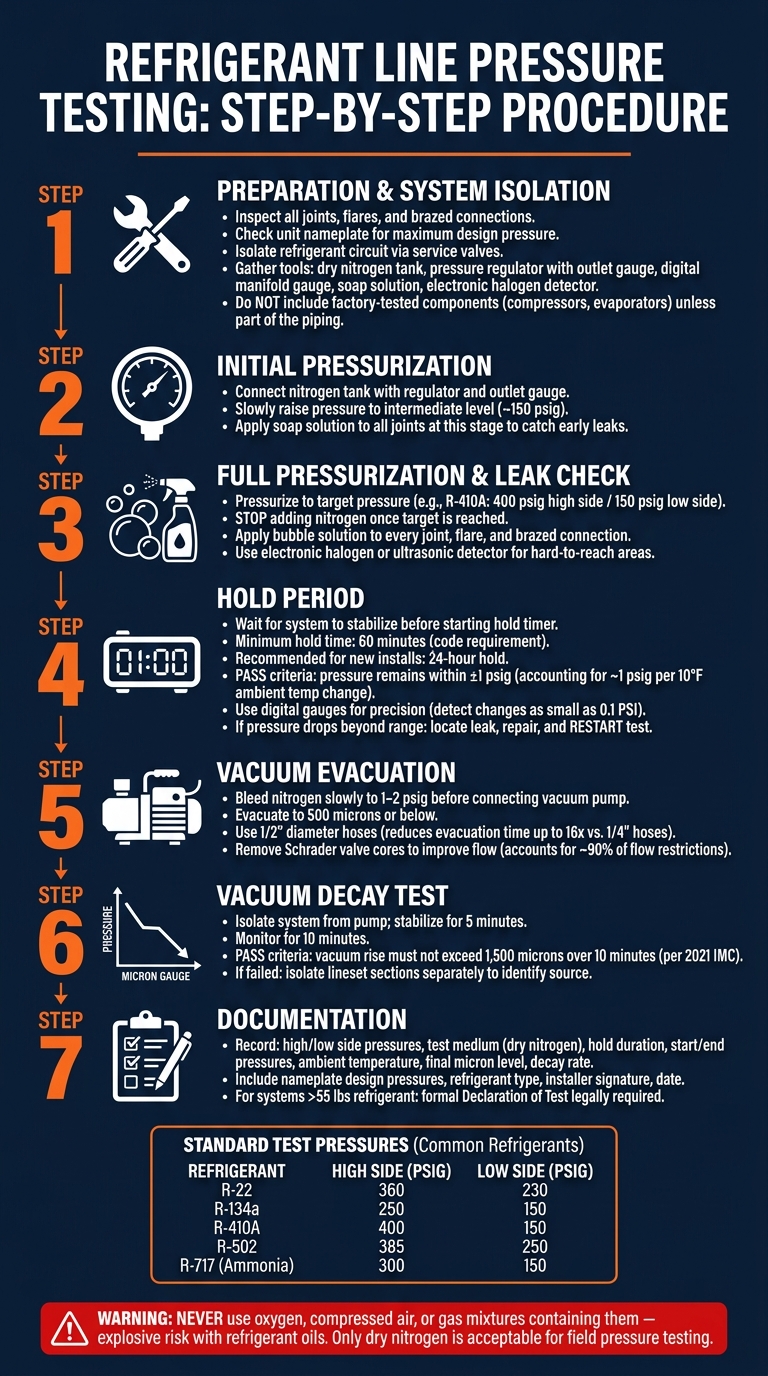
Refrigerant Line Pressure Testing: Step-by-Step Procedure
Preparation and System Isolation
Before starting the pressure test, carefully inspect all joints, flares, and brazed connections for any signs of damage. Make sure all service valves are properly isolating the refrigerant circuit.
The target pressure for testing should always match the lowest design pressure indicated on the component nameplates – this includes the condensing unit, compressor, and any pressure vessels. Never exceed this value. For R-410A systems, the typical maximum is 400 psig on the high side and 150 psig on the low side. Factory-tested components, like compressors and evaporators, should not be included in field pressure tests unless they are part of the piping system.
Gather the necessary tools: a dry nitrogen tank, a pressure regulator with an outlet gauge, a digital manifold gauge, soap solution, and an electronic halogen detector. Once the system is fully inspected and isolated, you’re ready to begin pressurizing the circuit.
How to Perform the Pressure Test
Start by connecting the nitrogen tank to the system using a regulator equipped with an outlet gauge. Slowly pressurize the system, initially raising the pressure to an intermediate level (around 150 psig). At this stage, use a soap solution to check for leaks at all joints before proceeding to the full test pressure. This step ensures that minor leaks are identified early, avoiding complications later on.
When the system reaches the target pressure, stop adding nitrogen. Apply bubble solution to every joint, flare, and brazed connection to check for leaks. For areas that are hard to access, use an electronic halogen detector or an ultrasonic detector.
"Taking the time to pressure test and vacuum your mini-split lines isn’t just about ‘doing it right’ – it’s about avoiding major headaches later." – Alex Lane, Home Comfort Advocate
Once the target pressure is achieved and all connections have been inspected, proceed to the holding period to monitor for pressure consistency.
Holding Pressure and Reading Results
After reaching full pressurization, wait briefly to allow the system to stabilize before starting the hold timer. The minimum hold time is 60 minutes, as required by code. However, for new installations or significant repairs, a 24-hour hold is often recommended for added assurance.
During the hold period, the system passes if the pressure remains within ±1 psig, accounting for ambient temperature changes (approximately 1 psig for every 10°F shift). Digital gauges are preferred over analog ones because they can detect even the slightest pressure changes more accurately.
If the pressure drops beyond the acceptable range, locate the leak, repair it, and restart the test from the beginning. Only after successfully completing both the pressure test and the subsequent vacuum decay test should you open the refrigerant valves and proceed.
Vacuum Testing and Final Leak Checks
Vacuum Process and Moisture Removal
After confirming the system’s integrity through pressure testing, the next step is to evacuate the refrigerant lines and conduct final leak checks. Begin by bleeding nitrogen slowly until the pressure drops to 1–2 psig. This step prevents ambient air and moisture from entering the system before connecting the vacuum pump.
Once the vacuum pump is connected, aim to achieve a vacuum level of 500 microns or below. At this depth, the boiling point of water is low enough for any trapped moisture to evaporate and be removed. To speed up the process, use 1/2" diameter hoses instead of the standard 1/4" ones – this simple adjustment can reduce evacuation time by up to 16 times. Additionally, removing Schrader valve cores during the process can significantly improve flow, as these valves account for about 90% of flow restrictions.
"The evacuation process is not dependent on time or when your compound gauge hits 29.92″ Hg. Use the reading on your micron gauge to determine when a proper vacuum has been achieved." – Gary McCreadie, HVAC Tech and Creator, HVAC Know It All
Vacuum Decay Testing
After reaching 500 microns, perform a vacuum decay test to check for potential issues. Isolate the system from the pump and let it stabilize for about 5 minutes before measuring the decay rate. According to the 2021 International Mechanical Code (IMC), the vacuum level should not exceed 1,500 microns over a 10-minute period.
Here’s what different vacuum rise patterns could indicate:
| Vacuum Rise Pattern | Likely Cause | Suggested Action |
|---|---|---|
| Steady climb to atmospheric pressure | Physical leak | Locate and repair the leak; restart evacuation |
| Levels off above 20,000 microns | Moisture or contaminants | Perform a nitrogen sweep, then re-evacuate |
| Levels off between 3,500–4,500 microns | Frozen moisture (ice) | Apply external heat and continue evacuation |
| Slow rise that stabilizes at low microns | Incomplete degassing | Continue evacuation until stable |
If the decay test fails and you can’t pinpoint the cause, isolate the lineset from both the condenser and evaporator to test each section separately.
Post-Startup Leak Verification
Once the vacuum decay test is successful, perform a final leak check after charging and starting the system. Use a high-sensitivity electronic leak detector to scan for leaks, then switch to low sensitivity to pinpoint the exact location. Pay close attention to common problem areas like Schrader valves, valve caps, flare connections, and brazed joints.
For elusive leaks, the "baggie" method can be effective. Wrap the suspected joint in a plastic bag overnight, then test the trapped air inside with the detector the next day. Another option is to apply a soap solution, such as Big Blu, to joints. Keep in mind that small leaks may take 15 minutes or more to produce visible bubbles.
"Your ‘Vacuum Test’ and ‘Decay Test’ will add further certainty that your system is free from leaks." – Julian Finbow, 313a Refrigeration Mechanic
Documentation and Quality Assurance
After completing pressure and vacuum tests, proper documentation plays a critical role in ensuring quality assurance and simplifying warranty claims.
What to Document During Pressure Tests
Accurate documentation isn’t optional – it’s essential. Below are the key details that should be recorded:
| Documentation Category | Details to Record |
|---|---|
| Pressure Test | High side/low side pressures, test medium, hold duration, start/end pressure |
| Vacuum Test | Final micron level, decay duration, micron rise during isolation |
| Environmental | Ambient temperature at start and completion |
| Compliance | Refrigerant type, nameplate design pressure, installer signature, date, inspector signature (if applicable) |
For pressure tests, document the test pressures applied to the high and low sides, the test medium (commonly dry nitrogen), and the start and end times of the hold period. Don’t overlook ambient temperature at the beginning and end of the test – temperature changes can cause nitrogen pressure to fluctuate, which might otherwise be mistaken for a leak.
Include the design pressures from the unit nameplate to justify the chosen test pressures. Using a digital pressure gauge capable of detecting changes as small as 0.1 PSI ensures precise readings, which are critical when verifying a system’s integrity.
Supporting Warranty and Compliance
Detailed documentation not only ensures compliance but also protects installers, customers, and manufacturers. It supports adherence to EPA Section 608, ASHRAE Standard 15, and the International Mechanical Code (IMC). A comprehensive test log can help distinguish between installation errors and equipment defects – an important factor for warranty claims.
For systems with more than 55 pounds of refrigerant, a formal Declaration of Test is legally required. This document must include the refrigerant type, applied test pressures for both system sides, and signatures from both the installer and any inspector present.
"The declaration of test shall be signed by the installer and, where an inspector is present at the tests, the inspector shall also sign the declaration." – Nevada Mechanical Code
New installations often require documented pressure tests and standing hold data to pass inspections conducted by the Authority Having Jurisdiction (AHJ). Keeping these records organized ensures you’re prepared for audits and helps maintain system reliability over time.
Eco Temp HVAC‘s Commitment to Quality
At Eco Temp HVAC, thorough documentation is a cornerstone of every installation and service job across Chicagoland. Their certified technicians meticulously record test pressures, hold times, ambient conditions, vacuum results, and compliance signatures. These practices ensure regulatory compliance and protect warranty eligibility, including the 12-year warranty on Mitsubishi products available through Eco Temp HVAC’s Mitsubishi Diamond Elite Contractor status. By maintaining accurate records, Eco Temp HVAC guarantees reliable system performance and long-term coverage for projects ranging from residential mini-split installations in St. Charles to large-scale commercial HVAC work in Chicago and beyond.
Conclusion
Pressure testing refrigerant lines plays a crucial role in ensuring system reliability. It verifies the integrity of the system, helps prevent refrigerant loss, and ensures compliance with EPA Section 608 and ASHRAE Standard 15 regulations.
To get it right, follow these key steps: use dry nitrogen as the test medium, apply the correct pressures based on the refrigerant type (like 400 psig on the high side for R-410A systems), maintain pressure to catch slow leaks, evacuate to 500 microns or below, and keep thorough documentation. This structured process helps reduce risks and ensures compliance at every stage.
Keeping accurate records is not just good practice – it’s essential. These records validate the installation, support warranty claims, and build trust with the system owner. For systems holding more than 55 pounds of refrigerant, this documentation is also a legal requirement.
For Chicagoland residents, Eco Temp HVAC provides expert service rooted in these principles. Since 2016, their certified technicians have applied these best practices to every installation and repair. With over 100 five-star reviews and top-tier certifications – including Mitsubishi Diamond Elite Contractor and American Standard Customer Care Dealer – Eco Temp HVAC offers peace of mind with 10–12 year warranties and 24/7 availability.
"Our extensive certifications aren’t just badges, they’re your assurance of receiving expert service and unparalleled care." – Eco Temp HVAC
FAQs
How do I choose the right test pressure for my system?
To determine the right test pressure, start by consulting your system’s design pressures and any relevant industry standards. Typically, the test pressure should stay below 150% of the system’s maximum allowable pressure or the setting of its pressure relief device. Look for details on the system label or in the manufacturer’s specifications to confirm these limits.
Make sure to use a reliable pressure gauge and carefully monitor the pressure for at least 10 minutes. This helps identify any leaks or pressure drops, ensuring the system remains safe and undamaged during the test.
Why can’t I use compressed air or oxygen to pressure test refrigerant lines?
Using compressed air or oxygen to pressure test refrigerant lines poses serious risks. Oxygen is extremely flammable and can trigger explosions when it reacts with refrigerant oils. On the other hand, compressed air can introduce moisture or contaminants into the system, which may cause damage or create safety issues. To maintain safety and protect the system, always rely on approved methods and materials for pressure testing.
What should I do if pressure drops but the temperature changed during the hold?
If you notice a pressure drop while the temperature fluctuates during the hold, it could be a sign of a leak or restriction. Keep a close eye on pressure stability – any pressure decay usually indicates a breach. A drop in temperature might point to a restriction or a problem with the metering device. On the other hand, if the pressure decreases as the temperature increases, it’s likely due to a leak. Make sure to follow proper pressure testing protocols to pinpoint the issue accurately.