
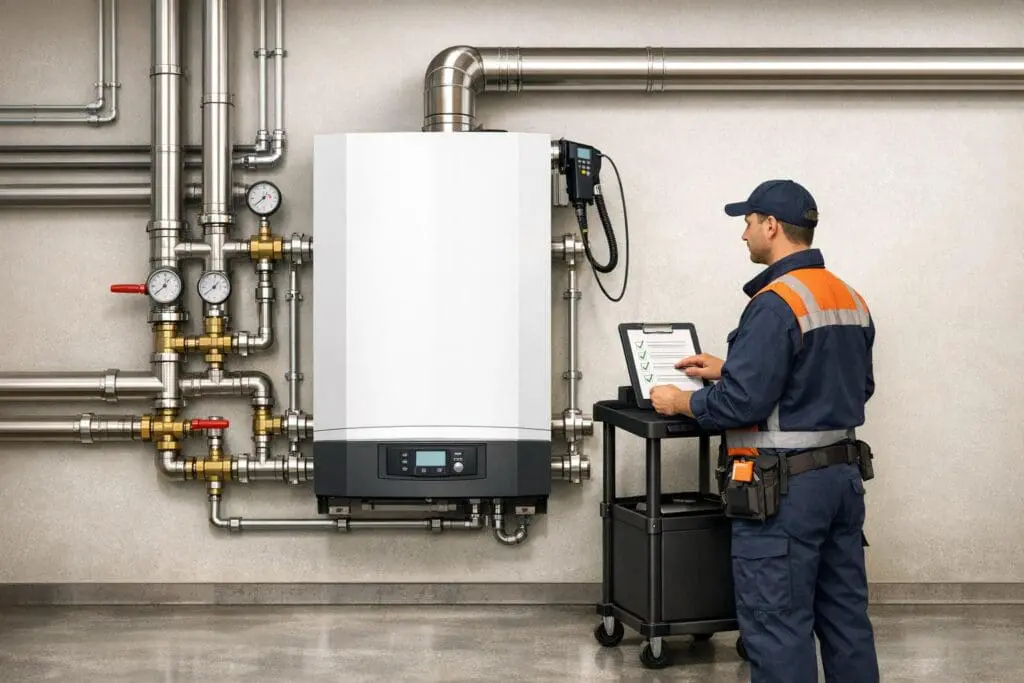
Boiler commissioning ensures your system operates safely, efficiently, and according to design. Unlike a simple start-up, commissioning involves detailed checks and adjustments to optimize performance and extend equipment life. The process includes:
- Precommissioning Checks: Verifying installation, cleaning systems, and inspecting components like piping, electrical connections, and safety devices.
- Safety and Leak Testing: Testing for gas tightness, pressure integrity, and proper operation of safety devices like relief valves and low-water cutoffs.
- Start-Up and Burner Adjustment: Setting ignition, fine-tuning combustion with a calibrated analyzer, and ensuring proper air and water temperature conditions.
- Performance Verification: Running full heating cycles, testing alarms, and ensuring smooth operation across all zones.
- Documentation and Handover: Providing detailed records of tests, settings, and performance data for future reference and compliance.
Proper commissioning can save 5–15% on energy costs and prevent premature wear. Skipping these steps risks safety hazards, inefficiency, and higher maintenance costs.
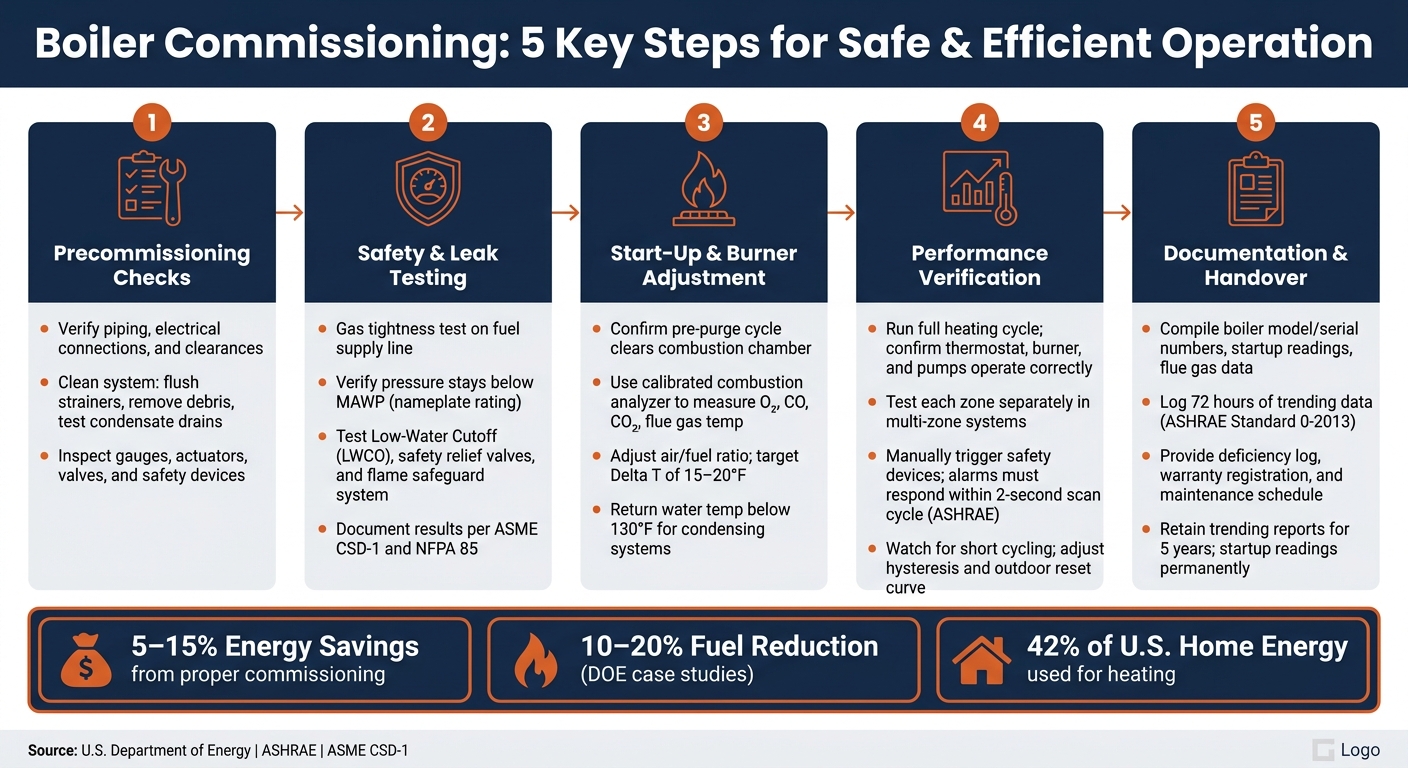
Boiler Commissioning: 5 Key Steps for Safe & Efficient Operation
HOW TO COMMISSION A BOILER to the new benchmark procedure part 1.
Precommissioning Checks
Before powering on the boiler, it’s essential to carry out thorough precommissioning checks to confirm everything is installed correctly. As Samantha Reyes from The Furnace Outlet aptly states:
"A system that starts isn’t the same as a system that’s ready."
Skipping these steps could result in misdiagnosed failures or even damage to the equipment.
Installation Verification
Start by confirming the physical setup is in order. Check that all piping is properly installed, insulated, and labeled. Ensure air vents and flexible connectors are in their correct positions. Verify that power is available at a disconnect switch located in plain sight, with control wiring properly connected. Additionally, confirm the boiler meets clearance requirements, examine the casing and insulation for any shipping damage, and ensure that as-built drawings and the startup report form are submitted.
System Cleaning
A clean system is critical for reliable operation. Inspect the boiler cabinet to remove tools, loose wires, or debris that may have been left behind. Flush out strainers and ensure all filters are the correct size, clean, and properly oriented. Test condensate drains by pouring a small amount of water into the drain pan to confirm they flow freely.
Once the installation and cleaning steps are complete, move on to inspecting individual components.
Component Inspection
After cleaning, thoroughly inspect the system’s components. Check that thermometers and pressure gauges are installed and easy to read. Test actuators to ensure they respond correctly and confirm valves move freely. Perform a bump test on pumps to verify proper rotation. Ensure all bearings and moving parts are lubricated according to the manufacturer’s guidelines. Lastly, visually confirm that safety devices, such as pressure relief valves and low-water cutoffs, are installed correctly.
| Category | Key Verification Steps |
|---|---|
| Piping | Flushed and cleaned; strainers cleared; valves labeled and operable |
| Electrical | Power at disconnect; disconnect within sight; motor rotation verified |
| Cleaning | Debris removed; filters correct and clean; condensate drain tested |
| Components | Gauges installed; actuators operable; valve travel unobstructed |
| Safety/Access | Clearances met; casing undamaged; relief valves correctly installed |
Safety and Leak Testing
Once precommissioning is complete, the next step is to verify every safety component under actual operating conditions. This phase ensures that all safety measures function as intended, building on the integrity checks performed earlier. It’s a critical process for confirming the system’s operational safety.
Gas and Pressure Testing
Begin by visually inspecting all joints, valves, and fittings for any signs of leaks involving water, steam, or fuel. After confirming no visible issues, proceed with a gas tightness test on the fuel supply line to ensure there are no leaks. On the water side, check that the operating pressure remains below the Maximum Allowable Working Pressure (MAWP) listed on the boiler nameplate – this step is mandatory. Even minor leaks at this stage can escalate into serious hazards when the system operates at full pressure.
Safety Device Verification
Each safety device must be tested individually to confirm proper functionality. For the Low-Water Cutoff (LWCO), simulate low-water conditions by activating the float chamber or probe. This test ensures the burner shuts down before water levels drop to an unsafe point. Since low-water conditions are a leading cause of catastrophic boiler failures, this check is especially critical.
For safety relief valves, perform a manual lift test (if allowed by local codes) to ensure the valve opens and reseats correctly. If the valve leaks after reseating, replace it immediately rather than attempting recalibration.
On the controls side, test and calibrate the operating pressure controls, high-limit pressure controls, and temperature controls to ensure they activate at the correct set points. For the flame safeguard system, clean the flame sensor and ignitor electrode, and verify the electrode gap matches the manufacturer’s specifications. Incorrect gaps can lead to nuisance shutdowns or, worse, unlit fuel accumulation, which poses a serious risk. Additionally, confirm that the burner management system identifies fault codes and that lockout alarms stay active until the issue is resolved.
Once all safety devices have been tested, record the results for future reference.
Documentation of Results
Documenting test results is a vital part of this stage. For commercial systems, ASME CSD-1 mandates regular documentation of safety device tests, including timestamps and clear pass/fail outcomes for each item. This ensures the system is ready for inspections by jurisdictional authorities and insurance providers.
The table below highlights the key standards governing this phase of commissioning:
| Standard | Focus Area | Description |
|---|---|---|
| ASME CSD-1 | Controls & Safety Devices | Covers flame safeguards, burner management, and low-water cutoff requirements. |
| NFPA 85 | Combustion Hazards | Addresses interlock requirements and burner management for fired equipment. |
| ASME Section I | Power Boiler Code | Regulates safety valve ratings and MAWP. |
| NBIC | In-Service Inspection | Focuses on inspection, repair, and alteration of pressure-retaining equipment. |
Thorough documentation not only ensures compliance but also establishes a baseline for future maintenance and inspections. This makes it easier to detect any decline in the performance of safety devices over time.
sbb-itb-b5c10b1
Start-Up and Burner Adjustment
After completing all safety and leak tests as outlined in the documentation, the commissioning process moves into the operational start-up phase. This step is where the boiler transitions from being a static installation to an active system.
Ignition and Combustion Setup
Before starting, confirm that the control panel is powered and all setpoints are correctly configured. Once you begin the start-up sequence, the boiler will initiate a pre-purge cycle. During this cycle, the combustion fan clears any leftover gases from the heat exchanger before attempting ignition. Pay close attention to the ignition process – issues like "hard light-off" or delayed flames indicate the need for adjustments.
Once the flame is stable, connect a calibrated combustion analyzer to the flue. Use the analyzer to measure O₂, CO, CO₂, and the temperature of the flue gas. If CO levels are unusually high, it could mean the air/fuel ratio is off, the burners are dirty, or the airflow is restricted. Make small adjustments to the gas valve or air shutter, checking the analyzer after each change to ensure proper combustion.
When ignition and combustion parameters are stable, move on to assessing air supply and temperature conditions.
Air and Temperature Checks
Check the combustion air supply to ensure proper operation. For sealed-combustion (direct vent) systems, make sure the intake pipe is the correct size, free of obstructions, and properly terminated outside. For systems that pull air from the mechanical room, verify that the room’s free air openings comply with NFPA 54 and any local regulations. Warning signs of insufficient combustion air include yellow or weak flames, frequent lockouts, or noticeable negative pressure in the room (e.g., doors closing unexpectedly).
Measure the supply and return water temperatures, aiming for a Delta T of 15–20°F. In condensing systems, the return temperature should stay below 130°F for optimal efficiency. If the Delta T is unusually low, such as 5°F, it may indicate excessive water flow, which reduces condensing efficiency. This issue may require adjustments to the circulator or system balancing.
Tuning for Stable Operation
After verifying combustion and air conditions, fine-tune the boiler’s control settings for consistent and efficient performance. Run the boiler through a full heat cycle, watching for short cycling – a rapid on/off pattern. If short cycling occurs, adjust the temperature differential (hysteresis) setting and configure an outdoor reset curve. The outdoor reset curve helps the boiler operate more efficiently by lowering the supply water temperature as outdoor temperatures rise, allowing longer operation at lower firing rates.
Set the boiler’s minimum and maximum modulation limits to align with the actual system load. Ensure smooth transitions between firing rates without flame instability. Once all adjustments are complete, document the final settings as a reference for future maintenance.
Final Performance Checks and Handover
With burner adjustments complete, the last step ensures the system performs as expected in real-world conditions and that the owner has all the tools and information needed for proper operation.
Functional Performance Checks
Start by running a full heating cycle to confirm the system’s functionality. Check that the thermostat activates heating as needed, the boiler fires up and reaches the target supply temperature, and the circulator pumps work as they should. If the system also provides domestic hot water, confirm that it meets the design requirements.
Pay close attention to the system’s behavior between cycles. Watch for any unusual short cycling and make sure the boiler transitions smoothly to standby after each cycle. For multi-zone systems, test each zone separately to verify proper valve operation and even heat distribution.
Alarms and Safety Behavior
Manually test each safety device to ensure it responds correctly. For example, briefly block the vent to see if the pressure switch activates and shuts the boiler down. Each safety feature should work as intended during operation. According to ASHRAE commissioning guidelines, alarm points must respond within a 2-second scan cycle.
Document every test in detail. Record the specific condition triggered, the system’s reaction, and the time it took to respond. This creates a thorough commissioning record with measurable results rather than vague notes.
Once all safety mechanisms and alarms are confirmed, complete the process with detailed documentation.
Documentation and Handover
The final documentation compiles all previous records, providing a complete history from initial safety tests to full operational checks. This handover package becomes the owner’s go-to reference for the system. Include the following:
- Boiler model and serial numbers
- Startup readings (e.g., supply/return temperatures, system pressure, flue gas data)
- Completed test procedures with contractor sign-off
- A deficiency log listing any issues and their resolutions
- Warranty registration confirmation
"This documentation protects you long after the installer leaves." – Samantha Reyes, The Furnace Outlet
Include trending data as well. ASHRAE Standard 0-2013 recommends logging at least 72 hours of performance data to confirm stable system operation. This data provides a baseline for future comparisons. Below is a table summarizing key documents and their retention periods:
| Document Type | Purpose | Retention Period |
|---|---|---|
| Completed Test Procedures | Proof of system verification | Project closeout + 1 year |
| Trending Reports (72-hour minimum) | Performance baseline and stability data | Project closeout + 5 years |
| Deficiency Log | Record of issues found and resolved | Until resolved |
| Startup Readings | Initial pressures, temperatures, and loads | Permanent |
| Final Commissioning Report | Comprehensive summary for the owner | Permanent |
Review these documents with the owner. Confirm that the warranty is registered, explain the recommended maintenance schedule, and ensure your contact information is included for any future support.
For expert boiler commissioning and ongoing assistance in the Chicagoland area, consider reaching out to Eco Temp HVAC.
Summary and Key Takeaways
Boiler commissioning is a step-by-step process that ensures your system operates safely, efficiently, and reliably. It involves five main stages: precommissioning checks, safety and leak testing, start-up and burner adjustment, performance verification, and documentation and handover. Skipping any of these steps can lead to higher energy costs and reduced equipment lifespan.
Key safety measures, like gas tightness tests, pressure relief valve checks, and low-water cutoff verification, help prevent hazards. On the efficiency side, improper combustion tuning – if not done with a calibrated analyzer – can waste 5–15% of fuel and cause premature wear on the heat exchanger. The Department of Energy (DOE) emphasizes that many boiler issues stem from "controls, piping, and distribution system issues that commissioning can identify and correct."
The financial benefits are hard to ignore. Proper boiler commissioning can deliver 5–15% energy savings, and DOE case studies have shown fuel reductions of 10–20%. Considering that heating accounts for 42% of energy use in U.S. homes, these savings can make a noticeable difference.
Once the commissioning process is complete, it’s important to keep all documentation organized and accessible. This includes your combustion analysis report, gas and water pressure readings, control setpoints, and the signed verification checklist. These records serve as a reference for future maintenance. Schedule annual professional servicing ahead of each heating season, and plan a more detailed recommissioning whenever you replace major components, switch fuel sources, or encounter ongoing comfort issues. This approach ensures your boiler remains optimized for both safety and performance.
For those in the Chicagoland area, Eco Temp HVAC offers expert boiler commissioning and maintenance services. Their certified technicians, holding Navien Service Specialist and American Standard Customer Care Dealer credentials, are available 24/7 to support communities across Chicago, St. Charles, Bartlett, Lemont, Downers Grove, and Palatine, especially during the demanding winter months.
FAQs
How long does boiler commissioning take?
Boiler commissioning can take several hours, with the duration largely influenced by the complexity of the system and the scope of testing and adjustments needed. The exact timeframe depends on the specific setup and the thoroughness of performance checks to guarantee everything runs smoothly.
Do I need commissioning if I’m just replacing the boiler?
Commissioning is a crucial step when installing a new boiler. It ensures the system operates correctly, efficiently, and aligns with its design specifications. This process involves checking and adjusting the setup to guarantee optimal performance and safety. Skipping commissioning can lead to inefficiencies, potential safety risks, and a system that doesn’t perform as intended.
How can I tell if my boiler was commissioned correctly?
To ensure your boiler is properly commissioned, check for a fully completed and signed Benchmark Checklist or commissioning record provided by the installer. This document confirms that essential safety and performance tests, like combustion efficiency and system settings, have been carried out.
If the checklist is unavailable or you experience problems such as strange noises, uneven heating, or increased energy bills, these could signal that the commissioning process wasn’t done correctly. Make sure to review the signed checklist before the installer leaves.