A high-temperature limit switch is a safety device in your furnace that prevents overheating by shutting off burners or heating elements when temperatures rise too high. Regular testing ensures your HVAC system operates safely and efficiently, avoiding risks like a cracked heat exchanger or carbon monoxide leaks. Here’s what you need to know:
Key Points:
- What it does: Monitors furnace air temperature and shuts off the system if it overheats.
- Why it matters: Prevents equipment damage, fire risks, and carbon monoxide leaks.
- How it works: Uses a bimetallic spring to open or close circuits based on temperature changes.
- Types: Automatic reset (resets when cooled) and manual reset (requires a button press).
- Testing steps:
- Visual inspection for damage or dirt.
- Continuity testing with a multimeter.
- Operational testing under heat to check response at specified temperatures.
Tools Needed:
- Multimeter, heat source (e.g., heat gun), screwdrivers, and the furnace manual.
Common Issues:
- Restricted airflow (clogged filters or blocked vents) often causes unnecessary trips.
- Faulty switches show no continuity, erratic behavior, or visible damage.
Tip: Replace the switch if it fails tests, shows visible damage, or trips unpredictably after fixing airflow problems. Regular maintenance, like changing air filters and professional inspections, helps prevent failures and ensures safety.
For detailed instructions and troubleshooting, read on.
How High-Temperature Limit Switches Work
Mechanism and Components
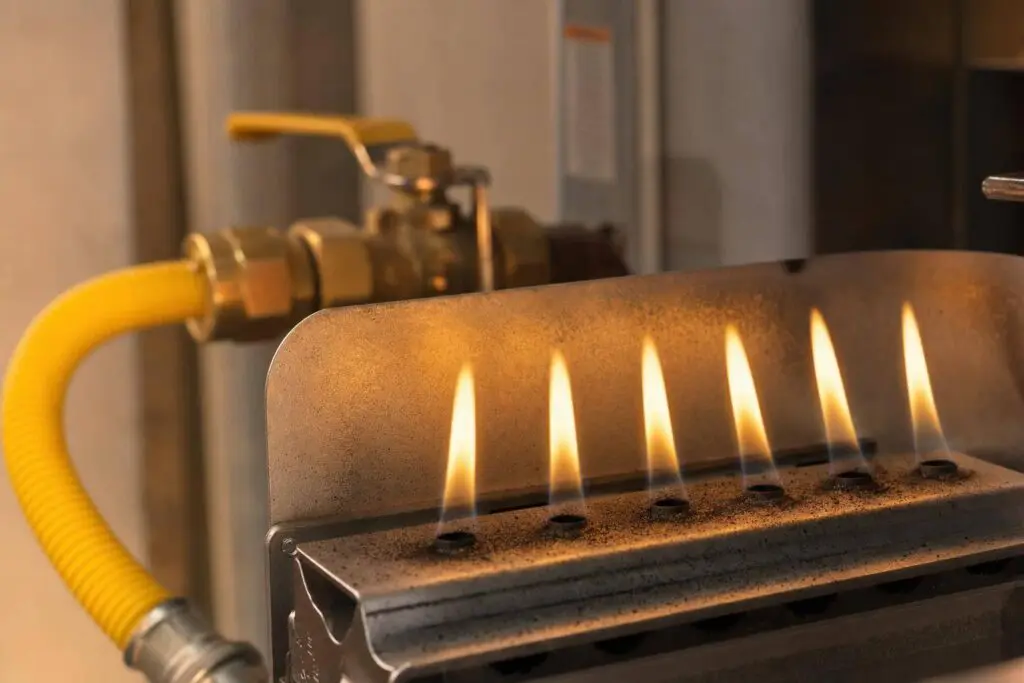
At the core of every high-temperature limit switch is a bimetal snap disc – a small, dome-shaped metal element that reacts to heat. When the air in your furnace’s plenum reaches a specific temperature, the disc flexes and snaps into a new position, mechanically opening the contacts and cutting power to the heating element. This process is entirely mechanical, relying on the physical properties of the metal.
The switch is installed directly in the airstream, close to the heating element, allowing it to respond quickly to temperature changes. Because it’s wired in series, an open contact immediately interrupts the circuit. Once the temperature cools to a designated reset point, the disc snaps back, reconnecting the circuit and restoring operation. This simple yet effective design is the foundation for the various types of limit switches used in HVAC systems, which are often at the root of common furnace problems.
Types of Limit Switches in HVAC Systems
High-temperature limit switches come in two main types, each affecting how the furnace resets after an overtemperature event.
- Automatic reset switches: These are common in most residential furnaces. They automatically reopen the circuit when the temperature drops to a safe level. For example, a switch might open at 120°F and reclose at 105°F, creating a 15°F differential.
- Manual reset switches: These require someone to press a button to restore operation after a trip. They’re typically used when overheating could indicate a more serious issue that needs inspection before restarting the system.
Another difference lies in their mounting styles:
- Airstream-mounted switches: These use brackets to position the bimetal disc directly in the moving air, ensuring the fastest response to temperature changes.
- Surface-mount switches: These are attached to the heat exchanger or housing, measuring the temperature of the metal itself. While they respond slightly slower, they’re ideal for specific commercial setups.
Temperature Ratings and Specifications
Limit switches are marked with key specifications that determine how they operate. The most critical are the open temperature (when the circuit breaks) and the reset temperature (when it closes again). Additionally, voltage and amperage ratings indicate how much electrical load the switch can safely handle.
"A high limit switch is used in an electric heater to shut off the heating element when the internal air temperature exceeds a defined threshold. This prevents damage to internal components and reduces the risk of fire." – Senasys
Here’s a breakdown of the typical specifications for a residential limit switch:
| Specification | Typical Value | Why It Matters |
|---|---|---|
| Open Temperature | e.g., 120°F | Shuts down the system to prevent overheating |
| Reset Temperature | e.g., 105°F | Sets the safe temperature for restarting the system |
| Amperage Rating | Up to 25A | Ensures it can handle the heating element’s power draw |
| Voltage Rating | Up to 240 VAC | Matches the system’s power supply requirements |
| Max Ambient Rating | Up to 350°F | Ensures the switch housing can withstand high heat |
When replacing a limit switch, it’s crucial to match these specifications exactly. Using a switch with the wrong open temperature might allow the furnace to overheat dangerously before shutting off. Similarly, an undersized amperage rating could lead to failure – or even create a fire risk – under normal operating conditions. These specifications are essential for safe operation and are critical for accurate testing, which will be covered in the next sections.
sbb-itb-b5c10b1
Preparing for Limit Switch Testing
Safety Precautions
Before working on your furnace, turn off the power at both the thermostat and the circuit breaker. Afterward, use a multimeter to confirm there’s no voltage at the terminals before disconnecting any wires. Skipping this step isn’t just risky – it could damage your equipment or result in serious injury.
"Be cautious when testing with the multimeter to avoid electric shock; do not touch the probes directly." – Tameson
If you’re dealing with a boiler system rather than a forced-air furnace, there’s an added concern: stored heat in the water. Wait until the water temperature drops to 150°F or lower before handling or resetting the switch. Ignoring this could lead to burns or inaccurate test results.
Sometimes, technicians temporarily bypass a limit switch for troubleshooting purposes. If you do this, make sure to remove the bypass before restoring normal operation. A bypassed switch leaves your system vulnerable to overheating, fire, or even carbon monoxide (CO) buildup.
Once you’ve taken these safety steps, gather the tools and materials you’ll need for the job.
Tools and Documentation Needed
Having the right tools ready can save you time and frustration. Here’s a quick list of what you’ll need:
| Tool Category | Specific Items |
|---|---|
| Measurement | Multimeter (set to Ohms/continuity), temperature probes |
| Heat Simulation | Heat gun, hairdryer, or lighter |
| Hand Tools | Screwdriver set, needle nose pliers |
| Electrical | Jumper wires, 16-gauge wire, 1/4" spade connectors, electrical tape |
| Documentation | Owner’s manual, manufacturer wiring diagrams |
| Maintenance | Non-abrasive cleaning cloth |
The owner’s manual is especially critical. It will tell you whether your switch is normally open (NO) or normally closed (NC) at room temperature – key information for interpreting multimeter readings. It also shows the exact location of the switch and which terminals to test.
Having a replacement switch on hand is also a smart move. These switches can fail after repeated exposure to high heat, and you don’t want to leave your furnace disassembled while waiting for a new one to arrive.
Once your tools are ready, make sure the system is in the right condition for accurate testing.
System Conditions Before Testing
Testing a limit switch in a system with airflow issues will give misleading results. Start by replacing any dirty air filters and ensuring all supply and return vents are open and unobstructed. Restricted airflow is the most common reason high-limit switches trip, so addressing this first is crucial.
Next, check the blower motor and inspect the plenum for air leaks. A slow blower or gaps in the plenum can cause localized temperature spikes, making the switch seem faulty when it isn’t. Verify that the thermostat is set correctly as well, since a miscalibrated thermostat can mimic limit switch issues and lead you down the wrong path.
Finally, visually inspect the limit switch itself. Look for cracks, corrosion on the terminals, or debris buildup around the disc. If it’s dirty, gently clean it with a non-abrasive cloth – avoid abrasive cleaners that might damage the internal components. These steps help ensure accurate testing when you move to the next phase.
Limit Switch Testing – How To Test HVAC Limit Switches With a Multimeter
Step-by-Step Testing Procedures
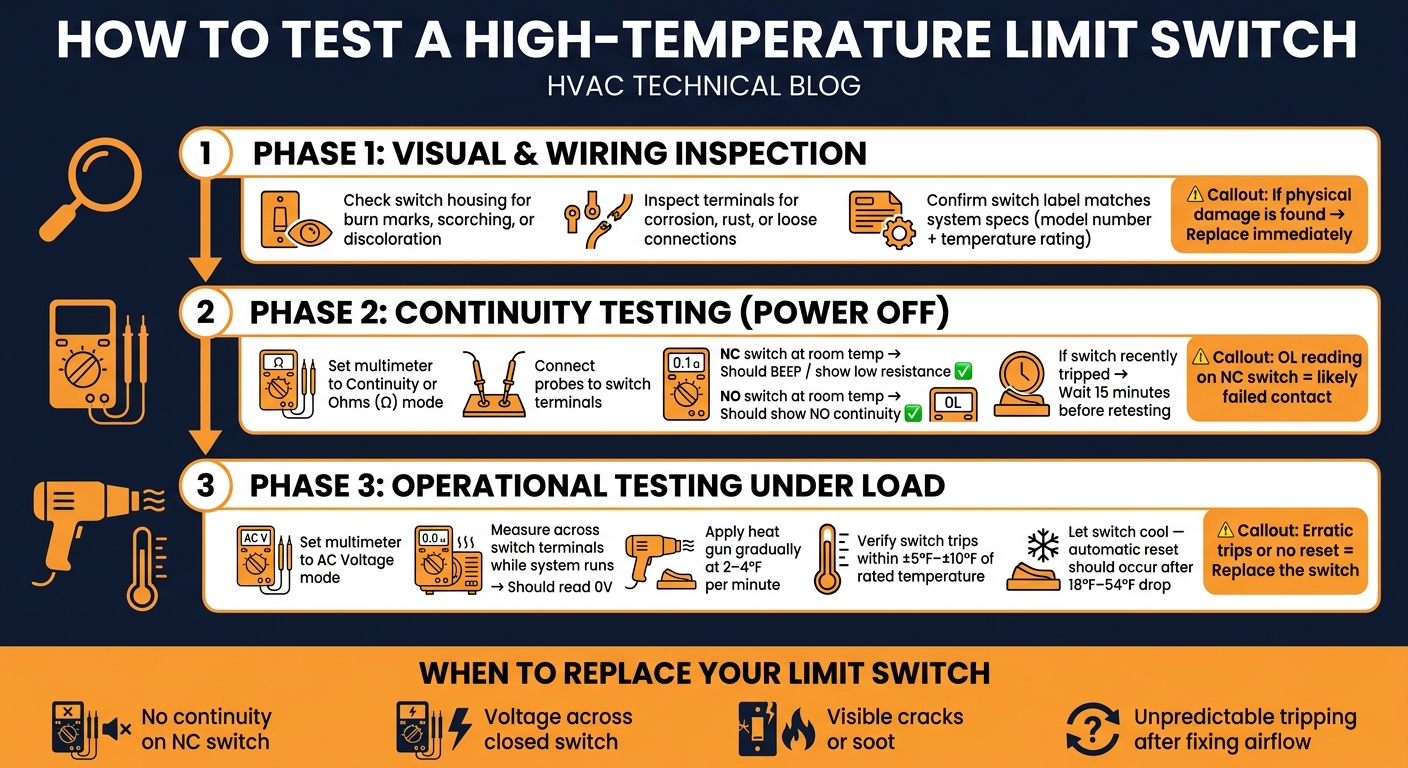
How to Test a High-Temperature Limit Switch: Step-by-Step Guide
Visual and Wiring Inspection
Start with a visual inspection before jumping into electrical tests. Look for any physical damage on the switch and check the housing for signs like burn marks, scorching, or discoloration – these could indicate overheating or arcing.
Next, inspect the electrical terminals for corrosion, rust, or loose connections, as these can increase resistance and skew your test results. Confirm that the switch’s label matches the system’s original specifications, including the model number and temperature rating. Using a switch with incorrect ratings can lead to frequent nuisance trips or inadequate system protection.
"A thermal protector is the last line of defense against overheating failure in electrical systems." – SAFTTY
If you notice any physical damage or signs of heat stress, replace the switch immediately. Once you’ve completed the inspection, move on to electrical continuity testing – but ensure the power is off first.
Continuity Testing with Power Off
Before testing, make sure the power is completely off. Set your digital multimeter to continuity or ohms (Ω) mode, then connect the probes directly to the switch terminals. The readings will depend on the type of switch:
- For a Normally Closed (NC) switch, you should hear an audible beep or see low resistance at room temperature.
- A Normally Open (NO) switch, on the other hand, should show no continuity when at rest.
The table below highlights common readings for switches and what they mean:
| Reading at Room Temperature | Switch Type | Meaning | Likely Cause |
|---|---|---|---|
| Low resistance / beep | NC | Working as expected | – |
| No continuity | NC | Failed or tripped | Broken contact or blown thermal fuse |
| High resistance (> 50 mΩ) | NC | Contact degradation | Mechanical wear or oxidation |
| Continuity | NO | Failed closed | Welded contacts or mechanical failure |
| Unstable / fluctuating | Either | Poor connection | Loose terminals or internal wear |
If the switch recently tripped, let the system cool for at least 15 minutes before retesting. A hot switch may not have fully reset, leading to a false "failed" reading.
Operational Testing Under Load
Once you’ve confirmed the wiring is intact, test the switch under load to verify its functionality. With the system running, set your multimeter to AC voltage and measure across the switch terminals. A properly functioning closed switch should show 0 volts. If any voltage is present, it means the switch is introducing resistance, which is not normal.
For a more detailed test, use a heat gun to gradually apply heat while monitoring the multimeter. Increase the temperature slowly – about 2–4°F per minute. Heating too quickly can cause the bimetal disc to react unpredictably, leading to inaccurate trip points. A working NC switch should trip within ±5°F–±10°F of its rated temperature.
After the switch trips, let it cool and check its reset behavior. Automatic-reset switches should restore the circuit once the temperature drops by 18°F to 54°F. If the switch doesn’t reset, trips at the wrong temperature, or behaves erratically during cooling, it’s better to replace it rather than attempt a manual recalibration.
Reading Test Results and Next Steps
After completing the testing process, follow these guidelines to interpret the results and decide on the next course of action.
Diagnosing Common Issues
Start by examining the test results to identify potential problems. For example, if a normally closed (NC) switch fails a continuity test – no beep or an "O.L." reading on the multimeter – it means the switch is open when it should be closed. However, this doesn’t automatically mean the switch is defective.
If the switch shows resistance between 0.1–0.5 Ω but still trips during normal operation, it’s likely functioning as intended and reacting to an overheating issue caused by restricted airflow. A blower that runs continuously could indicate heat buildup is causing the limit switch to trip. In this case, resolving the airflow restriction should be your first step.
Misalignment is another issue to consider. If the switch passes continuity tests but activates at unexpected times, it might be improperly positioned relative to the actuator. Power down the system, check the alignment, and retest the switch before deciding whether it needs replacement. These steps can help determine whether repair or replacement is necessary.
When to Replace a Limit Switch
Replace the limit switch if you encounter any of the following:
- No continuity on an NC switch: If your multimeter shows silence or an "O.L." reading at room temperature, the internal contacts have likely failed.
- DC voltage across a closed switch: A working switch should read 0 volts. Any voltage indicates the circuit isn’t closing properly.
- Visible damage: Cracks, heavy corrosion, or soot buildup are clear signs the switch is compromised and needs replacement.
- Erratic operation: If the switch continues to trip unpredictably after fixing airflow issues, it is likely worn out and should be replaced.
Maintaining Long-Term Reliability
Over time, limit switches can degrade due to wear, corrosion, and repeated heat cycling. To ensure reliability, schedule annual professional maintenance before the heating season. A certified technician can test the switch under load, inspect wiring connections, and confirm it trips at the correct temperature specified by the manufacturer. This also ensures the system isn’t putting unnecessary stress on the switch.
Simple maintenance tasks like cleaning or replacing air filters every 1–3 months can prevent restricted airflow, a common cause of unnecessary trips. Regular upkeep not only extends the life of the switch but also helps maintain the overall performance and reliability of the system.
Conclusion and Professional Support
Key Takeaways
High-temperature limit switches are crucial for keeping your heating system from overheating. To ensure they work properly, follow a thorough testing process: visual inspection, continuity check, and operational testing under load.
Here are a few important reminders for testing or routine maintenance:
- Restricted airflow is often the issue. Before assuming the switch is faulty, inspect air filters and vents. A clogged filter can cause repeated tripping, which might seem like a switch problem but isn’t.
- Continuity testing is essential. If the switch fails to show a closed circuit during a continuity test at room temperature, it could indicate a malfunction and warrants further investigation.
- Annual maintenance avoids bigger problems. Scheduling a yearly professional inspection before the heating season can help catch small issues early, reducing the risk of a full system failure.
If routine checks don’t resolve the problem, it’s best to call in certified technicians. They’ll ensure the system is safe and functioning properly.
How Eco Temp HVAC Can Help

When testing uncovers problems, Eco Temp HVAC is ready to assist with expert service across the Chicagoland area, including Chicago, Lemont, St. Charles, Bartlett, Palatine, and Downers Grove. Their team handles everything from troubleshooting to full system maintenance, ensuring your heating system gets the care it needs.
Eco Temp HVAC technicians come with impressive credentials – they’re certified as an American Standard Customer Care Dealer, Navien Service Specialist, and Mitsubishi Diamond Elite Contractor. Plus, their service vehicles are fully stocked and available 24/7, so you won’t be stuck waiting when urgent issues arise.
"Our fully stocked service cars are constantly ready to provide an on-the-spot solution to any problem that may surface." – Eco Temp HVAC
With clear, upfront pricing (no hidden fees) and over 100 five-star reviews from satisfied Chicagoland customers, Eco Temp HVAC is the go-to choice when your limit switch issues require more than a DIY fix.
FAQs
Can I test a high-limit switch without removing it?
To test a high-limit switch without removing it, you can use a multimeter to check for continuity. Set the multimeter to continuity mode, then touch the probes to the switch’s terminals. If the circuit is complete when the switch is activated, the multimeter will indicate continuity. If it doesn’t, or if the results seem off, the switch may need to be removed and replaced to ensure proper function and safety.
What causes a limit switch to trip even if it’s not faulty?
A limit switch can trip for several reasons, often tied to airflow or temperature issues. For example, a dirty air filter might restrict airflow, causing the system to overheat. Blocked vents can also lead to similar problems by trapping heat. Additionally, a malfunctioning blower might fail to circulate air properly, which can result in excessive temperatures and activate the switch.
Is it safe to run a furnace with the limit switch bypassed?
It’s dangerous to operate a furnace with the limit switch bypassed for a long time. While bypassing the high limit switch might be done temporarily for testing, running the furnace this way for an extended period poses serious risks. Overheating, damage to components, or even hazards like fires and carbon monoxide buildup can occur. The limit switch is a key safety feature and should only be bypassed briefly and under controlled circumstances.