Sealing refrigerant lines is critical for maintaining HVAC efficiency, preventing energy loss, and avoiding costly repairs. Proper insulation minimizes heat gain, reduces condensation, and extends the system’s lifespan. Neglecting this can lead to compressor damage, water leaks, and higher energy bills.
Key Takeaways:
- Why It Matters: Sealing ensures proper heat exchange, protects the compressor, and complies with EPA regulations.
- Residential vs. Commercial: Residential systems use smaller lines (e.g., 3/8-inch liquid lines), while commercial setups require larger, more complex sealing due to stricter energy codes.
- Materials & Tools: Use closed-cell elastomeric foam (ASTM C534) for insulation, HVAC vinyl tape for sealing, and nitrogen pressure tests to check for leaks.
- Outdoor Protection: UV-resistant jackets and weatherproof materials prevent insulation damage.
- Maintenance Tips: Inspect every 3 months, replace insulation every 2 years, and monitor pressure to detect leaks.
Proper refrigerant line sealing is a smart investment that saves energy, prolongs system life, and ensures compliance with environmental standards.
How to Replace Outdoor AC Pipe Insulation | DIY Refrigerant Line Replacement for HVAC
sbb-itb-b5c10b1
Tools and Materials You’ll Need
When it comes to ensuring a reliable and long-lasting installation, having the right tools and materials is a game-changer. The equipment you choose plays a direct role in the system’s performance and durability. Some items are straightforward, while others need to meet industry standards to guarantee compliance and efficiency.
Insulation Materials
For insulating suction lines, closed-cell elastomeric foam is the go-to material. To meet industry requirements, it must comply with ASTM C534 Type I or Type II specifications. This ensures it effectively prevents condensation and minimizes heat gain. In areas where temperatures exceed 90°F, insulation should be at least ¾-inch thick. This isn’t just a suggestion – the International Energy Conservation Code (IECC) Table R403.4.2 mandates minimum R-values based on climate zones. For example, zones 1 through 3 require thicker insulation to combat higher heat levels.
Rubber and foam tubing are widely used for both residential and commercial setups. Rubber insulation can be taped to block moisture, while pre-slit foam tubing is designed for easy installation, especially when routing around existing lines. For outdoor applications, consider UV-resistant jackets like the OutSet Jacket. These jackets, equipped with hook-and-loop closures, protect insulation from sunlight damage, preventing brittleness. Plus, they’re reusable – perfect for systems that need regular maintenance.
Let’s move on to sealing accessories that pair well with these insulation methods.
Sealing Accessories
To secure insulation, use HVAC vinyl tape, but avoid taping control wires directly to copper tubing to prevent damage. For wall penetrations, factory-engineered solutions like SideWallSeal kits provide airtight, weatherproof, and pest-resistant seals. For example, the SWS-3500-B model is ideal for handling large line sets up to 3.5 inches, making it suitable for VRF systems. On the other hand, the SWS-2375-B model is designed for smaller line sets, such as those in mini-splits, accommodating up to 2.375 inches.
Weatherproof expanding foam and hinge-style covers like the OutSet Seal are excellent for sealing gaps where linesets enter the structure. These solutions help deter rodents and prevent air leakage. Unlike caulk or foam, which degrade under UV exposure, engineered seals last longer and maintain their effectiveness. For addressing small micro-leaks (up to 0.5mm), chemical sealants like AC Leak Freeze are an option. However, major manufacturers like Emerson Climate Technologies and Danfoss advise caution, as these sealants can clog thermostatic expansion valves (TXV) or capillary tubes.
Now, let’s look at the specialized tools that make refrigerant line sealing more efficient.
Specialized Tools
Press tools are gaining popularity for creating leak-free connections on copper or stainless steel tubing without the need for soldering. For example, the NAVAC NEF6LM Cordless Power Flaring Tool ($379.00) delivers precise, solder-free connections. These tools use hydraulic or battery-powered jaws to compress fittings, eliminating the need for open flames and cutting down on installation time.
Another must-have is a digital micron gauge, which ensures moisture and non-condensable gases are fully removed during evacuation. These gauges, combined with press tools, help achieve leak-free connections and accurate vacuum readings. Additionally, flowing dry nitrogen while brazing is essential to prevent copper oxide scale formation, which can harm compressor valves. For retrofitting systems from R-22 to R-410A, the Hilmor HLC007 Lineset Cleaning Kit ($386.46) uses pressurized foam "pigs" to clean pipes of contaminants, ensuring optimal performance.
How to Seal Refrigerant Lines
Step-by-Step Guide to Sealing Refrigerant Lines in HVAC Systems
Preparing the Lines
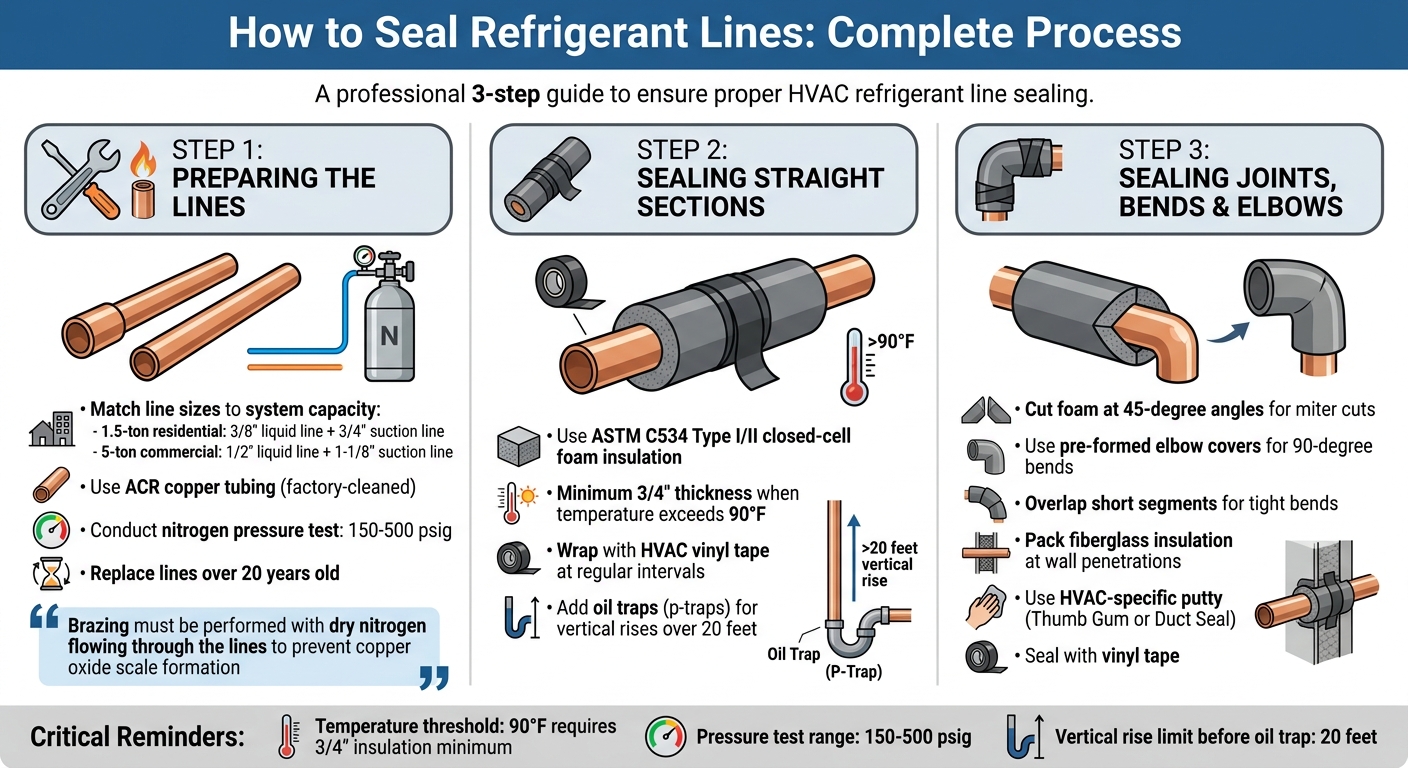
Before sealing or insulating refrigerant lines, it’s crucial to ensure the line sizes match the system’s capacity. For example, a 1.5-ton residential system typically requires a 3/8-inch liquid line and a 3/4-inch suction line, while a commercial 5-ton unit often needs a 1/2-inch liquid line and a 1-1/8-inch suction line. Always opt for ACR (Air Conditioning and Refrigeration) copper tubing, which comes factory-cleaned and capped to prevent debris from contaminating the system.
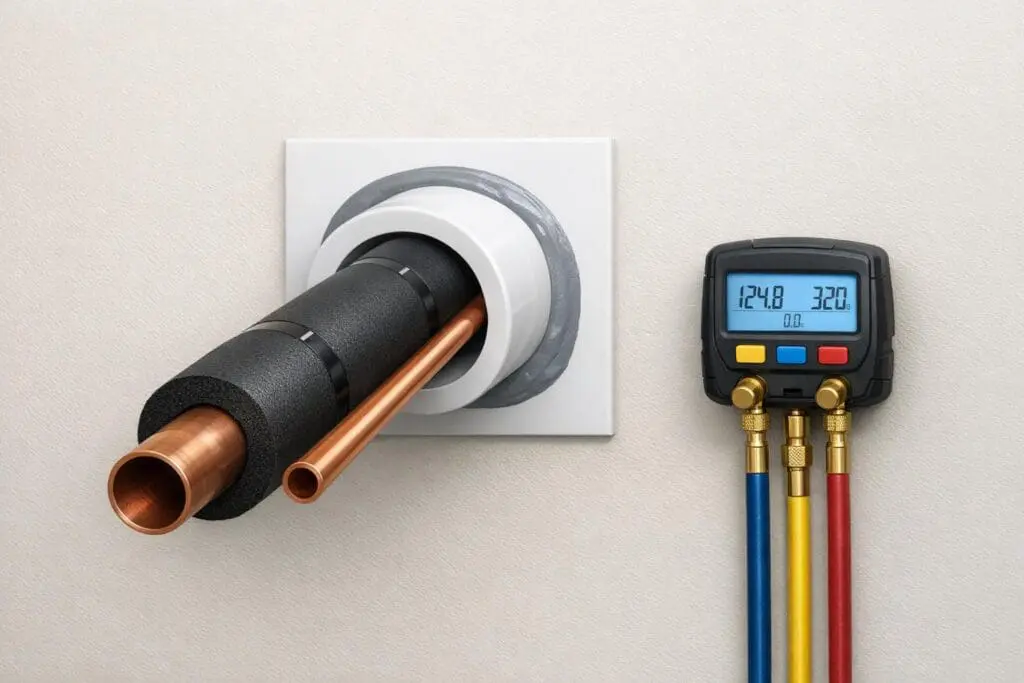
Before sealing, conduct a nitrogen pressure test at 150 to 500 psig to check for leaks. This step helps catch issues early, saving you the hassle of removing insulation later. If you’re reusing existing lines, inspect them carefully. If you find significant damage, you may need professional air conditioning repair service to replace lines that are over 20 years old or show signs of corrosion or kinks. Older refrigerants like R-22 leave residual oils that are incompatible with the POE oils used in newer systems like R-410A or R-454B.
"Brazing must be performed with dry nitrogen flowing through the lines to prevent copper oxide scale formation inside the tubing – a contaminant that degrades compressor valve function." – HVAC Installation Authority
Once the lines are prepared and tested, you’re ready to secure insulation on the straight sections.
Sealing Straight Sections
For straight sections of the suction line, use ASTM C534 Type I/II closed-cell foam insulation. If the ambient temperature exceeds 90°F, make sure the insulation has a minimum wall thickness of 3/4 inch.
To secure the insulation, wrap it tightly with HVAC vinyl tape at regular intervals. This prevents moisture from seeping in. For vertical rises longer than 20 feet, include oil traps (p-traps) in the suction line to ensure proper oil return to the compressor.
With the straight sections sealed, the next step is to address the more intricate areas, such as joints and bends.
Sealing Joints, Bends, and Elbows
Joints and bends are trickier to seal but are critical for preventing condensation and heat gain, both of which can reduce compressor efficiency. For elbows, use miter cuts on the insulation. Cut the foam at a 45-degree angle, fit the pieces snugly together, and seal the seams with vinyl tape. Pre-formed elbow covers are a great option for standard 90-degree bends, simplifying the process.
For tighter bends where pre-formed covers don’t fit, cut and overlap short segments of insulation, securing each piece with tape. At wall penetrations, pack fiberglass insulation around the lines before applying sealants. This cushions the tubes and prevents them from rubbing against hard surfaces. Use HVAC-specific putty like Thumb Gum or Duct Seal instead of standard expanding foam, especially near the liquid line where temperature changes are more pronounced.
Sealing Outdoor Lines and Wall Penetrations
When working outdoors, refrigerant lines and wall penetrations need special attention to withstand the challenges posed by weather and environmental factors.
Sealing Wall Penetrations
Every wall penetration should be sealed to block air leaks and moisture. Before applying any sealant, pack the opening with steel wool – this simple step helps deter rodents from chewing through the barrier. Make sure the insulation fully covers the wall opening to avoid exposing bare copper, which can lead to issues down the line. On the outside, protect the insulation with UV-resistant jacketing or rigid PVC covers to shield it from sunlight and harsh weather. Be careful not to compress the insulation too much near wall penetrations, as this can lower its R-value, reducing its thermal efficiency.
"Every wall penetration should be sealed with caulk, expanding foam, or specialized sealants. Some professionals also recommend packing steel wool inside the opening before sealing, which deters rodents from chewing through." – Carrie Powers, Polyguard
Outdoor refrigerant lines also demand durable protection to ensure insulation remains effective, even under extreme weather conditions.
Protecting Outdoor Lines
Outdoor refrigerant lines face more wear and tear than indoor ones, so their insulation must be up to the task. Closed-cell elastomeric foam that meets ASTM C534 standards is the go-to material for outdoor use, as it provides excellent resistance to moisture and maintains thermal stability. Avoid polyethylene foam, as it breaks down quickly when exposed to sunlight.
To extend the life of the insulation, cover it with UV-resistant materials like rigid PVC or aluminum jackets. These protective layers guard against sunlight and weather damage. Additionally, secure the line sets every 4 to 6 feet using brackets or clamps. This prevents sagging and reduces the risk of damage caused by vibrations, ensuring the insulation stays intact. When sealing seams on outdoor sections, use adhesives designed specifically for insulation rather than duct tape, which can compress the foam and reduce its thermal performance.
Inspection and Maintenance
To check for micro-leaks, pressurize the system with dry nitrogen between 400–500 psi and hold it steady for 24 hours. During this time, monitor the pressure – any drop indicates a micro-leak. For further confirmation, use a soap bubble test. Mix dish soap with water and apply it to every joint. Large bubbles will reveal active leaks, while tiny "fizzing" points to smaller issues that still need attention.
Afterward, pull a vacuum to 500 microns or lower and isolate the valves. Monitor them for 10 minutes – if the vacuum rises by less than 100 microns, the seal is effective. Record key metrics such as suction and discharge pressures, superheat, subcooling, and compressor amps. These readings will serve as a baseline for future checks. Additionally, ensure outdoor joints are shielded with PVC sleeves or putty caps to protect them from the elements. These steps establish a solid reference point for ongoing inspections.
"Leaks don’t just waste refrigerant – they waste energy, time, and money. I treat every joint like it’s holding rocket fuel." – Mike Sanders, HVAC Specialist
Post-Installation Inspection Checklist
Inspect the entire line set to confirm it’s completely covered. No copper should be exposed – the suction line must be fully insulated to prevent energy loss and condensation. Ensure insulation covers all copper sections entirely, and seal seams with insulation-specific adhesive instead of duct tape, which can compress the foam and reduce its thermal efficiency. Check wall penetrations to confirm they’re packed with steel wool and sealed with caulk or expanding foam. Outdoor sections should be protected with UV-resistant jacketing or rigid PVC covers. Following this checklist simplifies maintenance and helps preserve the system’s integrity over time.
Ongoing Maintenance
Regular AC maintenance and inspections are key to maintaining system performance. Conduct a visual check every three months for signs of corrosion, wear from vibrations, or exposed copper. Annually, compare system pressures to your baseline to detect slow leaks early – losing just 10% of refrigerant can cut efficiency by up to 20%. Replace insulation wrap every two years to guard against UV damage, and re-torque flare nuts every three years to account for expansion and contraction cycles. If the system struggles to cool or vents are blowing warm air, these could signal a refrigerant leak. Schedule professional inspections in early spring to identify small issues, like leaks or insulation wear, before the summer heat puts extra strain on the system.
Conclusion
Effective sealing practices – ranging from insulation to pressure testing – play a key role in ensuring system reliability. Properly sealing refrigerant lines safeguards the entire system’s performance. For instance, insulating the suction line minimizes heat gain and condensation, while brazing with dry nitrogen flow prevents the formation of copper oxide scale inside the tubes. This scale can harm compressor valves and lead to early system failure. Additionally, sealing wall penetrations with materials like Duct Seal putty and reinforcing lines with fiberglass helps block air leaks, deter pests, and reduce wear caused by vibrations.
Maintaining the pressure differential between liquid and suction lines is equally important for efficient heat exchange. Errors in line sizing or sealing can disrupt this balance. Undersized lines may cause excessive pressure drops, while oversized suction lines can slow oil return velocity, compromising compressor lubrication. To ensure joints are secure, nitrogen pressure tests between 150–500 psig are recommended.
"Proper installation of these lines directly affects system efficiency, refrigerant charge integrity, and long-term equipment reliability." – HVAC Installation Authority
Following ASTM C534 standards, including using at least ¾-inch insulation for temperatures above 90°F, is essential for maintaining thermal performance. In vertical installations, where the outdoor unit is positioned above the indoor unit, oil traps should be installed every 20 feet to ensure proper lubrication. These details can be the difference between a system that operates efficiently for 10–15 years and one that fails prematurely.
Adhering to these best practices ensures optimal system performance, reduces energy waste, and complies with EPA Section 608 regulations. Whether you’re working on a residential 1.5-ton unit or a commercial 5-ton system, the principles remain consistent: insulate effectively, braze with precision, test thoroughly, and protect outdoor components. A well-executed installation maximizes efficiency and longevity.
For expert HVAC solutions and assistance with refrigerant line sealing, reach out to Eco Temp HVAC.
FAQs
What size insulation do refrigerant lines need?
The insulation thickness needed for refrigerant lines depends on where they’re installed. Inside the building, the insulation should be at least 1/2 inch thick. For outdoor lines, a minimum of 1 inch thick insulation is recommended. Additionally, the size of the lines varies by system type: liquid lines are usually smaller, often 3/8 inch or 1/2 inch OD, while suction lines are larger, typically 3/4 inch or 1-1/8 inch OD.
How can I tell if my line set has a leak?
If your cooling system isn’t performing as it should, a refrigerant line leak might be the culprit. Common signs include weakened cooling performance, hissing noises, or even visible damage to the lines.
To pinpoint leaks, technicians rely on tools like electronic leak detectors, UV dye, or the simple yet effective soap bubble solution. One thing to note: active leaks, which constantly release refrigerant, are usually easier to find. On the other hand, passive leaks – those that don’t continuously release refrigerant – often require more advanced tools to detect.
If you suspect a leak, acting quickly is crucial. Prompt detection and repair help keep your system running efficiently and prevent further issues.
What should I use to protect outdoor line insulation?
To safeguard outdoor line insulation, opt for materials crafted specifically for outdoor HVAC use, like foam pipe insulation or weatherproof covers. These options provide a barrier against harsh weather, UV rays, pests, condensation, and energy loss. Ensuring proper insulation and protection is key to preserving the efficiency and lifespan of refrigerant line sets exposed to the elements.