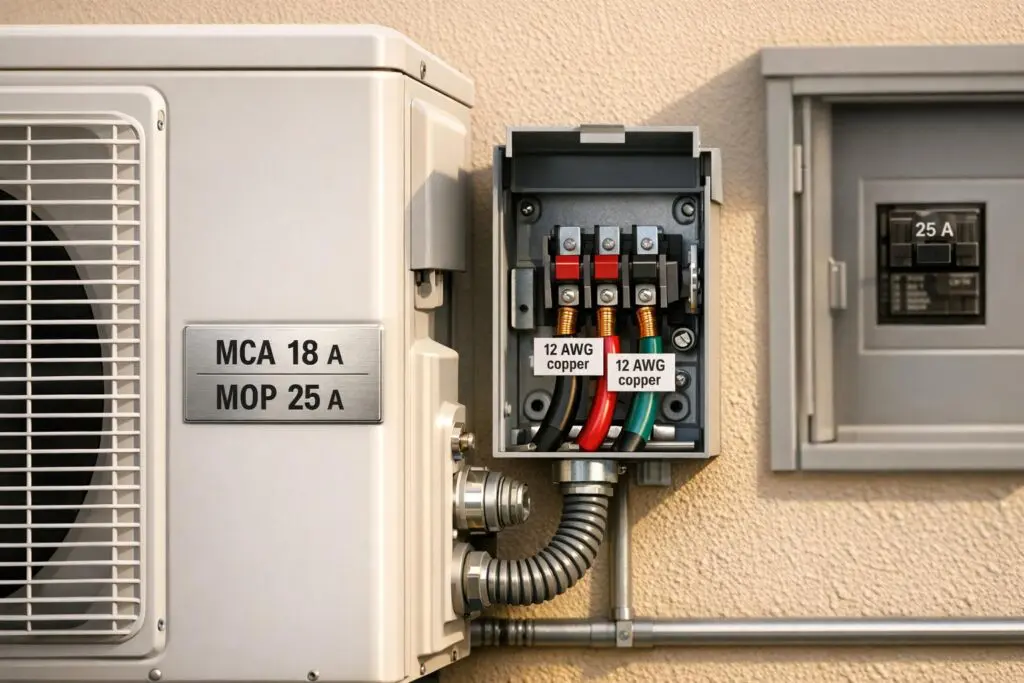
When wiring a mini-split system, safety and efficiency hinge on choosing the correct wire size and circuit breaker based on the unit’s Minimum Circuit Ampacity (MCA) and Maximum Overcurrent Protection (MOP) ratings. These ratings, found on the system’s nameplate, guide you in selecting the right components to avoid overheating, voltage drops, or system errors. Here’s what you need to know:
- MCA determines the minimum wire size needed to safely handle the system’s electrical load.
- MOP specifies the maximum breaker size to handle startup surges without unnecessary trips.
- Use copper wire for better conductivity and durability. Consider thicker wire for runs over 50 feet to minimize voltage drops.
- Match breaker type to voltage: single-pole for 115V, double-pole for 230V systems.
- Use stranded wire for communication lines to prevent vibration-induced fatigue.
Ignoring these guidelines can lead to inspection failures, voided warranties, or even fire hazards. Always follow NEC requirements and manufacturer specifications for a safe and reliable installation.
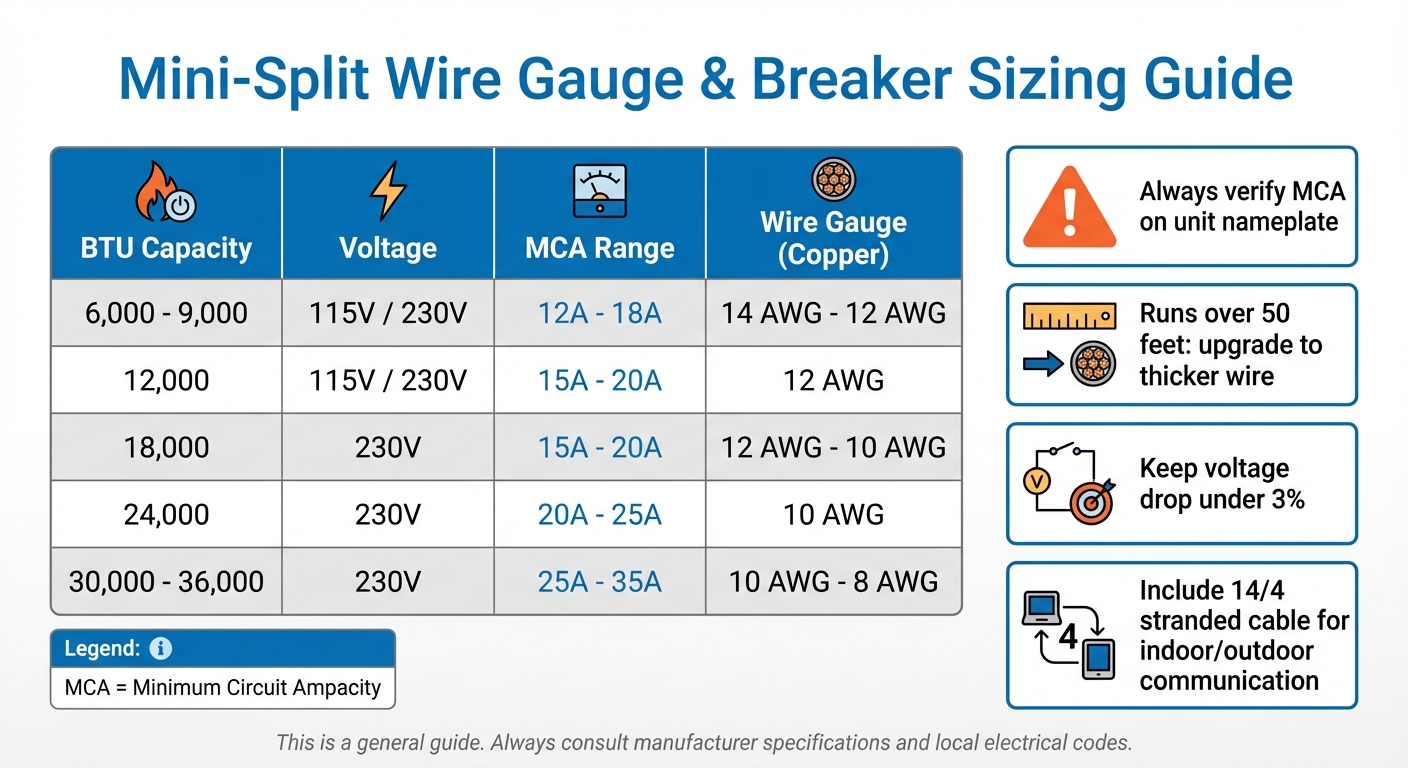
Mini-Split Wire Gauge and Breaker Sizing Chart by BTU Capacity
How to Get the Right Breaker Size and Wire Gauge for a Mini Split
sbb-itb-b5c10b1
1. Know Your System’s MCA and MOP Ratings
Every mini-split system has two crucial electrical ratings printed on a metal nameplate attached to the outdoor condenser unit: MCA (Minimum Circuit Ampacity) and MOP (Maximum Overcurrent Protection). These provide the exact specifications your electrician needs to properly size the wire and breaker for your system. Getting this right is essential for safe and efficient operation.
"MCA (Minimum Circuit Ampacity) tells you how to size the wire. MOP (Maximum Overcurrent Protection) tells you how to size the breaker or fuse." – ExpertCE
The MCA indicates the minimum wire size needed to safely handle the system’s electrical load. This is calculated by taking 125% of the compressor’s Rated Load Amps (RLA) and adding the current draw from other components, such as fan motors. On the other hand, the MOP specifies the maximum breaker size that can handle the system’s startup surge (Locked Rotor Amps) without causing unnecessary trips.
It’s important to avoid using BTU ratings as a basis for sizing (unlike when comparing mini splits vs. central HVAC). Instead, rely on the MCA and MOP values provided by the manufacturer. For example, even a 12,000 BTU unit can require a breaker size ranging from 15A to 25A depending on its specific MCA and MOP. Take the MRCOOL DIY systems as an example: their 12K BTU unit running on 115V has an MCA of 18A and an MOP of 20A, while the 36K BTU model at 230V has an MCA of 33A and an MOP of 35A.
"The manufacturer gives MCA/MOP for a reason. That’s what inspectors care about." – MRCOOL DIY Direct
Always double-check the nameplate ratings, and for wire runs exceeding 50 feet, consider using a heavier gauge to prevent voltage drops and protect your system. Once you’ve confirmed the MCA and MOP values, you can confidently select the appropriate circuit breaker for your mini-split system.
2. Match the Circuit Breaker to System Requirements
Once you’ve determined your MCA (Minimum Circuit Ampacity) and MOP (Maximum Overcurrent Protection) values, it’s time to select a circuit breaker that aligns with your mini-split system’s needs. These ratings are your guide to choosing a breaker that provides adequate protection without exceeding safety limits. The MOP rating, in particular, sets the maximum breaker size you can safely use. Never install a breaker larger than the MOP rating, even if you think it offers extra protection – it doesn’t. Instead, it could compromise the system’s safety.
"Select the fuse based on the maximum overcurrent protection amp rating of your system." – Total Home Supply
For proper installation, follow the National Electrical Code and use a dedicated circuit for your mini-split. A single-pole breaker is appropriate for 115V systems, while a double-pole breaker is needed for 230V systems. This ensures that no other devices share the circuit, reducing the risk of voltage drops or frequent breaker trips.
Avoid the common mistake of sizing a breaker based on BTU ratings. Instead, stick to the manufacturer’s specifications. An undersized breaker can cause constant tripping when the compressor starts, while an oversized breaker might not trip during a fault, leaving wires vulnerable to overheating and potentially causing a fire.
Additionally, install a weatherproof disconnect box within 10 feet of your outdoor unit. This box allows technicians to safely cut power during maintenance or emergencies. Quick disconnect switch kits are available for around $69.00, and adding a surge protector – typically costing about $86.00 – can shield sensitive inverter electronics from damaging voltage spikes.
3. Choose the Right Wire Gauge for Your Amperage
When wiring your mini-split system, the wire gauge you choose should match the unit’s MCA (Minimum Circuit Ampacity) rating. The MCA tells you the minimum current the wire must handle safely during normal operation. Think of wire gauge like a hose: the lower the gauge number, the thicker the wire, and the more current it can carry. In the American Wire Gauge (AWG) system, this means:
- 14-gauge wire: Handles up to 15 amps
- 12-gauge wire: Handles up to 20 amps
- 10-gauge wire: Handles up to 30 amps
For example, an 18,000 BTU mini-split running at 230V with an MCA of 15–19 amps will typically require 12-gauge wire. On the other hand, a 24,000 BTU unit with an MCA of 19–24 amps will need 10-gauge wire. Choosing the correct wire gauge is not just about handling the current – it also helps prevent voltage drops, especially over longer distances.
"Matching wire size to amp draw is non-negotiable." – HeatAndCool.com
Adjusting for Distance
The length of the wire run can impact performance. Longer distances increase resistance, which can lead to voltage drops. To address this, the National Electrical Code recommends keeping voltage drops under 3%. If the run is particularly long, you may need to use a thicker wire to maintain stable voltage for the mini-split’s sensitive inverter electronics.
Risks of Undersized Wire
Using a wire that’s too small can lead to serious issues. Undersized wires may carry up to 25% more amps than they’re rated for, resulting in overheating and potential system errors. This can damage your mini-split’s inverter board and cause error codes.
For best results, always use copper wire, as manufacturers typically base their recommendations on copper conductors. If you must use aluminum wire, you’ll need to increase the gauge to account for aluminum’s higher resistance. Proper wire gauge selection ensures your system operates safely and reliably while staying compliant with MCA requirements.
4. Decide Between Stranded and Solid Wire
After selecting the correct wire gauge for ampacity, the next step is deciding on the type of conductor: stranded or solid wire. Stranded wire is made up of multiple thin strands twisted together, giving it flexibility and making it easier to maneuver through tight spaces or conduits with multiple bends. Solid wire, on the other hand, consists of a single rigid conductor. It’s less flexible but generally more affordable.
This decision becomes especially important when installing mini-splits, as the communication lines between indoor and outdoor units are critical. Stranded wire is the standard choice for mini-splits, particularly for the widely used 14/4 cable. For low-voltage communication lines, stranded wire is often recommended because it resists vibration-induced fatigue better than solid wire. Its flexibility not only simplifies installation but also makes future maintenance easier. Choosing the right conductor type ensures proper connectivity and durability, which are essential for a reliable mini-split system.
Stranded wire is particularly well-suited for handling the constant vibrations caused by compressors and blower motors. Unlike solid wire, which can develop metal fatigue in high-vibration environments, stranded wire maintains its integrity over time. Additionally, its flexibility makes it much easier to pull through conduits with multiple bends. Selecting the right conductor type complements your wire gauge choice, ensuring the overall reliability of the system.
For power supply lines, solid wire can be a practical option for straightforward, stationary runs. It offers slightly lower resistance and is typically more cost-effective. However, for larger gauges (8 AWG and above), stranded wire becomes almost a necessity. Solid wire at these sizes is too rigid to work with effectively. When using stranded wire with screw terminals, ensure no loose strands ("whiskers") extend outside the terminal, as these can cause shorts. Many technicians prefer crimped fork connectors to secure the connection properly.
For instance, LG specifies 18/3 stranded non-shielded wire for wall thermostats. Using solid wire when stranded wire is required can result in intermittent communication errors and system malfunctions, which are often difficult to diagnose. This highlights the importance of following manufacturer recommendations to maintain system safety and performance integrity.
5. Follow Code Requirements for Wire Material
When it comes to mini-split installations, copper wire is the go-to standard. Manufacturers design their systems with copper in mind, and the National Electrical Code (NEC) sets the baseline for conductor sizes: 14 AWG for copper and 12 AWG for aluminum. While aluminum may be lighter and less expensive, it has a much higher resistance – 21.2 compared to copper’s 12.9. This means that aluminum wires require a larger gauge to safely handle the same current. The choice of conductor material directly impacts ampacity and overall system safety.
For instance, at 75°C, 8 AWG copper can carry 50 amps, while aluminum of the same size is limited to 40 amps. Most residential mini-split systems, which typically operate between 60–100 amps, benefit from copper’s superior performance. If you opt for aluminum, it’s critical to apply anti-oxidation compounds at all terminations to avoid corrosion and overheating.
Insulation and Protection Matter
The type of insulation is just as important as the conductor material. For outdoor wiring, use THHN (Thermoplastic High Heat-resistant Nylon-coated) conductors that are resistant to sunlight and housed in weatherproof conduit or an electrical whip. For indoor wiring, standard NM-B (Romex) cable may be acceptable if permitted by local codes, but outdoor sections must include UV-resistant insulation. In some areas, local codes may also require armored or metal-clad (MC) cable for added protection.
Check Local Codes
Always consult a licensed electrician to verify NEC amendments in your area. Code requirements can vary widely, especially regarding armored cable use and outdoor installation methods. The wire you select must match the Minimum Circuit Ampacity (MCA) listed on your unit’s nameplate – not just a generic BTU-based guideline. This ensures compliance with both safety standards and manufacturer warranties. By following these guidelines for wire material and insulation, you’ll meet safety codes and protect your equipment.
6. Size Wire Based on Mini-Split Capacity
While BTU capacity gives a general starting point, always check the Minimum Circuit Ampacity (MCA) on the unit’s nameplate for precise requirements. Two ductless mini splits with the same 12,000 BTU capacity can have completely different electrical needs based on their design and efficiency.
Voltage plays a big role in determining the amperage draw. For example, a 12,000 BTU mini-split running on 115V will typically draw about 15 amps, while the same unit on a 230V circuit might only need 10 amps. Generally, mini-splits up to 12,000 BTUs can run on 115V, but larger systems (over 12,000 BTUs) almost always require 230V. Here’s a quick reference table for common capacities, voltages, and wire gauges:
| Mini-Split Capacity (BTU) | Typical Voltage | Common MCA Range | Recommended Wire Gauge (Copper) |
|---|---|---|---|
| 6,000 – 9,000 | 115V / 230V | 12A – 18A | 14 AWG – 12 AWG |
| 12,000 | 115V / 230V | 15A – 20A | 12 AWG |
| 18,000 | 230V | 15A – 20A | 12 AWG – 10 AWG |
| 24,000 | 230V | 20A – 25A | 10 AWG |
| 30,000 – 36,000 | 230V | 25A – 35A | 10 AWG – 8 AWG |
Another critical factor is the length of the wire run. For runs longer than 50 feet, you’ll need to use a thicker wire (e.g., upgrade from 14 AWG to 12 AWG) to minimize voltage drop. Installers often aim for less than a 3% voltage drop in mini-split systems to maintain efficiency and protect the compressor. Using undersized wire can result in energy losses of 20–30% and increase the risk of overheating or fire.
Additionally, include a 14/4 stranded cable for communication between the indoor and outdoor units. This four-conductor wire should either be shielded or kept away from high-voltage lines to prevent electromagnetic interference, which can disrupt the system’s operation.
Conclusion
Getting mini-split wiring right means sticking to the MCA and MOP ratings listed on the unit’s nameplate. These specifications are what inspectors rely on, and skipping any step in the wiring process can lead to serious issues like system failure, voided warranties, or even fire hazards. Mark Callahan from The Furnace Outlet emphasizes, "Neglecting those rules can void warranties and, worse, leave you without insurance coverage after a claim". Similarly, HeatAndCool warns, "A single swapped conductor can fry the inverter board in seconds, so double-check your work before closing the cover". Following these guidelines not only satisfies inspectors but also ensures your system runs smoothly for years to come.
Proper wiring is about more than just passing inspections – it’s critical for safety and efficiency. The National Electrical Code (NEC) Article 440 mandates dedicated circuits for mini-split systems to avoid voltage drops and prevent nuisance breaker trips. These technical requirements are the foundation of a reliable and efficient system, and they highlight the importance of professional installation.
While some mini-split units are marketed as DIY-friendly, most states in the U.S. require licensed professionals for high-voltage electrical work to ensure compliance with local codes. For expert installation and wiring that meets NEC standards, certified professionals like those at Eco Temp HVAC offer specialized services across the Chicagoland area. With credentials such as Mitsubishi Diamond Elite Contractor status – which supports a 12-year warranty on Mitsubishi products – they handle everything from permits to inspections. Their 24/7 service in areas like Chicago, St. Charles, Bartlett, Lemont, Downers Grove, and Palatine ensures quick, reliable, and code-compliant installations when you need them most.
FAQs
Where do I find the MCA and MOP on my mini-split?
You can locate the MCA (Minimum Circuit Ampacity) and MOP (Maximum Overcurrent Protection) ratings on your mini-split’s nameplate or label. Typically, these details are found on the outdoor unit’s data plate and offer crucial electrical information for ensuring correct wiring and circuit protection.
When should I upsize the wire for a long run?
When the distance between the electrical panel and the mini-split unit goes beyond the typical 50 feet, it’s essential to use a larger wire gauge. Longer wire runs can lead to voltage drops and overheating if the wire isn’t properly sized. To avoid these issues and ensure everything operates safely, it’s best to consult a licensed electrician. They can calculate the correct wire size based on the specific distance and local electrical codes.
Do I need a disconnect box and surge protector?
Whether you need a disconnect box or a surge protector hinges on your local electrical codes and what your mini-split system requires.
- Disconnect box: This is often a must for safety and meeting code requirements. It lets you cut off power during maintenance or in emergencies.
- Surge protector: While not always mandatory, it’s a smart choice to shield your system from power surges, especially in regions prone to electrical storms or unstable power supplies. For proper setup, it’s best to consult a licensed electrician.