Installing a mini-split system requires careful planning to ensure it performs efficiently, complies with codes, and avoids costly mistakes. Key preparation steps include:
- Electrical Setup: Use the correct voltage (120V or 240V) based on unit size, ensure a dedicated circuit, and follow NEC 2023 standards. Proper breaker size and wire gauge are critical.
- Indoor Unit Placement: Mount the unit 7–8 feet above the floor on a sturdy wall, ensuring proper airflow and avoiding obstructions like furniture or direct sunlight.
- Outdoor Unit Clearance: Maintain at least 3 feet of space on all sides, avoid debris, and place on a stable, level pad to prevent damage.
- Line Set and Drainage: Plan direct routes for refrigerant lines and ensure proper drainage slope to avoid water backup.
- Tools and Materials: Essential tools include a vacuum pump, torque wrench, and flaring tool. Materials like insulated copper lines, weatherproof disconnect boxes, and UV-resistant covers are also needed.
- Permits and Testing: Obtain necessary permits, perform nitrogen pressure tests, and vacuum lines to 500 microns or lower to avoid system damage.
Skipping these steps can lead to performance issues, void warranties, and increase energy costs. For professional installations, certified contractors like Eco Temp HVAC in Chicagoland can handle the process, ensuring compliance and long-term reliability.
Full Installation of Mini Split Ductless Unit, Step by Step!
Electrical and Power Requirements
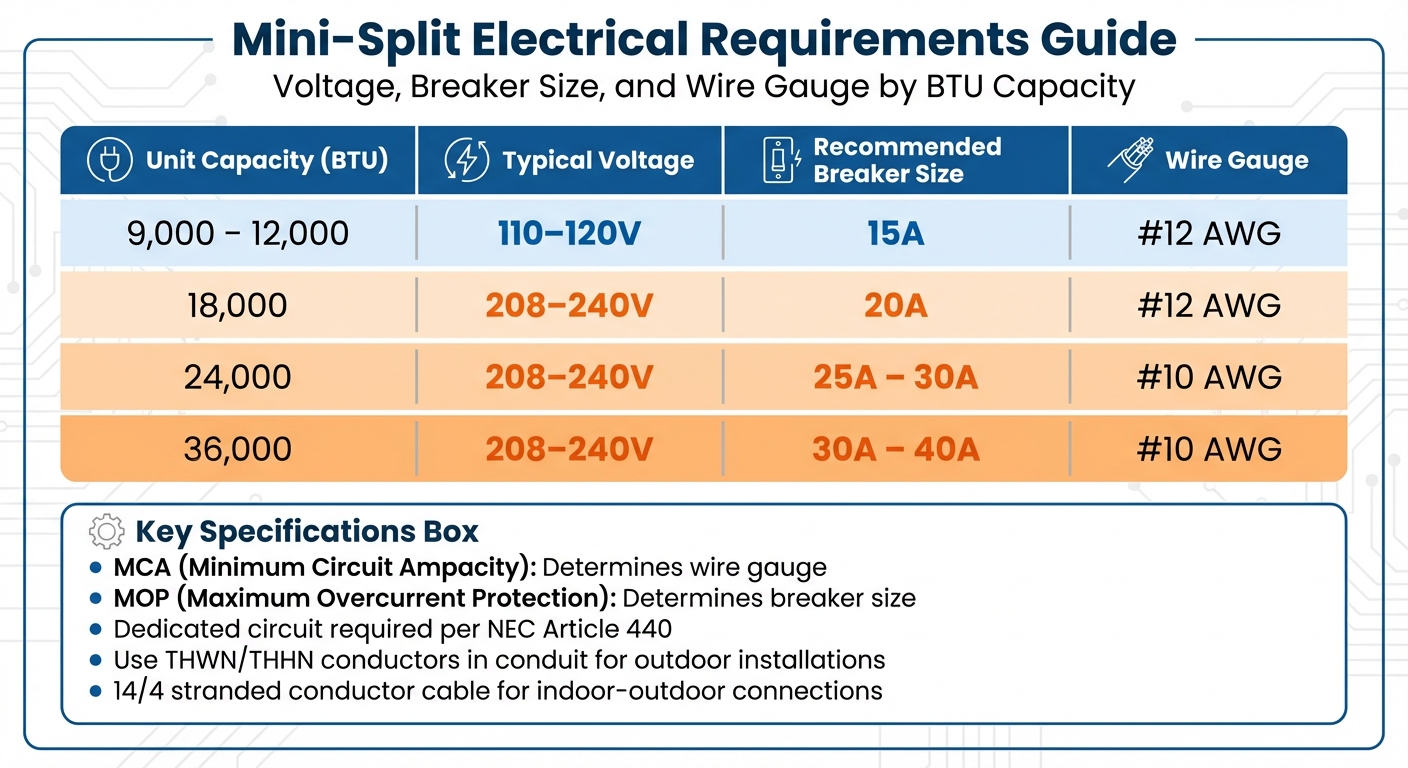
Mini-Split Electrical Requirements by Unit Capacity
Getting the electrical setup right is essential for your mini-split system to operate safely and efficiently. Mini-splits typically run on either 120V or 240V, depending on their size. Smaller units (12,000 BTU or less) generally use 120V, while larger units require 208–240V. To determine the correct wiring and breaker sizes, check the metal nameplate on the outdoor unit. It lists two key specifications: Minimum Circuit Ampacity (MCA) and Maximum Overcurrent Protection (MOP). According to Mark Callahan:
"MCA tells you the minimum circuit size for a continuous load. MOP caps the breaker size so it trips before the conductors melt."
Use the MCA to select the appropriate wire gauge and the MOP to determine the correct breaker size.
Verify Dedicated Circuit and Breaker Size
The National Electrical Code (NEC) Article 440 mandates a dedicated circuit for mini-splits. This ensures stable voltage and prevents issues from other appliances sharing the line. For circuits carrying 15–20A, use #12 AWG copper wire, and for circuits handling 25–40A, upgrade to #10 AWG. To connect the indoor and outdoor units, use a 14/4 stranded conductor cable. Stranded wire is preferred because it offers better flexibility and durability.
| Unit Capacity (BTU) | Typical Voltage | Recommended Breaker Size |
|---|---|---|
| 9,000 – 12,000 | 110–120V | 15A |
| 18,000 | 208–240V | 20A |
| 24,000 | 208–240V | 25A – 30A |
| 36,000 | 208–240V | 30A – 40A |
Ensure that the power supply for the mini-split is on an isolated circuit to avoid interference.
Confirm Power Access for Tools
During installation, make sure there’s a separate power source available for tools like vacuum pumps. Avoid using the mini-split’s circuit for these tools. Additionally, install a weatherproof disconnect box within sight of the outdoor unit – typically within 10 feet – to meet NEC 440.14 requirements. This disconnect box ensures safe servicing and compliance with code. These kits are widely available and usually cost around $69.00.
Follow NEC Standards
Adhering to NEC 2023 wiring standards is crucial. For outdoor or wet areas, use THWN/THHN conductors in conduit or a weather-rated electrical whip. If you’re using NM cable (Romex) indoors, note that it’s limited to the 60°C ampacity column and cannot be used outdoors. Proper grounding is also essential – connect the equipment ground conductor to both the outdoor unit’s ground lug and the disconnect box. To protect the system’s inverter control board from lightning and voltage surges, consider adding a surge protector. These are priced between $86.00 and $287.00.
Indoor Unit Location and Wall Prep
Choose the Indoor Unit Location
Where you place the indoor unit plays a big role in how efficiently your mini-split system operates. Mount it 7–8 feet above the floor on a sturdy wall that can handle its weight (about 25 pounds). This height allows air to flow naturally downward, cooling or heating the room evenly. Make sure to attach the mounting bracket to wall studs or solid lumber for proper support.
Leave at least 6 inches of clearance above and on both sides of the unit to ensure good airflow. Additionally, there should be 8 to 10 feet of open space in front of the unit for unobstructed air circulation. Avoid placing it near curtains, large furniture, or other barriers that could block airflow. Keep it away from direct sunlight and heat sources like stoves, fireplaces, or large electronics, as these can interfere with the unit’s temperature sensors, leading to inefficient cycling.
Whenever possible, choose an exterior wall to make routing the line set simpler. Use a stud finder to locate and mark at least two studs for secure mounting. Before drilling, double-check for hidden utilities such as wiring or plumbing with a detector. Once you’ve confirmed the wall is clear, you can start preparing it for installation.
Prepare the Wall
After selecting the location, clear the area by moving furniture at least 3 feet away from the wall. Lay down drop cloths to protect the floor from dust and debris. Use the template provided by the manufacturer to mark where the mounting bracket will go, as well as the position for the 2- to 3-inch hole needed for the line set.
Drill the wall penetration at a slight downward angle (5–10°) toward the outside. This angle is crucial for proper condensate drainage. Before securing the mounting plate, drill pilot holes into the studs to prevent splitting. Use 3 to 6 heavy-duty screws to fasten the plate securely.
Mark Callahan emphasizes this point, saying:
"The indoor bracket must hit solid lumber to hold the 25-pound head".
Make sure the bracket is perfectly level using a level tool – any tilt can cause drainage problems. Once the bracket is installed, give it a physical pull test to ensure it’s firmly attached and doesn’t flex. Only then should you proceed to hang the air handler.
Outdoor Unit Location and Clearance
Check Clearance and Airflow Requirements
To keep your outdoor condenser running smoothly, it’s essential to give it enough breathing room. Aim for a three-foot clearance on all sides, with at least 12 inches at the rear, 24–36 inches in front, and 5 feet above the unit. This spacing ensures proper airflow and helps prevent recirculation issues that can strain the system’s performance.
Keep noise in mind, too. Position the unit at least 10 feet away from patios, bedroom windows, or property lines, as mini-split systems typically produce 50–60 dB of operational noise. Avoid placing the condenser under leafy trees, near mulch beds, or below dryer vents – lint, leaves, and debris can clog the fins. Also, check local codes, which often require a three-foot setback from gas meters and utility disconnects.
If possible, mount the unit on a north- or east-facing wall. Direct sunlight from the south or west can increase head pressure, making the compressor work harder. Mark Callahan from The Furnace Outlet explains:
"Shading alone can lower power draw by roughly ten percent, especially during U.S. summer peaks".
By shading the condenser, you could see a 5–10 percent reduction in summer energy use.
Set Up a Level Mounting Pad
Once you’ve confirmed the necessary clearance, focus on creating a stable, level base for the outdoor unit. These condensers can weigh anywhere from 60 to 150 pounds, so a solid foundation is key. Use a pre-cast concrete or composite pad set on compacted gravel instead of bare soil – this prevents settling and keeps the unit level. Even a half-inch tilt can cause oil pooling in the compressor, which may damage the bearings and lead to premature failure.
For extra noise reduction, secure the unit’s feet with vibration-isolating rubber pads. Avoid mounting the condenser on wooden decks, as they tend to flex and amplify vibrations. Also, leave 18–24 inches of clear space in front of the unit to ensure technicians have enough room for maintenance. Once the pad is in place, you can plan the routing of the line set and drainage to maintain system efficiency.
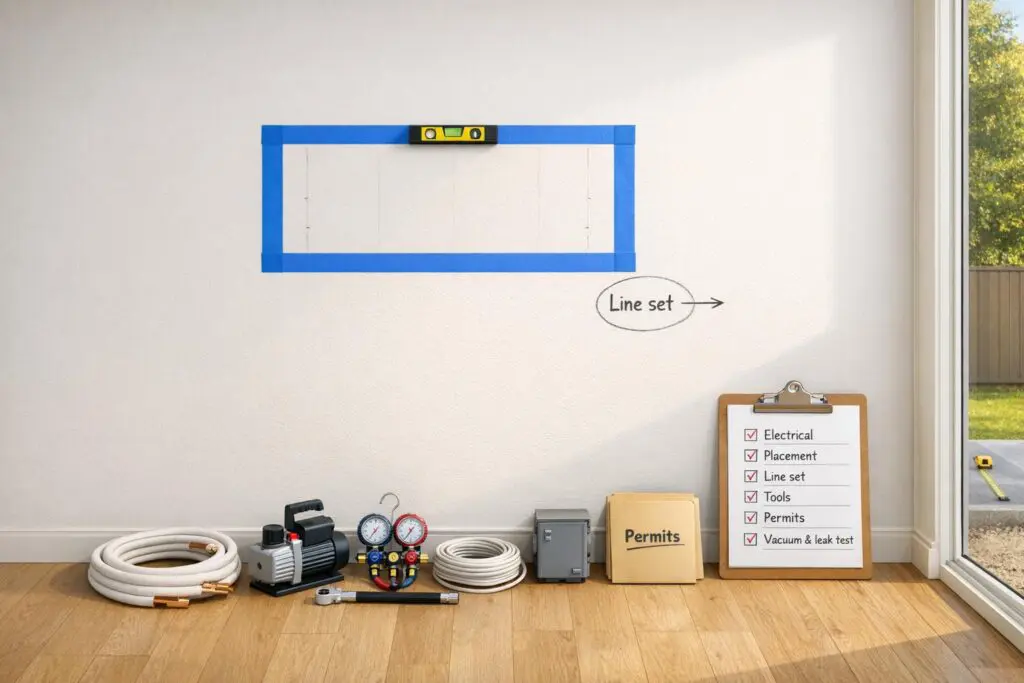
Plan Line Set and Drainage Routes
To connect the indoor and outdoor units, map out a direct route for the line set, drain hose, and wiring. Keep refrigerant line bends to a minimum to reduce resistance and ensure smooth operation. For proper drainage, the drain line should slope at least 1/4 inch per foot to prevent water from backing up into the indoor unit.
Protect your system from weather and wear by enclosing refrigerant lines, wiring, and insulation in UV-resistant PVC line set covers. This shields them from sun damage, pests, and the elements. Avoid running lines under gutters or eaves where dripping water could lead to rust or ice buildup. Around the mounting pad, consider using gravel, river rock, or synthetic turf instead of mulch. These materials discourage weeds and help prevent debris from clogging the condenser coils.
sbb-itb-b5c10b1
Tools and Materials Checklist
Before diving into your mini-split installation, make sure you’ve got everything you need. A well-prepared toolkit not only saves time but also ensures a smooth and professional setup.
A vacuum pump is essential for removing air and moisture from the refrigerant lines. The system must be evacuated to 500 microns or lower to avoid acid formation, which could harm the compressor. Pair this with a digital micron gauge for accurate readings to confirm the system is dry.
If you’re working with copper lines, a clutch-type flaring tool is critical for creating precise 45° flares that can handle pressures over 400 psi. A tubing bender prevents kinks that could restrict refrigerant flow, while a pipe cutter and deburring tool ensure clean, smooth cuts. To tighten flare nuts to the correct specifications, use a torque wrench. For example, 1/4-inch nuts require 11–14 ft-lb, and 3/8-inch nuts need 26–30 ft-lb. As Alex Lane from Your Home Comfort Advocate points out:
"A $35 torque wrench used correctly can save a $3,000 system from failure. That’s a good trade".
Here’s what you’ll need to get started:
Required Tools
Your toolkit should include:
- 2.5″–3″ hole saw for wall penetration
- Cordless drill
- Level
- Stud finder
- Multimeter
- Wire strippers
- Clutch-type flaring tool
- Tubing bender
- Pipe cutter
- Deburring tool
- Manifold gauge set compatible with R-410A or R-32 refrigerants
When mounting the indoor unit, ensure it’s fastened to at least two studs for proper stability.
Required Materials
Start with an insulated copper line set to connect the indoor and outdoor units. Use flare nuts for secure connections. You’ll also need:
- Wall brackets, anchors, and screws for mounting the indoor unit
- A leveling pad for the outdoor condenser
- A dedicated 240-volt circuit with a weatherproof disconnect box and the appropriate wiring (e.g., most 12,000 BTU models need a 15-amp breaker with 14 AWG copper wire)
- Condensate drain hose
- PVC wall sleeve
- Weatherproof caulk to seal wall penetrations
- UV-resistant tape and foam insulation sleeves to protect against sun damage and wear
Optional Items
For added convenience and durability, consider these optional items:
- Vibration pads to minimize noise and mechanical strain under the outdoor unit
- A nitrogen tank and regulator for high-pressure leak testing (up to 500 psi) before vacuuming
- Line set cover kits to shield copper lines from UV exposure and pests while improving aesthetics
- A condensate pump for situations where gravity drainage isn’t possible
- Heat tape to prevent freezing in drain lines during colder months
Having these tools and materials ready will set you up for a seamless installation process.
Permits and Testing Preparation
After installing the electrical and mounting components, it’s time to wrap up the final prep work. This includes securing all necessary permits and completing essential testing. Skipping these steps – like rushing through leak checks or ignoring permits – can void warranties and lead to expensive issues down the line.
Review Building Codes and Obtain Permits
In most parts of the U.S., you’ll need to secure the following:
- A mechanical (HVAC) permit and an electrical permit
- Compliance with the International Residential Code (IRC) and International Energy Conservation Code (IECC)
- Permit applications submitted at least one week before installation
- HVAC load calculations based on ACCA Manual J
- A scaled site plan showing where equipment will be installed
- An energy compliance form
- A structural evaluation letter from a licensed architect or engineer if mounting the outdoor unit on a rooftop or truss (required in some cities like Chicago)
- Written approval from your HOA for exterior condenser placement in managed communities
Keep a well-organized job folder with printed specifications, torque records, and vacuum logs. These documents not only demonstrate compliance with safety and warranty standards but also provide proof of proper installation practices. As Mark Callahan from The Furnace Outlet explains:
"U.S. building inspectors and most manufacturers now require installers to record their final micron reading on permit paperwork."
Prepare for Vacuum and Pressure Testing
Before evacuating the system, it’s essential to perform a nitrogen pressure test to ensure the line set is leak-free. Here’s how:
- Pressurize the lines: Connect a nitrogen tank and regulator to your manifold gauge set and pressurize the system to 150 psi.
- Wait and monitor: Let the lines sit for at least 10 minutes to confirm they’re holding pressure.
- Evacuate the system: Attach your vacuum pump using large-diameter, vacuum-rated hoses. Remove the valve cores with a core removal tool to speed things up.
- Pull down to 500 microns or lower: Use a digital micron gauge to measure this. Once achieved, shut off the pump and monitor for at least 10 minutes. A rise of less than 50 microns indicates the system is dry and leak-free.
This vacuum decay test is crucial. Moisture left in the system can form acids that damage the compressor, potentially leading to costly repairs.
Conduct Leak Checks
With the system pressurized using nitrogen, apply a soapy solution to all connections – bubbles will reveal any leaks. Don’t forget to torque all flare nuts to their specified values. For areas that are hard to inspect, try using an electronic leak detector or listen for hissing sounds.
Studies show that 70% to 90% of air conditioner and heat pump systems have at least one fault that impacts performance due to improper installation. Skipping steps like vacuuming or torque checks can also void 10-year compressor warranties from many manufacturers. After confirming there are no leaks and that the micron reading remains steady, document everything. Inspectors may request these records for final approval, and manufacturers often require proof of proper evacuation to validate warranty claims.
Keep all permit applications, vacuum logs, and leak test results on hand to ensure your installation checklist is complete.
Conclusion
Getting ready for a mini-split installation isn’t just about gathering tools – it’s about ensuring your system performs efficiently for years to come. By following the critical pre-installation steps outlined in this checklist, you’re setting yourself up for a system that could lower utility bills by as much as 47%.
Skipping these steps can lead to expensive problems down the line. For instance, neglecting proper drainage planning might result in costly water damage, while failing to vacuum the lines adequately could cut your compressor’s lifespan in half. Careful preparation is key to efficiency, and overlooking even one step can cause setbacks that compromise your system’s performance.
Adhering to code requirements not only protects your system but also preserves your warranty, insurance coverage, and property value. Plus, it can qualify you for federal tax credits and utility rebates. As Mark Callahan explains:
"By securing permits first, you lock in legal compliance, protect insurance coverage, and give future buyers peace of mind that the system is safe and efficient."
For homeowners in the Chicagoland area, Eco Temp HVAC offers professional mini-split installation services. Their certified technicians handle everything – from accurate sizing and electrical work to vacuum testing and permit documentation. As a Mitsubishi Diamond Elite Contractor, they provide a 12-year warranty on Mitsubishi products, giving you added protection and confidence.
This checklist brings together all the essential steps to ensure your system meets safety, performance, and efficiency standards. Whether you’re taking on the installation yourself or hiring professionals, following these guidelines helps avoid mistakes that could impact your system’s safety and longevity. A well-prepared installation ensures reliable comfort for years to come.
FAQs
Do I need permits to install a mini-split?
Yes, you’ll usually need permits for mini-split installations. These permits ensure the installation complies with local building codes and safety standards. To find out the exact requirements in your area, contact your city or county’s building department.
How do I choose the right mini-split breaker and wire size?
To choose the right breaker and wire size for a mini-split system, you need to consider the system’s voltage, BTU rating, and the manufacturer’s guidelines. For 115V systems, a single-pole breaker paired with 12-2 or 10-2 gauge wire is often used. On the other hand, 230V systems typically require a double-pole breaker and thicker wire. Always refer to the product’s data sheet for exact specifications and consult a licensed electrician to ensure everything meets local electrical codes.
When should I hire Eco Temp HVAC instead of doing it myself?
When your HVAC installation involves intricate electrical work, handling refrigerants, or navigating permits and local codes, Eco Temp HVAC is a solid choice. Their certified technicians prioritize safety, efficiency, and compliance with all regulations. Plus, they back their work with warranties, including a 12-year warranty on Mitsubishi products. For complex projects – or if you’re uncertain about your DIY abilities – relying on professionals ensures the job is done right and gives you peace of mind.