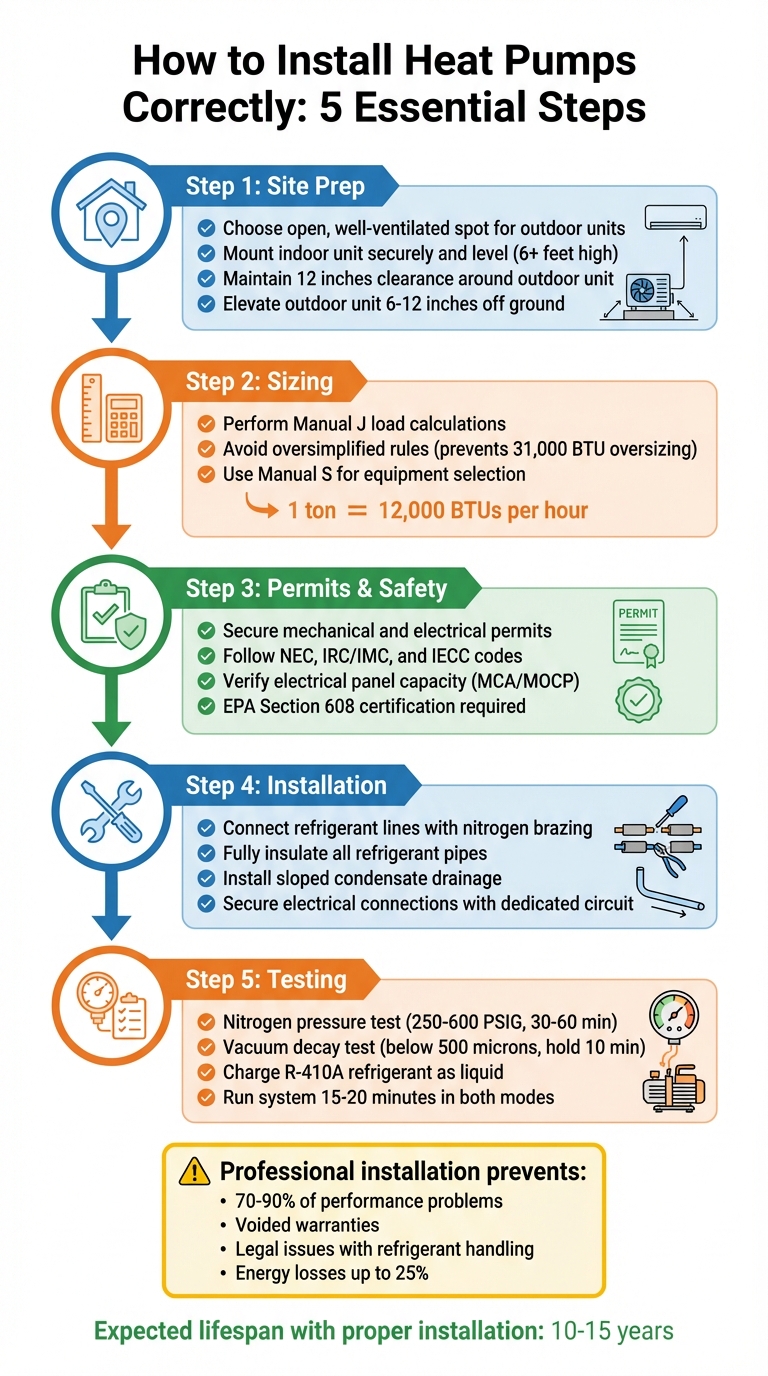
Installing a heat pump demands precision and planning to ensure efficiency, reliability, and long-term performance. Improper installation can lead to higher energy costs, frequent maintenance, and reduced system lifespan. Here’s a quick summary of the key steps:
- Site Prep: Choose an open, well-ventilated spot for outdoor units and ensure the indoor unit is mounted securely and level.
- Sizing: Perform accurate load calculations (Manual J) to avoid over- or undersized systems.
- Permits & Safety: Secure necessary permits and follow local codes for electrical and mechanical work.
- Installation: Properly connect refrigerant lines, electrical wiring, and drainage systems, ensuring all components are sealed and insulated.
- Testing: Conduct leak tests, vacuum decay tests, and performance checks to confirm the system operates as intended.
Professional installation ensures compliance with safety standards, optimal performance, and warranty validity. Attempting DIY setups risks inefficiency, legal issues, and voided warranties. For expert installation, rely on certified technicians who follow established guidelines and prioritize safety.
Heat Pump Installation Process: 5 Essential Steps for Proper Setup
Step-by-Step Heat Pump Installation Guide
Site Survey and Preparation
To ensure your heat pump delivers peak performance right from the start, begin with a thorough site survey and proper preparation of the installation area.
Property Evaluation and Measurements
Start by identifying the best locations for the outdoor condenser and indoor unit. For the outdoor condenser, choose an open area with good air circulation, away from obstructions like bushes, alcoves, or walls that could block airflow. Keep at least 12 inches of clearance around the unit to support ventilation and allow for easy maintenance access.
For ductless indoor systems, mount the unit at least six feet high on the wall, away from direct sunlight, which can interfere with the unit’s temperature sensors. Ensure the mounting surface is stable and secured to wall studs or a solid masonry structure. Additionally, consider the distance between the outdoor unit and your electrical panel – longer refrigerant line runs can complicate installation and increase costs.
If you live in a colder climate, elevate the outdoor unit 6 to 12 inches off the ground to prevent snow from obstructing the coils or drainage. Position it away from prevailing winds to shield the fan and improve efficiency.
Electrical and Plumbing Assessments
Check whether your electrical panel can handle the additional load of a heat pump. You may need a dedicated circuit or even a panel upgrade. Tanner Dickerson, Owner of Dickerson Services, advises:
"When switching to a heat pump, you’ll likely need bigger high-voltage wires and more wires for the thermostat".
Ensure the installation site can accommodate a dedicated breaker and a local disconnect box, as these are typically required by code for safe power shutoff during maintenance. Plan for the condensate drain line as well – indoor units generate moisture during cooling, and improper leveling of the mounting bracket can cause drainage issues and leaks.
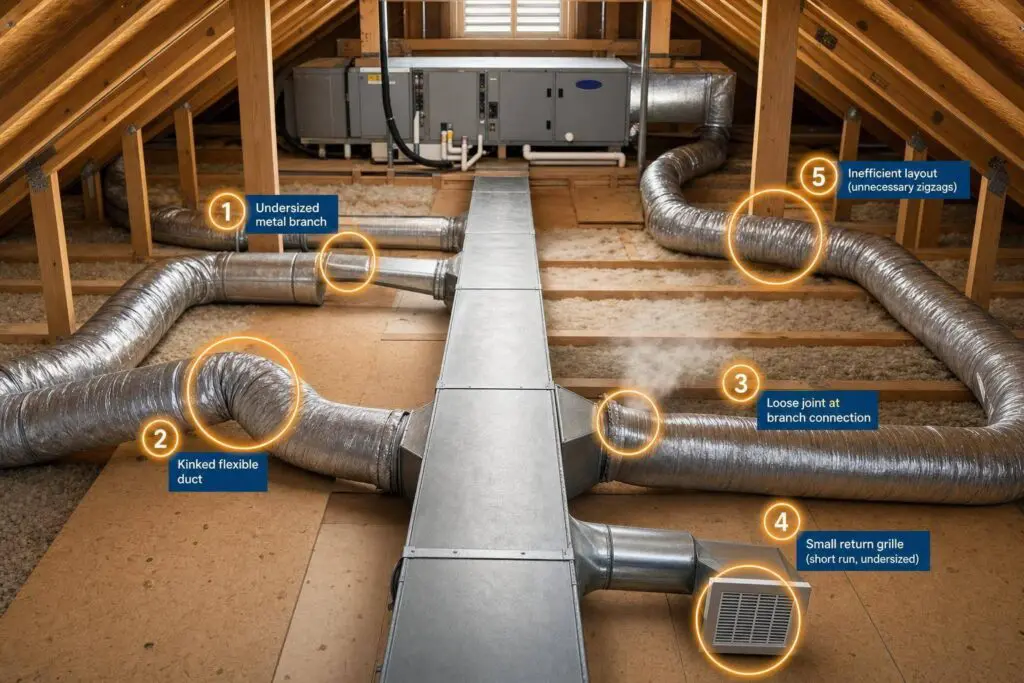
If your home has existing ductwork, inspect it for leaks and confirm it’s properly sized. Heat pumps often require larger ducts than traditional furnaces to maintain efficient airflow. Poorly insulated ducts can also force the system to work harder, reducing efficiency.
Clearing and Preparing the Installation Area
Prepare the outdoor area by clearing away debris, vegetation, dust, and pollen. Ensure the ground is level and install a stable base – such as a cement, composite, or concrete pad – to keep the unit elevated and protected from dirt and standing water. A gravel base can also work as an alternative.
For ductless systems, locate wall studs to securely mount the indoor bracket. You’ll also need to drill a 2-3 inch hole through the exterior wall to route refrigerant pipes, drainage lines, and control wiring. If you’re replacing an old system, safely recover the refrigerant before disconnecting wires, copper lines, and ductwork to clear the area for the new equipment.
Once the site is fully prepared, you’ll be ready to move on to selecting the right system size and equipment for your needs.
System Sizing and Equipment Selection
Choosing the right size heat pump is crucial for both energy efficiency and maintaining comfort. Once the optimal setup is in place, accurate load calculations and thoughtful equipment selection become the foundation of a successful installation.
Performing Load Calculations
To determine the exact heating and cooling needs of your home, professionals rely on the Manual J load calculation, a standard developed by the Air Conditioning Contractors of America (ACCA). This method considers several factors, including square footage, ceiling height, insulation R-values, window types and orientation, air leakage rates, local climate extremes, ductwork location, and even the heat generated by occupants and appliances.
Forget about oversimplified rules like "one ton per 500 square feet" or "30 BTUs per square foot." These shortcuts can lead to oversizing by about 31,000 BTUs, which results in inefficient performance and can shorten the lifespan of your equipment.
For a more precise assessment, a blower door test is recommended. This test measures your home’s actual air leakage, either in air changes per hour (ACH) or cubic feet per minute (CFM). The results are then integrated into the Manual J calculation, eliminating the need for guesswork. After completing the load calculation, the installer should use Manual S sizing to select equipment that aligns perfectly with your home’s heating and cooling demands, avoiding the pitfalls of over- or undersizing.
Keep in mind that one "ton" of capacity equals 12,000 BTUs per hour. ACCA guidelines allow for a system to be slightly undersized – up to 10% – as long as it can still handle your local climate’s extremes. It’s also essential to ensure the calculation uses your area’s "1% coldest" and "1% hottest" design temperatures, not annual averages. This approach ensures the system will perform reliably during extreme weather events.
With these precise calculations, you’re ready to choose equipment that fits the bill.
Choosing the Right Heat Pump Type
Once you’ve identified the required capacity, the next step is to select the heat pump type that aligns with your home’s setup and your comfort goals. Ducted systems work well with existing ductwork, while ductless mini-split systems are ideal for homes without ducts, room additions, or when creating separate temperature zones.
In colder climates, standard air-source heat pumps tend to lose efficiency. For such regions, opt for a cold-climate heat pump equipped with a variable-speed compressor that can retain at least 70% of its heating capacity at 5°F. Curtis Hercenbach, owner of Herchenbach Mechanical, advises:
"Consider a one-stage heat pump when you’re looking for the best option for your budget, two stages to get humidity removal and five stages for maximum comfort".
Variable-speed (multi-stage) units adjust their output to maintain steady temperatures and better humidity control, while single-stage units operate at full capacity or shut off entirely. This on-off cycling can lead to temperature fluctuations and short-cycling if the system is oversized. Before making your final decision, confirm that your electrical panel can handle the additional load. In some cases, a dedicated circuit or panel upgrade may be necessary.
Permits, Safety, and Pre-Installation Checks
Before your equipment even arrives, it’s crucial to secure all necessary permits and ensure safety compliance. This not only safeguards your investment but also keeps your warranty intact and helps you avoid expensive callbacks. As Rene Langer, Senior Comfort Specialist at PICKHVAC, puts it:
"Meeting requirements protects safety, comfort, and warranties. It also unlocks rebates and prevents costly callbacks."
Here’s what you need to know about obtaining permits and conducting safety checks for a smooth, compliant installation.
Obtaining Permits and Inspections
Most areas require a mechanical permit and an electrical permit for work involving circuit modifications or panel upgrades. For outdoor or roof-mounted units, you might also need zoning or structural permits.
When applying for permits, be prepared to provide details like model numbers, tonnage ratings, and equipment locations. Many jurisdictions also require supporting documents, such as:
- ACCA Manual J load calculation
- Manual S equipment selection report
- Manual D duct design
If you live in a condominium, you may need a signed approval letter from your association.
Inspections typically happen in two stages. The rough-in inspection checks new wiring, ductwork, or line sets, while the final inspection ensures everything complies with codes and the system operates correctly. Always confirm with your local Authority Having Jurisdiction (AHJ) to understand which codes and amendments apply in your area.
Safety Preparations and Compliance
Your installation must meet various codes to ensure safety and efficiency. Key codes include:
- National Electrical Code (NEC/NFPA 70): Covers wiring and requires a disconnect switch within sight of the unit (NEC 440.14) and a 125-volt service receptacle within 25 feet of the equipment (NEC 210.63).
- International Residential/Mechanical Code (IRC/IMC): Focuses on proper placement and access.
- International Energy Conservation Code (IECC): Sets efficiency standards.
Before starting, confirm that your electrical panel can handle the unit’s Minimum Circuit Ampacity (MCA) and that the breaker doesn’t exceed the Maximum Overcurrent Protection (MOCP) listed on the unit’s nameplate.
If your system uses newer A2L refrigerants like R-32 or R-454B, which are considered "mildly flammable", you’ll need A2L-rated tools and must follow UL 60335-2-40 safety standards. Additionally, any technician working with refrigerants must have EPA Section 608 certification.
Finally, archive essential documents – like AHRI certificates, Manual J/S/D reports, and commissioning data (airflow, pressure, vacuum levels) – to streamline inspections and rebate applications.
Installing the Heat Pump
Once you’ve secured the necessary permits and completed all safety checks, it’s time to install the heat pump. A proper installation is critical to avoid common issues that could hurt the system’s performance. With accurate placement and secure connections, the system can then move on to electrical integration and commissioning.
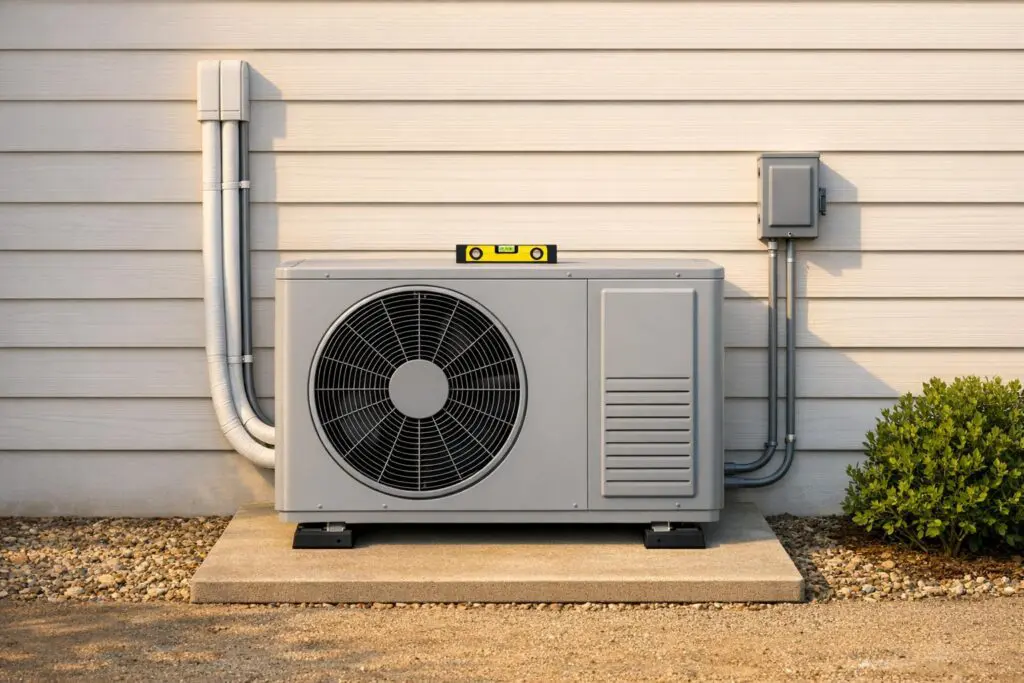
Outdoor Unit Placement
Start by positioning the outdoor unit on your prepared site. To create a stable foundation, use a concrete or composite pad, or a gravel base if the ground is uneven. Make sure to elevate the heat pump 6-12 inches above the pad. This clearance helps with proper drainage during defrost cycles and ensures the coils stay free from snow and ice.
Choose an open area with good air circulation for the unit. Avoid placing it near bushes, walls, or alcoves that could block airflow. If possible, position it to face away from prevailing winds to reduce strain on the fan motor. Keep it at least a couple of feet away from driveways and away from doors or windows for safety and noise reduction.
Secure the unit to the pad using the mounting hardware specified by the manufacturer. This prevents unwanted vibration or movement. Additionally, install a service disconnect box nearby. This not only ensures safe power shutoff during maintenance but also complies with NEC requirements.
Indoor Unit Installation
Once the outdoor unit is in place, the focus shifts to the indoor components. For ductless systems, mount the air handler at least six feet high on an interior wall. This height promotes optimal air distribution throughout the room. Avoid placing the unit in direct sunlight, as this can interfere with temperature sensors and lead to inaccurate readings.
Keep the indoor unit away from windows and doors to avoid drafts that could affect its operation. Ensure there’s enough clearance – typically several inches on all sides – so maintenance panels can open easily and air can flow freely.
When mounting the bracket, ensure it’s perfectly level. Even a slight tilt can disrupt gravity-fed condensate drainage, potentially causing water to back up and damage walls or flooring.
Connecting Refrigerant Lines and Drainage
To connect the refrigerant lines, drainage, and wiring, drill a 2-3 inch hole through the exterior wall. Carefully measure, cut, and deburr the copper tubing to avoid debris entering the system.
For brazing joints, maintain a low-pressure flow of dry nitrogen during the process. According to Reedie Ward from Comfort Services:
"Braze the line set and filter drier with nitrogen flowing through the lines at a low pressure so no carbon deposits or scale gets in the line set and clogs the filter drier or the metering device."
Fully insulate the refrigerant pipes along their entire length to preserve thermal efficiency and prevent external condensation. Seal the wall penetration with weatherproofing materials, such as spray foam, to keep out pests and moisture.
Install the condensate line with a slight slope to ensure proper drainage. Test the drainage by pouring water into the pan to confirm smooth flow.
| Component | Installation Requirement | Why It Matters |
|---|---|---|
| Outdoor Unit | Elevated 6-12 inches on level pad | Prevents snow blockage, allows defrost drainage |
| Indoor Unit | Mounted 6+ feet high, level bracket | Optimizes air distribution, ensures gravity drainage |
| Refrigerant Lines | Deburred copper, nitrogen-brazed, fully insulated | Prevents clogs, maintains efficiency, stops condensation |
| Drainage | Sloped condensate line, flow-tested | Prevents water backup and structural damage |
sbb-itb-b5c10b1
Electrical Connections and System Commissioning
Connecting the electrical components and commissioning the system must be done with strict adherence to safety protocols.
Making Electrical Connections
A licensed electrician should handle the connection of the outdoor unit to the main electrical panel. This requires a dedicated circuit and a nearby service disconnect box, in compliance with the National Electrical Code (NEC). Low-voltage 24V control wiring is used to link the indoor unit, outdoor unit, reversing valve, and sensors. A flexible conduit, commonly referred to as a whip, carries power from the disconnect box to the heat pump. As Fire & Ice points out:
"Good HVAC companies replace the disconnect and the whip when replacing a heat pump, to ensure system safety."
To ensure everything is properly set up, use a voltmeter to verify all connections match the manufacturer’s wiring diagram and confirm correct polarity. Proper grounding of both the indoor and outdoor units is critical to avoid electrical shocks or fire hazards.
Once the electrical connections are secure, the next step is refrigerant charging to finalize the system setup.
Refrigerant Charging and Adjustment
Before adding refrigerant, it’s essential to conduct a nitrogen pressure test. Pressurize the lines with dry nitrogen to a range of 250 to 600 PSIG and hold this pressure for 30 to 60 minutes to check for leaks. Following this, perform a vacuum decay test by evacuating the system to below 500 microns – ideally between 100 and 200 microns – and hold it for at least 10 minutes. The system passes if the vacuum level rises by less than 50 microns.
For systems using R-410A refrigerant, charging must be done in the liquid phase by inverting the tank. As noted by AboveAir Technologies:
"R-410A must be charged as a liquid. Charging as a gas may result in refrigerant separation and improper unit operation."
The weigh-in method is recommended for initial installations. This involves adding the factory-specified refrigerant charge and accounting for any additional refrigerant based on the length of the line set. Always purge charging hoses before connecting them to avoid introducing air or moisture into the system. Add refrigerant gradually, pausing between additions to protect the compressor from damage.
Once refrigerant levels are confirmed, proceed to test the system and verify its performance.
Testing and Commissioning the System
Power on the system and allow it to run in both heating and cooling modes for 15–20 minutes to stabilize pressures. Check that the thermostat communicates properly and that backup heat sources activate only when the temperature drops below the designated balance point.
For ducted systems, measure the Total External Static Pressure (TESP) by drilling pressure taps on both the supply and return sides. This ensures the system is operating within the manufacturer’s specifications. Use flow grids or flow hoods to confirm the airflow matches the designed volume. Pay attention to any unusual noises or vibrations, as these could indicate loose components or issues with the refrigerant lines. Finally, seal all drilled pressure taps with rubber plugs to prevent air leaks.
Post-Installation Verification and Maintenance Tips
Performance Testing and Final Checks
Once the commissioning checks are complete, it’s time to run final performance tests to ensure everything meets installation standards. Studies show that 70% to 90% of heat pump systems encounter performance problems due to poor installation or lack of maintenance. When duct leakage is factored in, this rate can climb as high as 90% to 100%. Proper installation isn’t just a technicality – it directly impacts energy efficiency and system performance.
During the first few weeks of operation, keep an eye out for warning signs. These might include uneven heating or cooling across rooms, frequent cycling on and off, unusual noises or vibrations, or unexpectedly high energy bills. Other red flags include ice forming on the outdoor unit during mild weather or a thermostat that doesn’t match the actual room temperature. Addressing these issues early can prevent more significant problems down the line.
Energy losses in heat pumps often stem from common faults. For example, a 15% reduction in airflow or a 20% refrigerant undercharge can significantly waste energy. Research highlights that duct leakage accounts for about 15% of energy loss, while improper refrigerant levels and inadequate airflow contribute 4% and 3%, respectively.
Once you’re confident in the system’s initial performance, regular maintenance becomes essential to keep it running efficiently.
Routine Maintenance Advice
After confirming your heat pump is performing well, follow a consistent maintenance routine to ensure long-term efficiency. Start with the filters: clean or replace standard 1-inch pleated filters monthly, while thicker 4-inch or 5-inch filters can last up to six months. Dirty filters restrict airflow, forcing the system to work harder and putting extra strain on components like the compressor and fan motors.
For the outdoor unit, maintain at least 18 inches of clearance around it to allow proper airflow. In winter, keep the unit clear of snow and ice. A few times a year, turn off the power and gently rinse the outdoor coils with a garden hose to remove debris like dust and pollen. Don’t forget to flush the condensate drain line periodically – use 1/4 cup of bleach or vinegar, followed by 2 cups of water, to prevent clogs.
Professional servicing is another critical step. Schedule a check-up at least once a year, ideally in spring and fall. A well-maintained heat pump can use 10% to 25% less energy compared to a neglected one. As Energy.gov explains:
"The difference between the energy consumption of a well-maintained heat pump and a severely neglected one can range from 10% to 25%"
Annual tune-ups typically cost between $75 and $150 and include inspections of key components like blowers, coils, electric terminals, refrigerant levels, and ductwork. With proper installation and consistent upkeep, a heat pump can deliver efficient performance and last 10 to 15 years.
Eco Temp HVAC Services
Eco Temp HVAC offers expert heat pump installation services across the Chicagoland area, backed by factory-certified training. As a Mitsubishi Diamond Elite Contractor, their technicians follow advanced training and rigorous installation standards. This certification also provides customers with an exclusive 12-year parts warranty on Mitsubishi products – far exceeding standard manufacturer warranties.
Their team of NATE-certified technicians specializes in cold-climate heat pumps, an essential feature for Chicago’s harsh winters. Eco Temp HVAC installs systems from top-tier brands like Mitsubishi Hyper-Heating, Daikin Aurora, Carrier, and Trane, ensuring dependable performance even in sub-zero temperatures. To maintain high standards, all contractors undergo background checks and random drug testing. The company also boasts an A+ rating from the Better Business Bureau, a distinction achieved by only about 2% of HVAC providers.
For added convenience, Eco Temp HVAC provides 24/7 emergency repair services, detailed maintenance plans with biannual tune-ups, and guidance on securing financial incentives. These include federal tax credits of up to $2,000 under the Inflation Reduction Act and local ComEd rebates. They serve a wide range of areas, including Chicago, St. Charles, Bartlett, Lemont, Downers Grove, Palatine, Naperville, and Glenview, with most service calls answered in under 30 minutes.
Every service comes with a straightforward 100% money-back guarantee and a two-year protection plan. As Eco Temp HVAC puts it:
"You will get our trained pre-screened contractors and a two-year money-back guarantee on all services. Unlike other organizations with lengthy hidden terms and conditions, ours is straightforward".
Customers can expect transparent pricing with no hidden fees and financing options designed to fit a range of budgets.
Conclusion
Installing a heat pump the right way involves more than just setting up the unit – it requires a thorough site evaluation, precise load calculations, strategic placement, and comprehensive system testing. Skipping these steps can lead to higher energy costs, less comfort, and a shorter lifespan for your system.
This is why professional expertise is so important. Tasks like handling high-voltage connections, nitrogen brazing refrigerant lines, and conducting vacuum decay tests below 500 microns aren’t things you can learn overnight. These require specialized training and EPA certification. Professional installation ensures your system is properly sized, meets local code requirements, and stays eligible for warranty coverage. Attempting a DIY installation isn’t just unsafe – it can also be against the law. Releasing refrigerants into the atmosphere violates federal regulations, and manufacturers usually void warranties if the installation is done by someone unlicensed.
Eco Temp HVAC’s certified technicians follow every step meticulously, from performing load calculations and securing permits to commissioning the system and educating homeowners. Their commitment to quality is backed by a customer satisfaction guarantee.
If you’re ready to have your heat pump installed correctly, reach out to Eco Temp HVAC. Visit their website at https://ecotemphvac.com or call their 24/7 service line to book an in-home consultation with a certified technician in the Chicagoland area. Let the professionals handle it!
FAQs
What should I consider when deciding where to install a heat pump?
Choosing where to place your heat pump is a big deal if you want it to work efficiently, last longer, and keep your home comfortable. Here’s what you need to consider:
- Space and airflow: The outdoor unit needs room to breathe – leave at least 1–2 feet of clearance on all sides to ensure proper ventilation. Avoid cramped or enclosed spots like attics that could block airflow.
- Noise and proximity: To keep things quiet, position the unit away from bedrooms, living spaces, or your neighbor’s property. For indoor units, pick a location where the noise won’t interfere with daily life.
- Weather protection: Choose a spot that’s shielded from harsh weather like strong winds, heavy snow, or direct sunlight. Make sure there’s good drainage to prevent water buildup, and steer clear of frost-prone areas.
Finally, set the unit on a level, sturdy surface and double-check that everything aligns with local building codes. A well-thought-out placement can make all the difference in how well your heat pump performs over time.
Why is it necessary to perform a Manual J load calculation before installing a heat pump?
Performing a Manual J load calculation is a key step in ensuring your heat pump is the right size for your home. This calculation determines the exact heating and cooling capacity your space requires, measured in BTU/hr or tons. Getting this right means striking the perfect balance between efficiency, comfort, and the longevity of your system.
If your heat pump is too small, it will struggle to keep your home comfortable during extreme weather, leading to higher energy bills and unnecessary wear and tear. On the flip side, an oversized unit will frequently turn on and off, which not only wastes energy but also shortens the system’s lifespan and reduces overall comfort. Sizing your heat pump correctly helps maintain efficiency, ensures consistent performance, and protects your investment by minimizing the chances of costly repairs or early replacement.
A Manual J calculation considers important details like your home’s size, insulation, window area, local climate, and how many people live there. This ensures your heat pump runs efficiently while keeping your energy costs under control.
What happens if a heat pump is not installed correctly?
Improperly installing a heat pump can seriously impact its performance. You might end up with higher energy bills and uneven heating or cooling throughout your home. Plus, the added strain on the system can lead to frequent breakdowns or even cause vital components to fail earlier than expected.
To keep your heat pump running efficiently and extend its lifespan, having it installed by certified professionals is crucial. For those living in the Chicagoland area, Eco Temp HVAC provides expert installation services, prioritizing energy efficiency and dependable performance.