Choosing the right HVAC system like wall-mounted or ceiling-mounted mini splits depends on your space, budget, and preferences. Wall-mounted units are cost-effective and easier to install, making them ideal for smaller rooms like bedrooms or offices. Ceiling cassettes, while more expensive and complex to install, offer 360° air distribution, making them better suited for large, open spaces. Here’s a quick breakdown:
- Wall-Mounted Units:
- Cost: $3,000–$4,500
- Installation: Simple, takes about half a day
- Airflow: One-directional, good for smaller rooms
- Maintenance: Easy, no ladder required
- Ceiling-Mounted Units:
- Cost: $4,500–$6,500
- Installation: Complex, may require structural adjustments
- Airflow: 360°, ideal for large, open areas
- Maintenance: Requires a ladder or professional help
Key Tip: Wall-mounted units are better for quick, budget-friendly installations, while ceiling cassettes provide more even cooling for larger spaces. Always hire a professional installer to ensure proper setup and maintain your warranty.
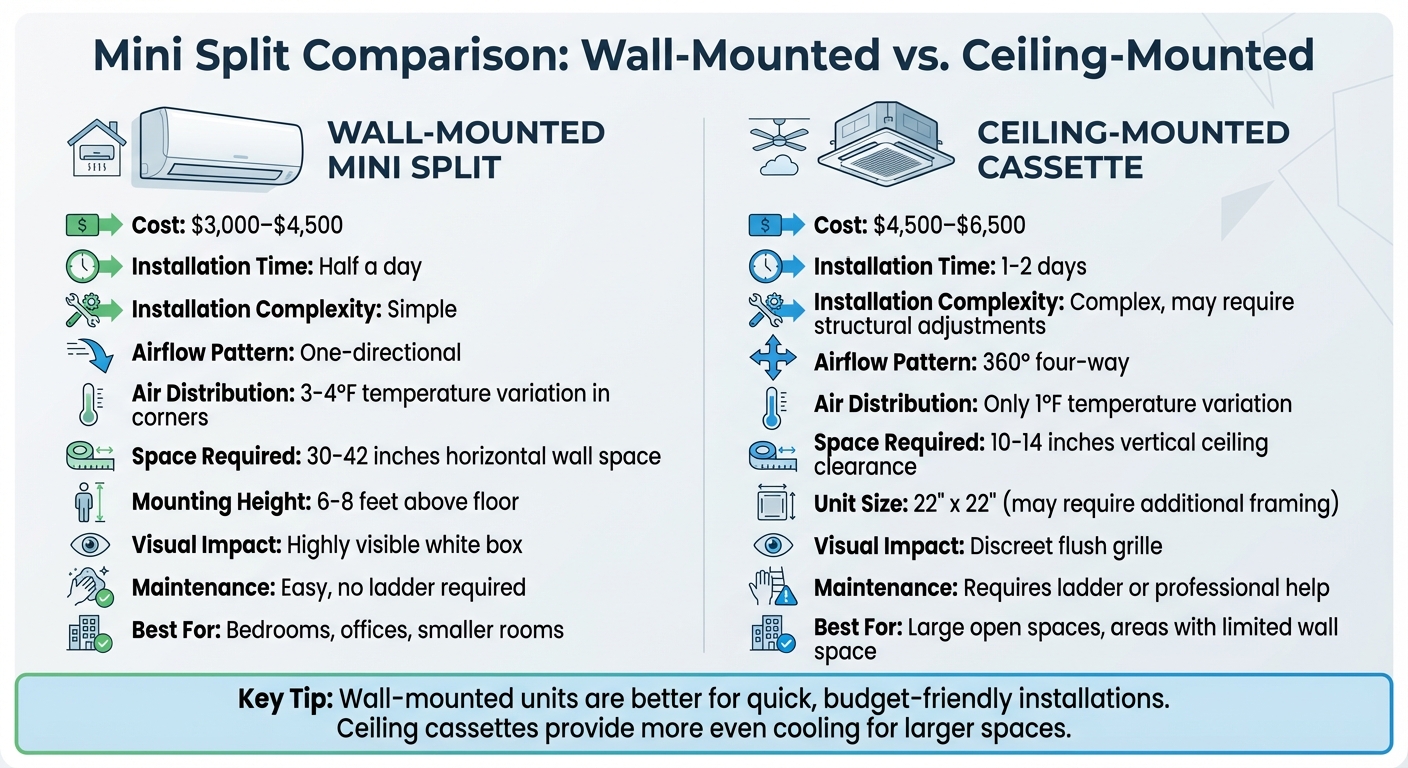
Wall-Mounted vs Ceiling-Mounted Mini Split Comparison Chart
Wall-Mounted vs. Ceiling-Mounted Mini Splits: Side-by-Side Comparison
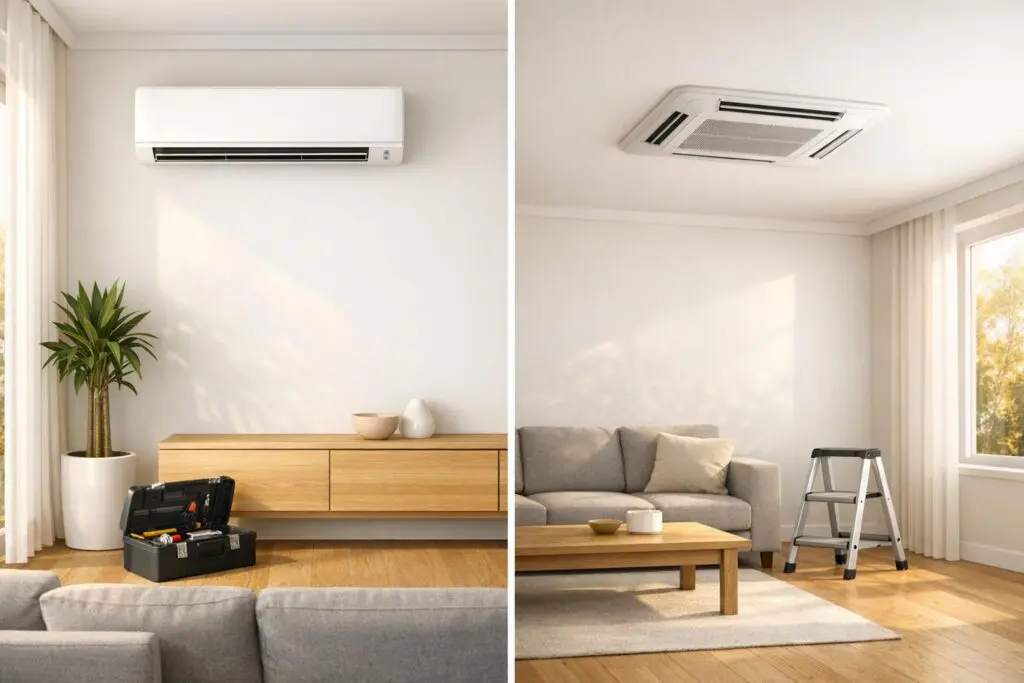
Aesthetics and Space Requirements
Wall-mounted units are easy to spot – they look like white rectangular boxes mounted on a wall. They typically need 30 to 42 inches of horizontal space and are installed 6 to 8 feet above the floor. Installation requires drilling a single 3-inch hole through the exterior wall to run refrigerant lines and wiring.
Ceiling cassettes, however, blend into the ceiling, with only a flush-mounted grille visible. They need 10 to 14 inches of vertical clearance in the ceiling cavity [8, 11]. Since these units are often square (about 22″ by 22″), they may not fit between standard 16″-on-center joists, which could mean additional framing work.
"Wall units rise up like sturdy picture frames… Cassettes recess so the grille is nearly flush, much like a supply register on steroids." – Mark Callahan
Wall-mounted units are a great choice for spaces like bedrooms or offices, where convenience is key. For example, cleaning the filters takes just five minutes and doesn’t require a ladder. On the other hand, ceiling cassettes shine in open kitchens, living rooms, or areas with limited wall space – perfect for those seeking a more seamless look [6, 9].
Performance and Air Distribution
The way these systems circulate air is a big differentiator. Wall-mounted units push air in one direction, making them a good fit for smaller rooms like a 12-by-15-foot bedroom. However, in larger spaces, you might notice temperature differences of 3 to 4°F in the far corners.
Ceiling cassettes, by contrast, distribute air in all directions (360°) from a central point. This even airflow keeps temperatures consistent, with only about a 1°F variation, even in large, open rooms measuring 25×30 feet. Both systems use the same outdoor compressors, so their energy efficiency ratings (SEER2) are comparable when matched for BTU output.
"Ceiling cassettes fire air in four directions simultaneously, evenly mixing the entire volume and reducing temperature swings to approximately 1°F." – Mark Callahan, The Furnace Outlet
These differences in air distribution can significantly influence comfort in various room layouts.
Installation and Maintenance Costs
When it comes to costs and ease of installation, wall-mounted units have the edge. They typically cost between $3,000 and $4,500 in the U.S. and can be installed in about half a day.
Ceiling cassettes are more expensive, ranging from $4,500 to $6,500. Their installation is more complex, often requiring cutting a square hole in the drywall, reinforcing ceiling joists, and running lines through attic or ceiling spaces. This extra work can increase labor costs by 40–60% compared to wall-mounted units.
"Cassettes take longer: the installer must cut out a square in the drywall, reinforce joists if needed, and snake lines through an attic or ceiling cavity. That extra work can push labor costs 40–60% higher." – The Furnace Outlet
Maintenance access is another factor to consider. Wall-mounted units are easy to maintain – no ladder needed for filter cleaning. Ceiling cassettes, on the other hand, require a ladder or professional help for routine upkeep.
| Feature | Wall-Mounted Mini Split | Ceiling-Mounted Cassette |
|---|---|---|
| Visual Impact | Highly visible white box | Discreet flush grille |
| Space Required | 30″–42″ horizontal wall space | 10″–14″ vertical ceiling clearance |
| Air Distribution | One-way directional flow | 360° four-way flow |
| Installation Cost | $3,000–$4,500 | $4,500–$6,500 |
| Installation Time | Approximately half a day | 1–2 days (with framing) |
| Maintenance Access | Easy; no ladder required | Requires ladder |
| Best For | Bedrooms, offices | Large open spaces |
sbb-itb-b5c10b1
Tools and Preparation for Installation
Required Tools for Installation
To install both wall-mounted and ceiling-mounted systems, you’ll need a few key tools: a power drill, 3-inch hole saw, torpedo level, stud finder, adjustable wrenches, wire strippers, and a torque wrench for securing refrigerant line connections properly. The torque wrench is particularly important for ensuring precise tightening:
"A $35 torque wrench used correctly can save a $3,000 system from failure." – Alex Lane, Your Home Comfort Advocate, The Furnace Outlet
If you’re not using a pre-charged DIY kit, you’ll also need HVAC-specific tools like a vacuum pump, manifold pressure gauges, nitrogen for pressure testing, and a flaring tool for working with refrigerant lines. Industry guidelines recommend achieving a deep vacuum of 500 microns or less to remove all moisture and non-condensable gases. Additionally, a PVC pipe cutter is essential for trimming condensate drain lines, which need to slope downward at an angle of 5–10° for proper drainage.
For ceiling-mounted systems, additional gear is necessary. You’ll require rafter spacers to support the unit’s weight, tools to access attic spaces, and specialized hardware for suspending units from drop ceilings. In contrast, wall-mounted units are simpler, needing only a standard mounting bracket, hollow drywall anchors, and masonry screws if you’re attaching to brick or stone surfaces.
Once your tools are assembled, the next step is to focus on pre-installation planning.
Pre-Installation Planning
With your tools ready, it’s time to map out the installation process. Start by measuring the room’s dimensions and choosing a system that delivers around 20 BTUs per square foot to avoid issues like improper cycling.
For wall-mounted units, position them on an exterior wall, 6–7 feet above the floor, to allow for efficient condensate drainage. Make sure at least one side of the mounting bracket is secured into a wall stud to handle the unit’s weight. Avoid placing the unit near direct sunlight, heat sources (like stoves or fireplaces), or electronics that might interfere with the temperature sensors.
For ceiling-mounted units, check that the ceiling structure can accommodate the cassette’s dimensions – typically 24×24 or 36×36 inches – and its required clearance of 10–14 inches. Be prepared to add framing if necessary. Before drilling, confirm that there are no hidden wires, pipes, or ductwork in the walls or ceiling.
Electrical preparation is another critical step. Hiring a licensed electrician to install a dedicated 220V (or 120V, depending on your model) circuit will cost between $250 and $1,000, as required by NEC standards. Use a multimeter and voltage tester to verify electrical safety. For the outdoor condenser, ensure proper clearances: at least 28 inches at the front, 12 inches at the rear, and 40 inches of unobstructed space above.
Installation Instructions
How to Install a Wall-Mounted Mini Split
Start by attaching the mounting bracket to the exterior wall. Use a stud finder to locate a secure spot and a level to ensure the bracket is straight – this is crucial for proper condensate drainage. The indoor unit should be positioned 6–8 feet above the floor, with at least one side of the bracket secured to a wall stud for stability.
Next, drill a 2- to 3-inch hole through the wall at a slight downward angle (5–10 degrees) toward the outside. This angle helps ensure gravity-fed drainage. Bundle the refrigerant lines, control wiring, and condensate drain tube together with electrical tape, keeping the drain tube at the bottom to avoid kinks or blockages.
Feed the bundled lines through the hole and carefully hang the indoor unit on its bracket. Outside, connect the refrigerant lines to the outdoor condenser using a torque wrench. Be cautious not to over-tighten or leave the connections too loose. Most systems require a dedicated 208/240V circuit, which should run from your breaker panel to an outdoor disconnect box.
Before powering up the system, vacuum it down to 500 microns or less to remove any moisture or air. Check for leaks, then release the pre-charged refrigerant. Keep in mind that many manufacturers, including Mitsubishi and Daikin, require a certified technician to handle the final refrigerant charging and system commissioning to maintain warranty coverage.
How to Install a Ceiling-Mounted Mini Split
Ceiling-mounted units follow a similar process but come with additional structural considerations. Use a stud finder to locate ceiling joists capable of supporting the unit. If necessary, add extra framing to ensure stability.
Cut the ceiling opening according to the manufacturer’s template, then securely attach suspension brackets to the joists. Make sure the unit is level and maintain a minimum clearance of 6 inches on all sides, and at least 3 feet away from electronics. Drill a wall hole at a 5–10 degree downward angle, and bundle the refrigerant lines, control wiring, and drain tube together, ensuring the drain tube remains at the bottom.
Run the bundled lines from the ceiling unit through the wall to the outdoor condenser. Seal the wall hole with weather-resistant sealant to prevent leaks. Connect the lines to the outdoor unit, using the correct torque specifications to secure the connections. Vacuum the system to 500 microns or less before releasing the refrigerant.
Finally, fit the cassette into the ceiling opening and attach it to the suspension brackets. After the installation is complete, have a certified professional commission the system to verify functionality and preserve the warranty. Perform final checks to ensure everything is running smoothly.
Summary and Recommendations
How to Choose the Right Mini Split
Deciding between wall-mounted and ceiling-mounted mini split units depends on your room’s layout, your budget, and the overall look you want. Wall-mounted units are a great fit for smaller spaces like bedrooms or home offices. They’re quick to install, cost-effective, and easy to maintain. Plus, they only need a small 3-inch hole in the wall, making the process faster and less invasive.
On the other hand, ceiling cassettes are perfect for larger, open-concept areas or rooms where wall space is limited by windows or decorations. Their 360° airflow minimizes temperature differences, keeping variations as low as 1°F across the room. Comparatively, wall-mounted units can leave far corners with 3–4°F fluctuations. However, before choosing a ceiling cassette, make sure your ceiling has enough vertical clearance to accommodate the unit.
Once you’ve selected the best unit for your space, the next step is ensuring proper installation.
Why Hire a Professional Installer
Proper installation is critical for your mini split system to operate effectively, which is why hiring a professional is non-negotiable. Many leading manufacturers – like Mitsubishi, Fujitsu, and Daikin – require certified technicians for installation to keep their warranties valid. Additionally, federal EPA regulations mandate licensing for anyone handling refrigerants.
Certified installers not only ensure your warranty remains intact but also follow manufacturer guidelines to the letter. For example, Eco Temp HVAC is a Mitsubishi Diamond Elite Contractor, allowing them to offer an extended 12-year warranty on Mitsubishi products. Their technicians handle everything from Manual J load calculations to ensure proper sizing to addressing structural needs for ceiling cassettes. With 24/7 service across Chicagoland – including areas like Chicago, St. Charles, Bartlett, Lemont, Downers Grove, and Palatine – they provide reliable, expert installation and maintenance.
Final Thoughts
Wall-mounted units are ideal for straightforward, budget-friendly solutions, while ceiling cassettes deliver better airflow in larger or more open spaces. Following proper installation procedures is essential to ensure your system works efficiently and lasts for years. For professional installation and expert support, reach out to Eco Temp HVAC. They’ll help you get the most out of your mini split system.
Mini-Split Installation For Dummies – Complete Step By Step Guide.
FAQs
Do I have enough ceiling clearance for a cassette?
To set up a cassette mini-split, make sure there’s 10–12 inches of clearance above the ceiling. This space is crucial for accommodating structural support, refrigerant lines, and proper airflow. If your joist spacing doesn’t naturally allow for this clearance, you might need to do extra framing work – like cutting a joist or constructing a support box. Always measure the area above your ceiling beforehand to ensure it meets these requirements.
Will a ceiling cassette reduce hot and cold spots?
Ceiling cassette units are great for tackling hot and cold spots in a room. They provide efficient multi-zone cooling and ensure better airflow distribution. Thanks to their design, they help maintain a more consistent temperature throughout the space, offering a comfortable and balanced environment.
Can I install a mini split myself without voiding the warranty?
Installing a mini split on your own might seem tempting, but it comes with risks. Most manufacturers insist on professional installation to maintain the warranty. Attempting a DIY installation could result in problems like refrigerant leaks, electrical issues, or reduced system efficiency, which might void the warranty altogether. Even if you opt for a system designed for DIY installation, it’s essential to stick closely to the manufacturer’s instructions. In some cases, bringing in a professional can help prevent costly mistakes and ensure your system operates as intended while keeping the warranty intact.