Installing an HVAC system? Electrical problems are more common than you think – and they can lead to higher bills, equipment damage, or even safety risks. Here are the five most frequent issues to watch out for:
- Incorrect Circuit Breaker Sizing: Using the wrong breaker size can cause overheating, frequent trips, or even fires. Always match the breaker to the HVAC unit’s nameplate specifications.
- Faulty or Undersized Wiring: Reusing old or undersized wires can lead to overheating, system failures, and increased energy costs. Verify wire gauge compatibility with the unit’s requirements.
- Improper Grounding Connections: Poor grounding increases the risk of shocks, equipment damage, and fire hazards. Ensure all components are properly bonded and grounded.
- Loose or Incorrect Wire Terminations: Loose connections create heat and resistance, leading to potential fires or system inefficiencies. Proper torque and regular maintenance can prevent this.
- Inadequate Disconnect Switch Installation: Missing or poorly installed switches compromise safety and violate codes. The switch must be accessible, weatherproof, and correctly rated.
Quick Tip: Hire certified technicians who follow electrical codes and inspect for these issues during installation. Simple mistakes can lead to costly repairs or hazards, so don’t cut corners.
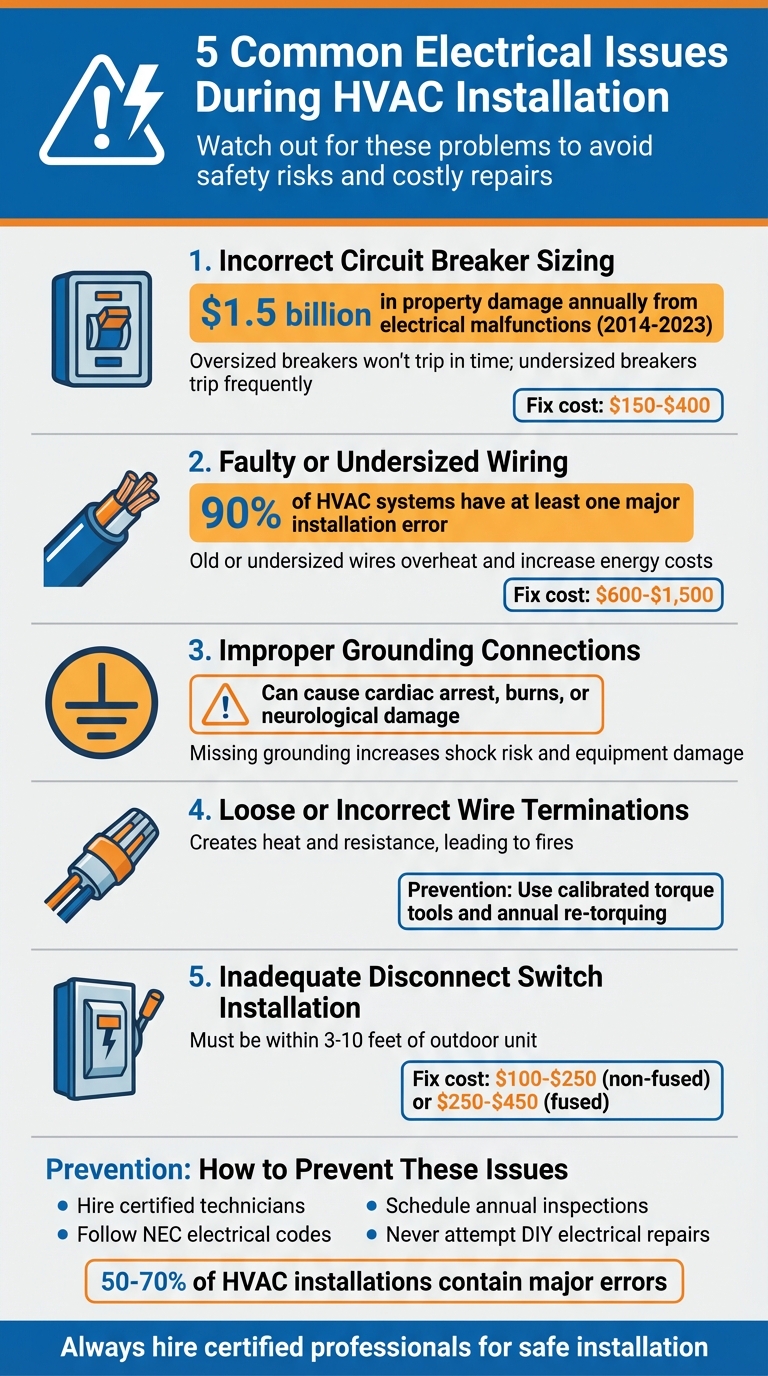
5 Common Electrical Issues During HVAC Installation and Prevention Tips
1. Incorrect Circuit Breaker Sizing
Compliance with Electrical Codes
The National Electrical Code (NEC Article 440) makes it clear: the breaker for your HVAC system must match the specifications on the unit’s nameplate. Forget relying on generic sizing charts, system tonnage, or even advice from the previous homeowner. The nameplate provides two critical numbers: the Minimum Circuit Ampacity (MCA) for wire sizing and the Maximum Overcurrent Protection (MOP) for the breaker limit. For example, if the nameplate specifies "Maximum 25 Amps" but a 30-amp breaker is installed, that’s a direct code violation – even if 30 amps is the next standard size up. This is one of the most common electrical issues flagged during home inspections.
"The nameplate on your outdoor condenser is the final word on breaker sizing. Not the tonnage, not a chart you found online, not what the previous homeowner told you." – Epic Electrical
Impact on System Safety and Performance
Using the wrong breaker size can lead to serious safety and performance issues. An oversized breaker is especially dangerous because it might not trip in time during a short circuit or ground fault. This delay allows wiring to overheat, potentially igniting insulation or other materials before the circuit is interrupted. On the other hand, an undersized breaker is prone to frequent tripping, especially during startup or hot weather when the system operates at peak current. This can leave you without cooling when you need it most. Between 2014 and 2023, electrical malfunctions in homes caused more than $1.5 billion in property damage annually.
Potential for Long-Term Damage or Hazards
High attic temperatures, often reaching 140°F to 150°F in warm climates, further complicate the issue. At these temperatures, the safe ampacity of wiring decreases. For instance, #10 AWG copper wire, typically rated for 40 amps, drops to about 28 amps in a 140°F attic. Pairing such heat-degraded wiring with an oversized breaker significantly raises the risk of fire. Additionally, using the wrong breaker size could void warranties on costly components like compressors and control boards.
Ease of Prevention or Correction
Preventing or fixing breaker sizing issues is straightforward. Before installation, check the MOP value on the condenser’s nameplate and ensure the breaker does not exceed that number. Correcting this issue is crucial for both safety and system efficiency. Replacing a breaker typically costs between $150 and $400, which includes proper sizing and re-torquing the terminals.
sbb-itb-b5c10b1
2. Faulty or Undersized Wiring
Compliance with Electrical Codes
The National Electrical Code (NEC) mandates that wire sizing align with the Minimum Circuit Ampacity (MCA) listed on your HVAC unit’s nameplate. This is essential because newer HVAC models often consume less power than older ones. If installers reuse outdated wiring without checking its compatibility, it can lead to dangerous mismatches. The wire gauge must handle the system’s full electrical load during continuous operation. In high-temperature areas, like attics where heat can exceed 140°F, the safe carrying capacity of wires decreases, further complicating the issue. While correctly sized breakers protect against overloads, the wiring itself plays an equally critical role in ensuring safe and efficient operation. Ignoring this requirement not only breaches NEC standards but also introduces serious risks, as outlined below.
Impact on System Safety and Performance
Undersized wiring has an immediate negative effect on system performance and safety. Wires that can’t handle the load overheat, creating risks like breaker trips, flickering lights, and sudden system shutdowns during high-demand periods. Improperly connected wiring to the condenser unit can cause it to run continuously without effectively cooling, potentially freezing refrigerant lines and burning out the motor. This forces the system to work harder to maintain desired temperatures, which increases energy costs and accelerates wear on key components like the compressor.
Potential for Long-Term Damage or Hazards
Faulty or poorly connected wiring increases electrical resistance, which generates excess heat at connection points. Over time, this heat can visibly damage the system, causing issues like melted or discolored insulation, brittle wire sheaths, charred terminals, and even the distinct smell of burning plastic. Between 2014 and 2023, residential electrical malfunctions caused over $1.5 billion in property damage annually. Alarmingly, industry research shows that 90% of HVAC systems have at least one major installation error, often tied to electrical problems.
Ease of Prevention or Correction
Avoiding these issues starts with verifying the MCA value on the HVAC unit’s data plate and ensuring the wire gauge meets the system’s requirements. Reusing old wiring without confirming its compatibility is a recipe for trouble. Fixing undersized wiring often requires a branch circuit re-wire, which typically costs between $600 and $1,500, depending on factors like the length of the wiring run and attic accessibility. Using calibrated torque tools during installation can help prevent loose connections. Additionally, a professional safety inspection – usually priced between $100 and $260 – can provide a detailed analysis of your system’s wiring and overall circuit integrity.
3. Improper Grounding Connections
Compliance with Electrical Codes
The National Electrical Code (NEC) requires a continuous equipment grounding conductor (EGC) running from the HVAC unit to the electrical panel. This is a critical safety measure often scrutinized during local inspections. The grounding wire – usually green or bare copper – must connect to a dedicated grounding terminal and be appropriately sized for the system. Additionally, all metallic components, such as cabinets and outdoor condensers, must be bonded to the grounding system. One common mistake is relying on flexible metallic conduit for grounding, which is only acceptable if specifically listed as a continuous grounding path. In sub-panels, it’s essential to keep neutral and ground wires isolated to avoid unwanted current flow.
Impact on System Safety and Performance
Grounding plays a vital role in creating a low-resistance path to the earth in the event of a fault or overload. Without proper grounding, electrical faults may fail to activate circuit breakers or fuses, significantly increasing the risk of fire. As Elite HVAC Installations explains:
"Grounding connects the electrical system to the earth, providing a path for electricity to follow in case of a fault or overload. This reduces the risk of electrical shock and helps protect your HVAC equipment from damage".
Improper grounding can also lead to nuisance tripping, where breakers shut off unexpectedly. This disrupts temperature regulation and humidity control. For modern systems with inverter-driven components, proper grounding and shielding are even more critical. Without them, induced currents can damage motors or electronics prematurely. Following these grounding standards not only safeguards against immediate dangers but also ensures the long-term reliability of the system.
Potential for Long-Term Damage or Hazards
An ungrounded HVAC system can allow electrical charges to build up on the cabinet, creating a serious shock hazard for homeowners and technicians. The consequences range from mild tingling to severe injuries, including cardiac arrest, burns, or permanent neurological damage. Additionally, ungrounded systems are more vulnerable to power surges, which can destroy sensitive electronic components and reduce the lifespan of the equipment. Warning signs of grounding problems include buzzing noises, burning smells, scorched plugs, and frequent breaker trips. In extreme cases, poor grounding can lead to compressor failures, damaged fans, and thermostat malfunctions, potentially causing burnt-out units or frozen refrigerant lines.
Ease of Prevention or Correction
Preventing grounding problems begins with testing the system using a multimeter to confirm a continuous, low-resistance grounding path before powering it on. Pay close attention to grounding lugs and connectors, ensuring they are secure and free from corrosion – especially on outdoor units exposed to the elements. Use a calibrated torque tool to tighten connections according to the manufacturer’s specifications, as this helps prevent loosening caused by vibrations over time. Never bypass grounding connections, as doing so violates codes and poses fire hazards. Always check local building codes, as they may have stricter bonding requirements for gas lines or outdoor equipment compared to national standards.
4. Loose or Incorrect Wire Terminations
Compliance with Electrical Codes
When it comes to HVAC electrical connections, getting it right matters. The National Electrical Code (NEC) Article 440 outlines the general requirements, but the real specifics – like torque settings – are found in the manufacturer’s installation manuals. Using a calibrated torque tool, tighten every terminal exactly to the manufacturer’s inch-pound specification. As Samantha Reyes from thefurnaceoutlet.com explains:
"Loose lugs lead to nuisance trips and heat; over-torqued lugs damage strands and threads".
Both under-tightening and over-tightening can lead to serious issues, including code violations and safety risks. Common mistakes include nicked conductors, improper stripping, or miswiring low-voltage, color-coded wires that manage communication between the thermostat, air handler, and outdoor unit.
Impact on System Safety and Performance
Even a slightly loose connection can spell trouble. Increased resistance generates heat, wasting energy and damaging the wire insulation over time. As insulation becomes brittle and cracks, the risk of further damage skyrockets. Additionally, vibrations from compressors and fans can loosen connections even more, creating a cycle of rising resistance and worsening problems. This can lead to frequent breaker trips, inefficient energy use, poor humidity control, and even damage to critical components like inverter boards or compressors. Rebecca Harrell from Wright Home Services highlights the risk:
"Electrical wiring that is not connected properly can cause excess heat around the wiring that can damage not only that one wire but also the surrounding equipment, creating even more issues in your system".
Potential for Long-Term Damage or Hazards
Loose wire terminations are a major culprit behind HVAC-related electrical fires. Between 2014 and 2023, residential electrical malfunctions caused over $1.5 billion in property damage annually. High-resistance connections create localized hot spots that melt insulation, warp plastic housings, and ignite nearby materials. The risk is even greater in extreme climates – attic temperatures in places like Dallas-Fort Worth can soar to 140°F to 150°F, which reduces the safe current-carrying capacity of wires and accelerates thermal damage. In coastal or humid areas, moisture and salt air worsen the situation by accelerating terminal oxidation, which further increases resistance and heat buildup.
Ease of Prevention or Correction
The good news? Preventing these issues is straightforward with the right approach. Start with proper installation techniques: after terminating wires, perform a physical tug test to ensure they’re secure. During system commissioning, scan for hot spots at terminal connections – excessive heat is a clear sign of a poor connection. Keep an eye out for visual clues like discoloration, warped plastic, or brittle wire sheaths. Regular maintenance is key: re-check and re-torque all connections annually to address loosening caused by thermal cycling and equipment vibrations. In areas with high humidity or salt exposure, using corrosion-resistant lugs and dielectric compounds (where allowed by code) can help slow terminal degradation.
These simple steps not only keep your system running smoothly but also lay the groundwork for the next phase: ensuring overall electrical integrity.
5. Inadequate Disconnect Switch Installation
Compliance with Electrical Codes
The disconnect switch is a vital safety component in HVAC systems, acting as a quick power cutoff when needed. For outdoor condensers, the National Electrical Code (NEC 440.14) mandates that a service disconnect switch must be installed "within sight" of the unit – typically within 3 to 10 feet. This ensures easy access in emergencies. Additionally, the disconnect must interrupt all live conductors (NEC 440.13), and systems rated over 60A must include lockout/tagout capabilities (NEC 110.25). Proper clearance is also critical, with a required space of 30 inches in width and 36 inches in depth (NEC 110.26). Samantha Reyes from The Furnace Outlet emphasizes:
"Every outdoor condenser must have a service disconnect within sight".
Skipping the installation or assuming it will go unnoticed during inspections can lead to unsafe, non-compliant systems.
Impact on System Safety and Performance
The disconnect switch isn’t just a regulatory requirement – it’s a key safety feature. In emergencies, it allows for immediate power shutdown, reducing risks. To function properly, the switch must match the system’s amperage, which for most residential units is between 30–60A at 240V. Weatherproofing is another crucial factor. Outdoor disconnects should be housed in NEMA-rated enclosures (NEMA 3R or 4) to shield them from the elements. Using liquid-tight flexible conduit and creating drip loops – where wires curve downward before entering the enclosure – helps prevent water from seeping in. These measures protect the system from moisture-related issues and ensure reliable operation.
Potential for Long-Term Damage or Hazards
Neglecting proper weatherproofing or sealing at wall penetrations can lead to serious problems like corrosion, electrical shorts, and even equipment failure. Water infiltration, especially without proper conduit fittings or drip loops, can corrode terminals and create high-resistance connections. This generates excess heat, which can damage nearby components and increase fire risks. Installing fused disconnects with dual-element time-delay fuses, sized to the unit’s Maximum Overcurrent Protection (MOCP) rating, provides added protection against surges or faults.
Ease of Prevention or Correction
Preventing these issues is straightforward. Ensure the disconnect is visible, accessible, and properly labeled with its rating, as noted on the unit’s data plate. Check weatherproofing annually, looking for secure conduit fittings, intact drip loops, and any signs of moisture or corrosion. Regularly test the switch to confirm it disconnects power completely. Installing or replacing a disconnect typically costs between $100 and $250 in labor (about 30–60 minutes of work), with the disconnect box itself priced at $20 to $80. For fused disconnects, the total cost ranges from $250 to $450. These small investments can save you from much costlier repairs or hazards down the line.
6 HVAC Electrical TIPS!
How to Prevent Electrical Problems
Avoiding issues like wiring mistakes, circuit overloads, and grounding faults starts with proper installation. Always hire certified technicians who are well-versed in both HVAC systems and electrical safety. According to research from the Department of Energy, 50–70% of HVAC installations contain major errors. Certified professionals bring the right tools and expertise to ensure every connection is safe and up to code. As Southern Air, Inc. explains:
"Certified technicians have the expertise to handle any electrical issue with precision. Their training ensures they recognize and diagnose problems quickly, using specialized tools and techniques that might not be accessible to the average homeowner".
This level of expertise ensures your system is installed correctly and meets all safety standards.
Follow Electrical Codes and Safety Practices
Adhering to electrical codes is non-negotiable. Installers must comply with NEC guidelines for breaker sizing, grounding, and matching circuits to the unit’s MCA and MOCP. Additionally, they need to confirm the panel has enough capacity to handle the load. Before starting any work, technicians should implement lockout/tagout (LOTO) procedures, which involve physically cutting and securing power at the breaker to prevent accidental re-energization. Clear labeling, such as marking a breaker as "AC CONDENSER", and properly marked disconnects are essential for safety and compliance.
Post-installation inspections are critical to catching potential issues early. Technicians should verify continuous grounding, proper weatherproofing, and the use of NEMA-rated boxes with drip loops to protect against moisture. Samantha Reyes of Smart Comfort highlights the importance of inspections:
"Passing inspection isn’t a nuisance – it’s proof your system is safe to live with for the next 15–20 years".
Choose Local Professionals for Reliable Service
For those in the Chicagoland area, working with trusted local companies like Eco Temp HVAC can make all the difference. Eco Temp HVAC offers certified installation services and holds top industry certifications, such as Mitsubishi Diamond Elite Contractor, Navien Service Specialist, and American Standard Customer Care Dealer. With service locations in Chicago, St. Charles, Bartlett, Lemont, Downers Grove, and Palatine, they provide prompt, code-compliant installations with warranty protection.
Regular Inspections and Cautionary Measures
Scheduling annual inspections is a simple yet effective way to catch minor issues before they turn into major problems. Be on the lookout for warning signs like burning smells, buzzing noises from the electrical panel, or flickering lights when the unit starts. If you notice any of these, shut down the system immediately and contact a licensed technician. Attempting DIY electrical repairs isn’t just dangerous – it can also void your manufacturer’s warranty. Always rely on professionals to ensure your system operates safely and efficiently.
Conclusion
Electrical problems during HVAC installation can lead to serious consequences like fires, equipment damage, and expensive repairs. Wright Home Services highlights the risks, stating:
"If an HVAC technician is not careful when installing a new unit or repairing a part of your system, an electrical fire is one of the most dangerous and costly problems that can come with a faulty installation".
Statistics back up these concerns. Power surges account for nearly 30% of HVAC system failures across the country. Additionally, improper wiring can lower the efficiency of high-performance units by around 2 SEER points, emphasizing the need for precise and accurate electrical work from the start.
Hiring certified technicians ensures proper installation, adhering to manufacturer instructions and NEC standards. This approach not only prevents electrical issues but also stops small problems from spiraling into costly emergencies.
FAQs
How do I find the right breaker size for my HVAC unit?
To find the right breaker size for your HVAC unit, take a look at the nameplate on the outdoor unit. It will list the recommended breaker size. Using a breaker that’s too large can be dangerous – it might not trip during a short circuit, putting your wiring at risk. Also, make sure the wire size is appropriate for the breaker, especially since extreme temperatures can impact performance. For precise sizing and safe installation, it’s best to consult a licensed electrician.
What warning signs indicate bad HVAC wiring or loose connections?
Faulty HVAC wiring or loose connections often show up through irregular system behavior. For instance, your system might turn on and off unexpectedly, which can be frustrating and inefficient. You might also notice frequent circuit breaker trips, a clear sign something’s not right. In some cases, there could even be visible damage to the wiring, which is a red flag.
These problems aren’t just inconvenient – they can lead to malfunctions and even pose fire risks. It’s crucial to address them as soon as possible to avoid bigger issues down the line.
When is an HVAC disconnect switch required, and where should it be located?
An HVAC disconnect switch is a safety feature installed near the outdoor air conditioning unit. Its purpose is to quickly and safely cut off power during maintenance or in emergencies. Electrical codes require it to be placed in a visible and easily accessible location close to the unit.