When your air conditioner isn’t cooling, it’s frustrating and can increase energy bills. The good news? Many cooling issues can be fixed in minutes without calling a technician. Here’s what you should check first:
- Thermostat Settings: Ensure it’s set to "Cool" and the temperature is at least 3°F lower than the room temperature. Replace batteries if the screen is blank.
- Air Filters: A clogged filter causes 90% of cooling issues. Replace it if it’s dirty to restore airflow.
- Blocked Vents: Ensure vents aren’t covered by furniture or curtains. Clean vents and check the outdoor unit for debris.
- Power Supply: Verify the AC is powered on and check for tripped circuit breakers.
- Frozen Coils: Turn off cooling mode and run the fan to thaw frozen evaporator coils.
If these steps don’t resolve the problem, it’s likely a more complex issue like refrigerant leaks or electrical faults. In such cases, call an HVAC professional to avoid further damage. Regular maintenance, like replacing filters every 1–3 months and cleaning components, can keep your system running efficiently and prevent future issues.
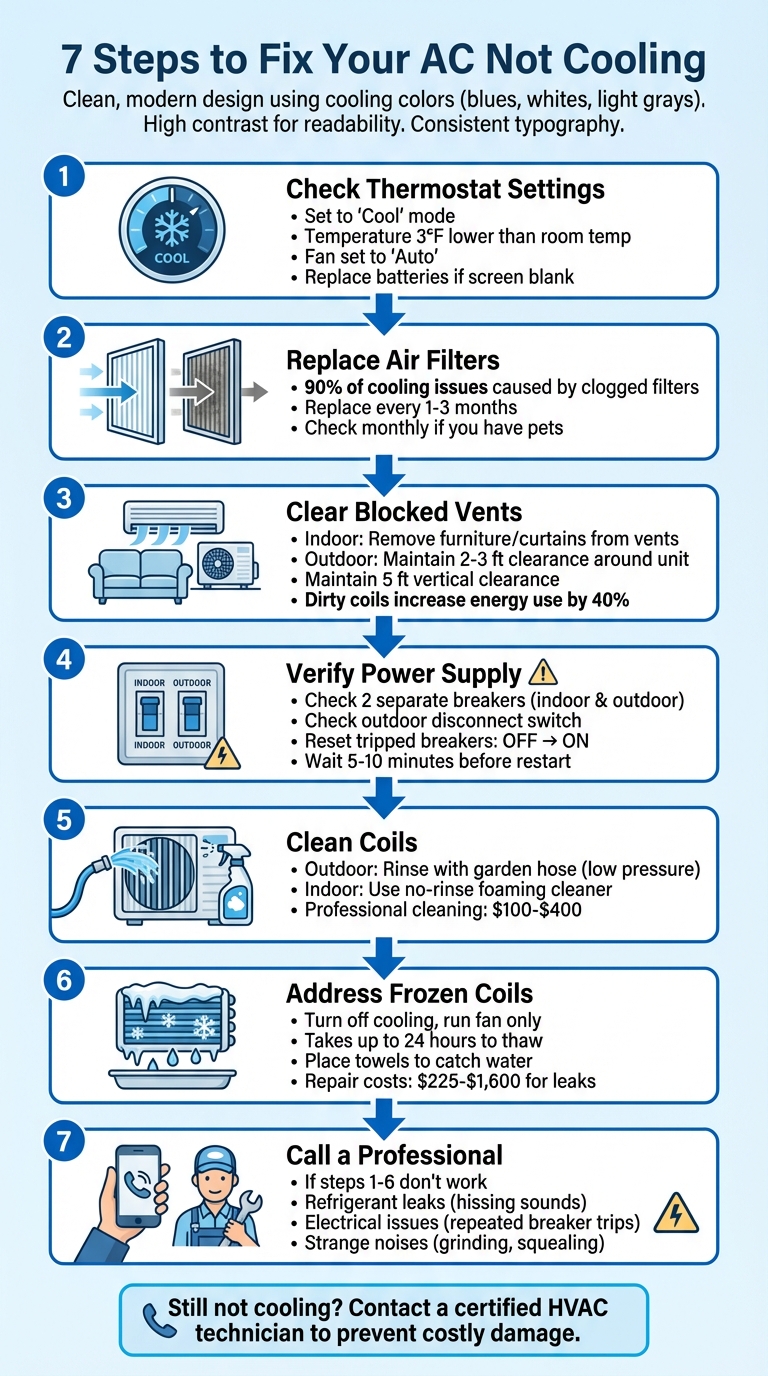
7-Step AC Troubleshooting Guide: Quick Fixes Before Calling a Pro
AC Unit Not Cooling House – 20 Reasons Why
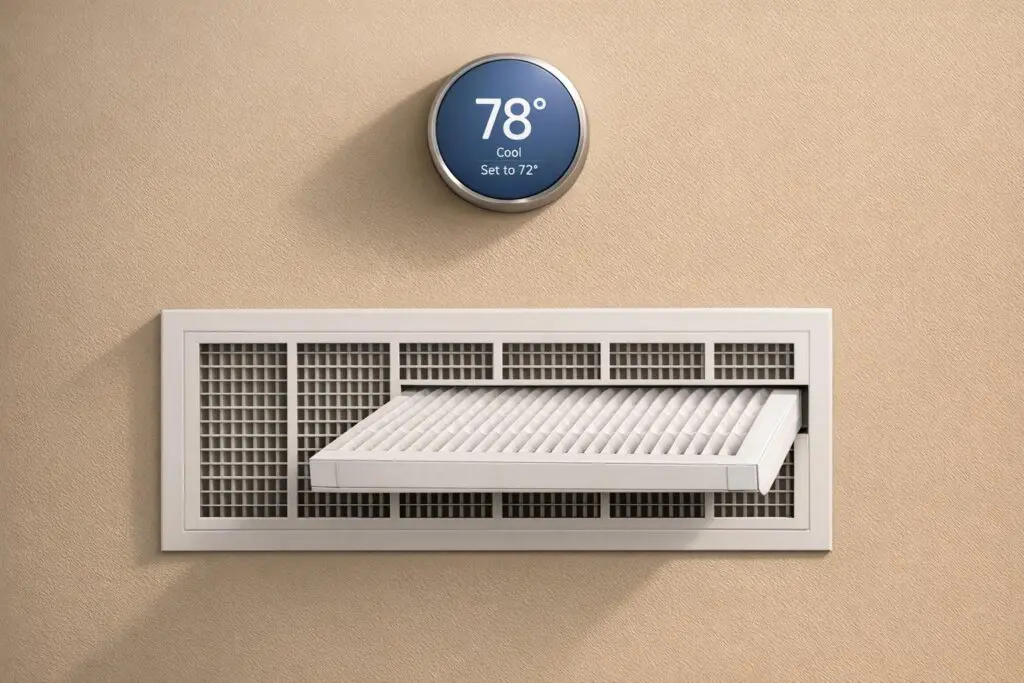
Step 1: Check Your Thermostat Settings
Start by examining your thermostat settings – make sure it’s set to "Cool" mode. If it’s on "Heat" or "Off", your air conditioner won’t kick in.
"Knowing how to troubleshoot an air conditioner often starts with the main control – its thermostat." – Travis Baugh, Digital Brand Marketing Manager, Carrier
Next, double-check the settings that influence your AC’s performance. Set the temperature at least 3°F lower than the current room temperature, and make sure the fan is set to "Auto." This prevents the fan from running non-stop and circulating uncooled air.
If the thermostat screen is blank, try replacing the batteries and ensuring the unit is securely mounted. For a quick reset, turn the thermostat off, then switch off the corresponding circuit breaker for 5–10 minutes. Afterward, restore power and set the thermostat back to "Cool" mode.
Also, ensure the thermostat isn’t exposed to direct sunlight or other heat sources, as these can interfere with its readings. If you’re using a programmable or smart thermostat, check that no energy-saving settings are overriding your cooling preferences.
Step 2: Replace Dirty Air Filters
Did you know that a clogged air filter is behind nearly 90% of air conditioner issues when it comes to cooling inefficiency?. When filters get packed with dust and debris, they block airflow, make your AC work overtime, spike your energy bills, and can even cause the evaporator coil to freeze.
To tackle this common issue, start by safely inspecting and replacing the filter. First, turn off your thermostat and shut off the circuit breaker to ensure safety. Then, open the air handler’s access panel or the return grill to access the filter. Once removed, hold the filter up to a light source – if you can barely see any light passing through, it’s time for a replacement. Make sure to install a new filter of the same size, aligning the airflow arrows on the frame in the correct direction.
For optimal performance, aim to replace your filters every 1–3 months. If you have pets or your AC is running constantly, check them monthly. This straightforward maintenance step not only restores proper airflow but also prevents frozen coils and helps your system run more efficiently.
Step 3: Clear Blocked Vents and Outdoor Unit
A clean filter won’t solve your AC issues if your vents or outdoor unit are blocked. Blocked vents can choke airflow, making it hard for your system to exchange heat effectively. This can lead to problems like a frozen evaporator coil or an outdoor unit that struggles to release heat – both of which can cause your AC to blow warm air instead of cooling your home.
Start by inspecting your indoor vents. Check that furniture, rugs, or curtains aren’t covering supply or return vents. It’s a common mistake – many people accidentally block vents when rearranging furniture. Also, leaving interior doors open can help improve airflow throughout your home. Don’t forget to vacuum the registers to remove dust buildup. This simple maintenance can prevent "short cycling", where the unit turns on and off too quickly, which can wear out your compressor prematurely.
Next, head outside to check the condenser unit. It needs plenty of room to work efficiently. Make sure there’s a 2–3 ft clearance around the unit on all sides and at least 5 ft of vertical space free from obstructions like branches or overhangs. When cleaning, wear gloves for safety.
For the condenser coils, use a garden hose with a low-pressure nozzle to gently rinse them off. If you notice any bent fins, a fin comb can help straighten them out.
"These steps restore airflow and cooling efficiently, often avoiding the need for professional service."
– Jennifer Fletcher, Owner of Modern Air Solutions
Dirty coils don’t just hurt your AC’s cooling power – they can also drive up energy usage by as much as 40% and reduce cooling efficiency by 30% or more. If the copper pipe leading to the unit feels warm instead of cold, or if your system runs continuously but fails to cool your home, these are clear signs that blockages are affecting performance.
Step 4: Verify Power and Circuit Breakers
If your AC isn’t cooling, the first step is to ensure it’s actually getting power. Before jumping to conclusions about broken parts, check the simple stuff.
Start by inspecting the dedicated power switches near your AC system. Most units have a switch near the indoor air handler or furnace, as well as a service disconnect by the outdoor condenser. These switches can sometimes be turned off accidentally during activities like yard work or cleaning. While you’re outside, take a moment to see if the condenser fan is spinning or if you can hear a humming sound – these are signs that the unit is receiving power.
If the switches look fine but the AC still isn’t running, head to your main electrical panel. Central AC systems usually rely on two separate breakers – one for indoor components and another for the outdoor unit. Check for any breakers that aren’t fully in the "ON" position. A tripped breaker often sits midway between "ON" and "OFF." To reset it, flip the breaker completely "OFF" and then back to "ON." Once reset, wait five to ten minutes before trying to restart the system. This pause allows the system to cool down.
"Remember that electricity can be dangerous – even deadly. If it is a blown fuse or a tripped circuit breaker, make sure you are comfortable and competent to safely replace the fuse and/or reset the breaker – if not, consult a qualified professional."
– Carrier
If the breaker trips again right away, stop there. Repeatedly resetting it can be dangerous and likely points to a more serious electrical problem that needs professional attention. Once you’re sure the power supply is intact, you can move on to inspecting the mechanical components for other potential issues.
sbb-itb-b5c10b1
Step 5: Clean the Condenser and Evaporator Coils
Once the power is confirmed, it’s time to clean the coils, which play a crucial role in efficient heat exchange. Your AC system relies on two sets of coils: the evaporator coil, located inside your home, absorbs heat from the air, while the condenser coil, situated outside, releases that heat. When dirt and debris cover these coils, the system has to work harder, leading to inefficiencies. In fact, dirty coils can increase energy consumption by 40% and reduce cooling performance by over 30%.
Start with the outdoor condenser unit. First, turn off the power at both the outdoor disconnect switch and the circuit breaker for safety. Remove the access panel to expose the fins. Use a shop vacuum with a soft-bristle brush to clear away loose debris like grass clippings, leaves, and dirt. Next, take a garden hose with a gentle spray and rinse the coils from the inside out to flush out remaining particles. Avoid using a pressure washer, as its high force can bend the aluminum fins, causing more harm than good. If you notice any bent fins, a fin comb can help straighten them, restoring proper airflow. Keeping these coils clean is critical to prevent overheating and ensure the system runs smoothly.
Indoor evaporator coils need a more delicate touch since they’re housed within the air handler. Regularly replacing air filters helps keep these coils cleaner, but if dust does build up, you can gently wipe them with a soft cloth or use a no-rinse foaming cleaner. While you’re at it, pour a solution of 1 part bleach to 16 parts water down the condensate drain line to stop algae from clogging it.
"Routine maintenance helps catch small issues before they turn into expensive repairs, keeps the system running efficiently, and protects the equipment’s lifespan – ultimately saving homeowners money and stress."
– Jennifer Fletcher, Owner, Modern Air Solutions
If the coils are heavily soiled, frozen, or you’re not comfortable tackling the indoor unit, it’s best to call a professional. Severe buildup may require removing the coils and cutting refrigerant lines, which should only be handled by EPA-certified technicians. Professional cleaning typically costs between $100 and $400, depending on how dirty and accessible the coils are. To avoid future buildup, maintain at least 1 to 2 feet of clearance around your outdoor unit by trimming nearby shrubs and clearing tall grass.
Step 6: Address Frozen Evaporator Coils
Spotting frost or ice on your indoor coils or the copper refrigerant lines leading to your outdoor unit is a clear sign that your evaporator coil might be frozen. Common symptoms include frost on the coils, weak airflow, pooling water from melting ice, or unusual hissing noises – often pointing to refrigerant issues. Frozen coils can take up to 24 hours to fully thaw, and leaving the issue unresolved could result in permanent damage to the compressor. If you notice these signs, follow these steps to safely thaw the coils.
Start by turning off the cooling mode and setting the fan to "On." This allows warmer air to circulate, speeding up the thawing process while keeping the compressor inactive. Place towels or trays beneath the unit to catch any water from the thawing ice. Avoid the temptation to scrape or chip away the ice with tools, as this can damage the delicate coil fins. Once the ice has melted, let the coils dry completely before restarting the system.
"A frozen evaporator coil can cause the system to overheat, cause more problems to your HVAC system, and even permanently damage it if it’s not fixed properly."
– Kat Brancato, Contributing Writer, Angi
While the system is thawing, ensure all vents are open and free of obstructions, as restricted airflow is one of the main culprits behind freezing. Consistent airflow and regular maintenance are crucial. However, if the freezing issue persists despite unblocked vents and a clean filter, it could signal deeper problems, such as low refrigerant levels or a failing blower motor. In such cases, turn off the system and contact a professional. Repairs for refrigerant leaks can range from $225 to $1,600, while replacing an evaporator coil may cost between $600 and $2,000.
Here’s a quick reference guide to help diagnose the problem based on symptoms:
| Symptom | Likely Cause | Recommended Action |
|---|---|---|
| Hissing/Whistling Sound | Refrigerant Leak | Turn off system; call a professional |
| Visible Ice + Dirty Filter | Airflow Restriction | Thaw unit; replace filter; restart |
| Visible Ice + Clean Filter | Low Refrigerant or Dirty Coil | Thaw unit; call a professional |
| No Airflow in "Fan" Mode | Blower Motor/Belt Failure | Call a professional |
If none of these steps resolve the issue, it’s time to bring in an expert to prevent further damage.
Step 7: Know When to Call a Professional
If you’ve tried the basic troubleshooting steps and your AC is still acting up, it might be time to bring in a professional. Some problems, like refrigerant leaks or persistent cooling failures, are beyond DIY fixes and require the expertise of a certified HVAC technician. For example, refrigerant leaks can often be identified by signs like hissing or whistling noises, ice forming on refrigerant lines, or a system that runs non-stop without actually cooling the space. Since handling refrigerants involves safety and environmental risks, the Environmental Protection Agency requires that only certified technicians manage and recharge them.
Electrical issues are another red flag. If your circuit breaker keeps tripping or you’re dealing with blown fuses, these could indicate serious, potentially dangerous electrical problems. It’s crucial not to attempt electrical repairs yourself – leave those to the experts.
Strange noises coming from your system can also signal trouble. Grinding, clanging, or squealing sounds might point to issues with the compressor, blower motor, or fan belt. Josh Elliott, an HVAC training technician at Williams Comfort Air, emphasizes the importance of knowing what your system should sound like when it’s working correctly:
"Acquaint yourself with what your system should sound like when it’s running normally. If it starts making strange noises, you know there is a problem."
Other signs that call for professional attention include persistent short cycling, unusual odors, weak airflow, or uneven cooling. These issues often require a technician to properly diagnose and address the root cause.
Before the technician arrives, take a few steps to help them out. Clear 2–3 feet of space around your outdoor unit and remove any obstacles near indoor vents. Keep track of symptoms like odd noises, erratic thermostat readings, or any noticeable changes in performance. If you see ice forming on the coils or smell something burning, shut the system down immediately at the breaker to prevent further damage.
For those in the Chicagoland area, Eco Temp HVAC offers 24/7 support with certified technicians who can ensure your system is repaired safely and in a way that protects your warranty.
Conclusion
When your AC stops cooling, these steps can help you troubleshoot and possibly resolve the issue without needing a technician. But if the problem continues, it’s best to stop using the system. Running an AC that isn’t cooling properly can turn small problems into much bigger, more expensive ones.
Regular maintenance, like changing filters and scheduling annual inspections, is key to avoiding costly repairs. A well-maintained system is less likely to face recurring issues.
If the problem remains unresolved, it’s time to bring in the experts. Eco Temp HVAC’s certified technicians offer 24/7 service in Chicagoland, ensuring your AC is thoroughly inspected, safely repaired, and back to running smoothly – just when you need it most during those hot summer days.
Don’t wait for a total breakdown. Taking care of your AC now can help you avoid expensive emergency repairs and keep your home cool and comfortable all season long.
FAQs
Why isn’t my air conditioner cooling, even after basic troubleshooting?
If your AC still isn’t cooling after handling the basics, it might be time to dig a little deeper. First, double-check that your thermostat is set to cooling mode and adjusted to your preferred temperature. Then, take a look at the air filter – a clogged or dirty filter can choke airflow and make your system work harder than it should. Another spot to inspect is the outdoor unit; debris around the condenser coils can block heat transfer, reducing the system’s efficiency.
Still no luck? The issue could be more serious, like low refrigerant levels, a faulty fan motor, or even electrical problems. These kinds of repairs are best left to the pros. If you’re in the Chicagoland area, Eco Temp HVAC provides top-notch service to diagnose and fix your AC issues, ensuring your home stays cool and comfortable.
How often should I change my air filters to keep my AC running smoothly?
To keep your air conditioner running smoothly and avoid common problems like poor cooling or unnecessary strain on the system, make it a habit to replace your air filters every 1 to 3 months. Changing filters regularly helps maintain proper airflow, keeps dust from accumulating, and minimizes the chances of issues like frozen evaporator coils or refrigerant leaks.
Clean filters not only ensure your AC provides reliable cooling during those scorching summer days but also help extend the life of your unit. If you’re unsure about the best filter type or how often to replace it in your home, reaching out to a professional HVAC technician – like the team at Eco Temp HVAC – can provide the guidance you need.
What are the signs that it’s time to call a professional for AC repairs?
If your air conditioner isn’t keeping your home cool despite your best efforts, it might be time to bring in a professional. Here are some common warning signs to watch out for:
- Warm air coming from the vents, even after you’ve checked the thermostat settings and replaced the filters.
- Strange noises like banging, rattling, or grinding sounds coming from the unit.
- Water leaks or noticeable moisture buildup around the system.
- Weak or inconsistent airflow that persists even after cleaning the filters or vents.
These symptoms could point to serious issues like refrigerant leaks, a failing compressor, or electrical problems – issues that are best left to an expert. Trying to tackle these repairs on your own could make matters worse. A licensed HVAC technician can diagnose and fix the problem properly, ensuring your AC runs efficiently and keeps your home cool and comfortable.