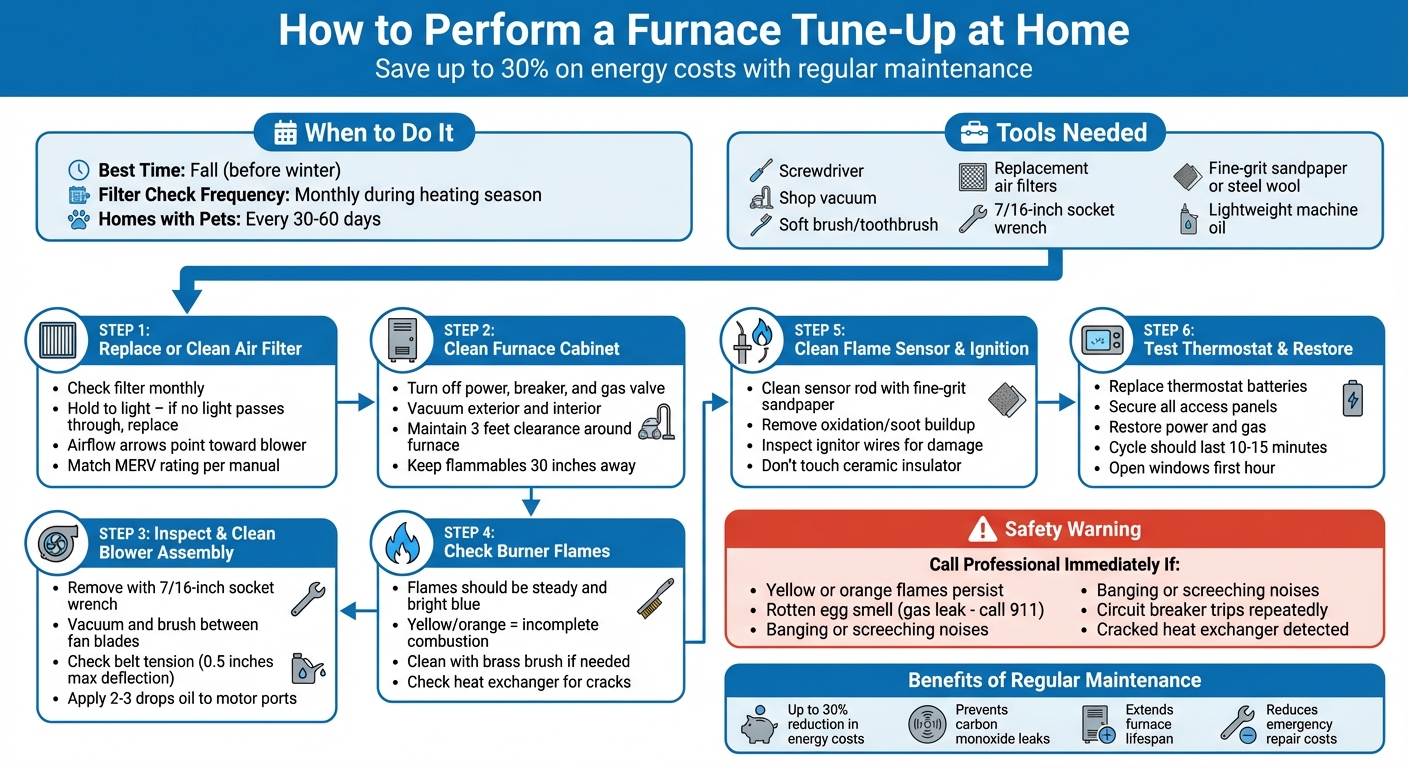
Want to keep your furnace running smoothly this winter? A DIY tune-up can improve efficiency, lower energy bills, and help prevent costly repairs. Here’s a quick breakdown of what you need to know:
- Why it matters: Regular maintenance improves performance, reduces energy costs by up to 30%, and ensures safety by preventing issues like carbon monoxide leaks.
- When to do it: The best time for a tune-up is in the fall, before temperatures drop and your furnace is working overtime.
- What you’ll need: Basic tools like a screwdriver, shop vacuum, soft brush, and replacement air filters.
Key Steps:
- Replace or clean the air filter to improve airflow and indoor air quality.
- Vacuum the furnace cabinet and surrounding area to remove dust and debris.
- Inspect and clean the blower assembly for better airflow and efficiency.
- Check and clean burner flames to ensure proper combustion.
- Clean the flame sensor and inspect the ignition system to prevent short cycling.
- Test the thermostat and restart the system to confirm everything is working.
While these tasks can be done at home, some jobs – like checking the heat exchanger or adjusting gas pressure – require professional expertise. If you encounter issues like odd noises, yellow flames, or a gas smell, it’s time to call an HVAC technician.
Bottom line: Regular furnace maintenance saves money, keeps your home warm, and ensures safety. Follow these steps to handle basic tasks, and don’t hesitate to contact a professional for complex issues.
6-Step DIY Furnace Tune-Up Process with Tools and Safety Tips
Easy Furnace Tune-Up: Filters, Flame Sensor, & Cleaning #FurnaceFix #diyhvac #homemaintenance
Step 1: Replace or Clean the Air Filter
Your furnace filter plays a key role in keeping your home’s air clean by trapping dust, pet dander, and other airborne particles. To locate it, check inside the furnace cabinet – typically in the blower compartment behind a removable access panel – or where the return air duct connects to the furnace.
Before removing the filter, look for airflow arrows on its frame. If they’re hard to spot, use a permanent marker to note the correct direction on the furnace cabinet. These arrows should always point toward the furnace blower, not the return duct. Once you’ve noted the orientation, remove the filter by hand.
To determine if the filter needs replacing, hold it up to a bright light. If little or no light shines through, it’s time for a new one. The frame type can also guide you: filters with plastic frames are reusable and can be washed and dried, while those with cardboard frames are disposable and must be replaced.
When installing a new filter, match its dimensions (length × width × thickness) with the old one. Also, ensure the filter’s MERV rating aligns with the recommendations in your owner’s manual. Travis Baugh, Digital Brand Marketing Manager at Carrier, emphasizes the importance of proper installation:
If the furnace filter is installed backwards, it restricts airflow and causes the furnace to work harder, reducing efficiency and potentially overheating the system.
During the heating season, it’s wise to check your filter monthly, even if it’s rated for three months. Homes with pets may require filter changes every 30 to 60 days due to fur and dander buildup. While the filter is out, take a moment to vacuum the slot and surrounding area to minimize dust accumulation.
Once you’ve replaced the filter and cleaned the slot, you’re ready to move on to inspecting the blower assembly in the next step.
Step 2: Clean the Furnace Cabinet and Surrounding Area
Before you start cleaning, make sure to turn off the furnace completely. Switch off the power at the unit, shut down the breaker, and close the gas valve. This step is crucial to avoid electrical shocks and ensure safe access to the furnace’s internal parts.
Begin by vacuuming the exterior of the cabinet using a shop vac with a brush attachment. This helps remove loose dust before you open any panels. Most access panels are either secured with screws or designed to lift off. If screws are involved, use a screwdriver to remove them and keep them in a safe spot for reassembly. Once the panels are off, you’ll be able to reach the interior areas around the burners and blower.
Inside the furnace, use the shop vac with a soft brush attachment to clean the base around the burners and blower compartment. For those hard-to-reach spots, attach about 20 inches of thin drain line to your vacuum hose – this makes it easier to get into tight spaces. Be cautious around sensitive components, especially the ignitor, which can be easily damaged.
Keep the area around your furnace clear to ensure proper airflow and reduce fire risks. Maintain at least 3 feet of clearance, and move flammable items like paint, fuel, and cleaners to a safe distance – at least 30 inches away. Don’t forget to vacuum the floor around the furnace to prevent dust and pet hair from being pulled into the system.
Once everything is clean, securely reinstall the access panels. A loose panel can trigger safety switches, preventing the furnace from starting. Worse, it could lead to carbon monoxide exposure. Many modern furnaces are equipped with door switches that automatically cut power or gas if the panels aren’t properly seated, so double-check that everything is tightly in place.
Step 3: Inspect and Clean the Blower Assembly
Keeping the blower assembly clean is crucial for maintaining proper furnace airflow and efficiency. This part of your furnace, often referred to as the "squirrel cage" due to its shape, tends to gather dust over time. To access it, you’ll need to remove any extra panels beyond the main cabinet door. In many newer furnaces, you may find an electronic control panel or circuit board in the way. If that’s the case, loosen the screws holding it in place and carefully set it aside.
The blower unit itself is usually mounted on tracks and held in place with two bolts. To remove it, use a 7/16-inch socket wrench to take out the bolts, then slide the unit forward along the tracks. If the power cord limits movement, disconnect it, and make sure to mark the wire connections to make reassembly easier. This process builds on the cleaning techniques mentioned earlier.
Once you’ve exposed the blower assembly, grab a shop vac with a brush attachment to clear away loose dust from the housing and motor. For the fan blades, gently scrub between each blade with a toothbrush to loosen dirt, then vacuum it up. Be cautious not to disturb the counterweights on the fan blades – shifting them even slightly can throw the blower off balance, causing noise or mechanical issues.
If your blower is belt-driven, check the belt tension. It should have no more than 0.5 inches of deflection when pressed. If the belt is loose or shows visible cracks, it’s time to tighten or replace it. For lubrication, inspect the motor housing for small oil port caps. If you find them, remove the caps and apply two to three drops of lightweight machine oil to each port – usually two on the motor and two on the shaft. Avoid using automotive oil or general-purpose household oils like 3-in-1, as they aren’t suitable for furnace motors.
| Component | Maintenance Task | Tools Needed |
|---|---|---|
| Blower Blades | Brush and vacuum to remove dust buildup | Toothbrush, shop vac with brush attachment |
| Blower Belt | Check for cracks and adjust tension | Screwdriver, wrench, replacement belt (if needed) |
| Motor Bearings | Lubricate with 2–3 drops of oil per port | Lightweight machine oil or electric motor oil |
| Motor Housing | Wipe clean to prevent heat buildup | Damp cloth |
After cleaning and lubricating, slide the blower assembly back onto its tracks, reconnect any wires you previously disconnected, and secure the bolts. Reattach the control panel and any access panels, making sure everything is firmly in place. With the blower assembly properly cleaned, lubricated, and reassembled, you’re ready to move on to inspecting the burner flames in the next step.
Step 4: Check and Clean the Burner Flames
Once the blower assembly is back in place, it’s time to inspect the burner flames. This step is crucial for assessing how efficiently your furnace is burning fuel. Start by turning off the power, removing the combustion chamber door and burner cover, and then restoring power. Raise the thermostat to ignite the burners.
Take a close look at the flames as they ignite. Proper burner flames should burn steadily and have a bright blue color. Jessica McKendree from The Furnace Outlet explains:
The flames are supposed to be steady and blue. Orange, yellow, or flickering flames indicate incomplete combustion due to dirty burners, insufficient air supply, or a cracked furnace heat exchanger.
Be mindful not to breathe directly on the flames during your inspection, as the added oxygen can temporarily change their color. If the flames aren’t the steady blue they should be, it’s time to clean the burners.
Start by turning off the power and shutting off the gas supply valve (usually with a quarter turn). If you want to clean the burners without removing them, attach a 20-inch drain line to your vacuum hose. This allows you to reach behind the burner assembly and furnace base to clear out debris. For a more thorough cleaning, carefully remove the burners, keeping track of their order. Use a brass brush or fine-grit sandpaper to scrub away any carbon buildup or soot, paying extra attention to the transition wings. If the flames remain abnormal – yellow, orange, or flickering – shut down the furnace and clean the burners. If the issue persists after cleaning, it’s time to call in a professional.
After cleaning, use compressed air to blow away any remaining debris. Reassemble everything with care, avoiding damage to the ignitor, and then restore power and gas. Check the flames again to ensure they’re steady and blue. If they’re still yellow, resist the urge to adjust the gas-to-air mixture yourself. This is a job for a professional, as running a furnace with yellow flames increases the risk of carbon monoxide production.
With the flames now checked, do one final inspection. While the combustion chamber is still open, look for soot buildup and examine the heat exchanger for cracks or corrosion. These are warning signs of poor combustion and potential carbon monoxide hazards. If you notice any damage, stop using the furnace immediately and call a professional. A cracked heat exchanger can leak dangerous carbon monoxide into your home, posing serious risks.
sbb-itb-b5c10b1
Step 5: Inspect the Ignition System and Flame Sensor
Once the burners are clean and the flames are steady and blue, it’s time to check the ignition system and flame sensor. The flame sensor is a small steel rod – either straight or L-shaped – that sits in front of the burner flame. Its job? To confirm there’s a flame when the gas valve is open. If it fails to do so, the furnace will shut down as a safety measure.
Start by cutting off power to the furnace at the switch or breaker panel, and close the gas valve. To access the flame sensor, remove the single screw securing it in place and disconnect the wires. Over time, this sensor can gather oxidation or soot, which interferes with its ability to detect flames. HVAC technician BillyHvac describes it this way:
The rod gets a coating over it that you cannot see. Some sensors need this every 2–3 years.
To clean the sensor, gently rub the metal rod with fine-grit sandpaper, steel wool, or a scouring pad to remove any residue. Be careful not to use anything too abrasive, as deep scratches can damage the rod. Also, avoid touching the porcelain or ceramic insulator at the rod’s base. Once cleaned, wipe the rod with a dry rag, reconnect the wires, and reinstall it. This quick maintenance step can prevent short cycling, a common issue caused by dirty flame sensors tripping the furnace’s safety controls.
For the ignition system, the cleaning process depends on whether your furnace uses a standing pilot light or a newer electronic ignition system, such as a hot surface ignitor. Use a vacuum hose with an extension to remove dust from the pilot or ignitor base, and for tight spots, a drinking straw works well. Be cautious with electronic ignitors – they’re fragile, so avoid touching them with your hands or tools.
While you have the access panel open, take a close look at the electronic ignitor wires. Check for any signs of wear, such as fraying, cracks, or corrosion, and ensure all connections are secure. Use a screwdriver to tighten loose terminals, but handle everything carefully to prevent accidental disconnections. If you spot damaged wires or a cracked ignitor, it’s best to call a professional to avoid further complications.
Once you’ve completed this inspection, you’ll be ready to move on to testing your thermostat and restoring your furnace’s operation in the next step.
Step 6: Test the Thermostat and Restore Operation
Now that the flame sensor is cleaned and the ignition system inspected, it’s time to get your furnace back up and running. Start by replacing the thermostat batteries with fresh ones. This is a small but important step to avoid unexpected failures during the heating or cooling seasons. As Jessica McKendree from The Furnace Outlet advises:
Replace the battery at the beginning of each heating and cooling season.
Once the batteries are replaced, check that the thermostat settings are correct. After updating the thermostat, ensure all furnace access panels are securely in place before restarting the system. Loose panels can not only reduce efficiency but might also cause safety shutdowns. Haley Nothstein, a contributor at Angi, emphasizes:
A front panel that doesn’t close properly could also put your home at risk for unhealthy carbon monoxide (CO) exposure.
To restore power, flip the electrical switch at the furnace and the breaker panel back on, and reopen the gas valve on the supply line. Set the thermostat to "Heat" and raise the temperature enough to activate the burners. You should hear the ignition and feel airflow through the ducts. Take a moment to inspect the burner flames – they should burn steady and blue. If you notice yellow or orange flames, this could signal incomplete combustion, which requires attention from a professional. A typical furnace cycle should last 10–15 minutes; if it shuts off in under five minutes, it might point to calibration issues or a safety mechanism being triggered.
During the first hour of operation, it’s a good idea to open your windows. This helps clear out any dust stirred up during maintenance. Check for warm air coming from all registers and ensure the thermostat reading is within 1°F of the ambient temperature. If you notice a "rotten egg" smell, leave immediately and contact 911 – this could indicate a gas leak. Also, pay attention to any unusual noises like banging, scraping, or screeching, as these could signal mechanical problems that need professional attention.
Finally, confirm safe combustion by performing a venting test. Light an incense stick and hold it near the draft hood. The smoke should be drawn into the vent, which indicates proper venting. This simple test ensures your furnace is operating safely and efficiently after your maintenance work.
When to Contact Eco Temp HVAC Professionals
After handling a basic tune-up, stay vigilant for signs that might indicate more complex problems needing professional attention. Certain tasks – like inspecting the heat exchanger or performing combustion analysis – require specialized tools and expertise. For jobs involving combustion analysis or electrical testing (e.g., measuring voltage, checking current, and tightening connections), it’s best to rely on certified professionals. Unusual sounds, strange odors, or electrical issues are clear signals that it’s time to call in an expert.
If you notice banging or screeching noises, these could point to loose components or a failing motor. Burning or musty smells may indicate electrical faults or mold buildup and should be addressed promptly. A circuit breaker that trips repeatedly is another red flag, often signaling an overworked system or a deeper electrical issue that requires professional diagnosis.
When DIY fixes don’t resolve the problem, professional help is essential. Eco Temp HVAC provides 24/7 emergency services across the Chicagoland area, including Chicago, St. Charles, Bartlett, Lemont, Downers Grove, and Palatine. Their certified technicians are available for same-day or next-day appointments to address urgent concerns. Maintenance plans include regular inspections, cleaning, and safety checks to help extend the life of your equipment and catch potential issues early. With a 100% money-back guarantee, a two-year service guarantee, and $40 off any repair service, Eco Temp HVAC ensures dependable support when DIY efforts aren’t enough.
Conclusion
Taking care of a basic furnace tune-up at home is a smart way to keep your heating system running smoothly and safely during the colder months. Simple tasks like replacing air filters every 30 to 90 days, vacuuming out dust from the furnace cabinet, cleaning the blower assembly, and checking burner flames can go a long way in maintaining proper airflow and reducing energy consumption. These small efforts not only improve your system’s efficiency but also help extend its overall lifespan.
Regular maintenance can save you money by lowering energy bills and reducing repair costs. Homeowners who stay consistent with filter changes and basic cleaning often experience fewer breakdowns and avoid the hassle of expensive emergency repairs. Keeping up with these tasks protects both the performance of your heating system and the investment you’ve made in it.
That said, some maintenance requires a professional touch. Tasks like checking for cracks in the heat exchanger, adjusting gas pressure, or conducting electrical tests demand specialized tools and expertise. If you notice warning signs like odd flame colors or strange noises, it’s time to call in a professional.
When DIY efforts aren’t enough, professional help becomes essential. Eco Temp HVAC offers full-service maintenance plans, including yearly inspections, cleaning, and safety checks for homeowners in the Chicagoland area. With 24/7 emergency services, same-day appointments, and a team of certified technicians, they’re ready to step in when your furnace needs expert care.
FAQs
What are the warning signs that my furnace needs professional attention?
If your furnace is acting up – whether it’s making odd noises, failing to deliver steady or adequate heat, or cycling on and off too often – it’s likely time to call in a professional. Other warning signs to watch for include higher energy bills, unusual smells (especially gas odors), a flickering or weak pilot light, or the alarming sound of your carbon monoxide detector going off.
To stay safe and avoid expensive repairs down the line, it’s smart to reach out to a certified technician as soon as you notice something’s wrong. Scheduling regular maintenance can also help prevent these problems and keep your furnace running smoothly.
How often should I change my furnace filter during the heating season?
During the colder months, keeping your furnace filter clean is key to ensuring your heating system works efficiently. Begin the season by installing a fresh filter, and make it a habit to check it every month while the furnace is in use. If you notice the filter is dirty or clogged, replace it right away.
Changing filters regularly not only boosts air quality but also helps your furnace run more efficiently and last longer. If you need assistance, Eco Temp HVAC provides professional filter replacement and maintenance services for homeowners in the Chicagoland area.
What safety steps should I follow when tuning up my furnace at home?
Before diving into a furnace tune-up, safety must be your top priority. Start by cutting off the power and fuel supply – switch off the circuit breaker and close the gas valve. This step ensures there’s no risk of accidental startups or leaks. Make sure the workspace is well-ventilated by opening a window or door, and always be alert for gas odors or signs of carbon monoxide. If you detect a gas smell, stop immediately and call a professional.
Equip yourself with the right protective gear, such as gloves, safety glasses, and a dust mask, to shield against debris and potential hazards. Stick to using the proper tools for the task, and never bypass any built-in safety features. Carefully inspect all electrical components, and if you come across issues like tripped breakers, damaged parts, or anything you’re unsure about, pause the work and reach out to a certified HVAC technician. For expert help, Eco Temp HVAC provides professional furnace tune-ups to keep your system operating safely and effectively.