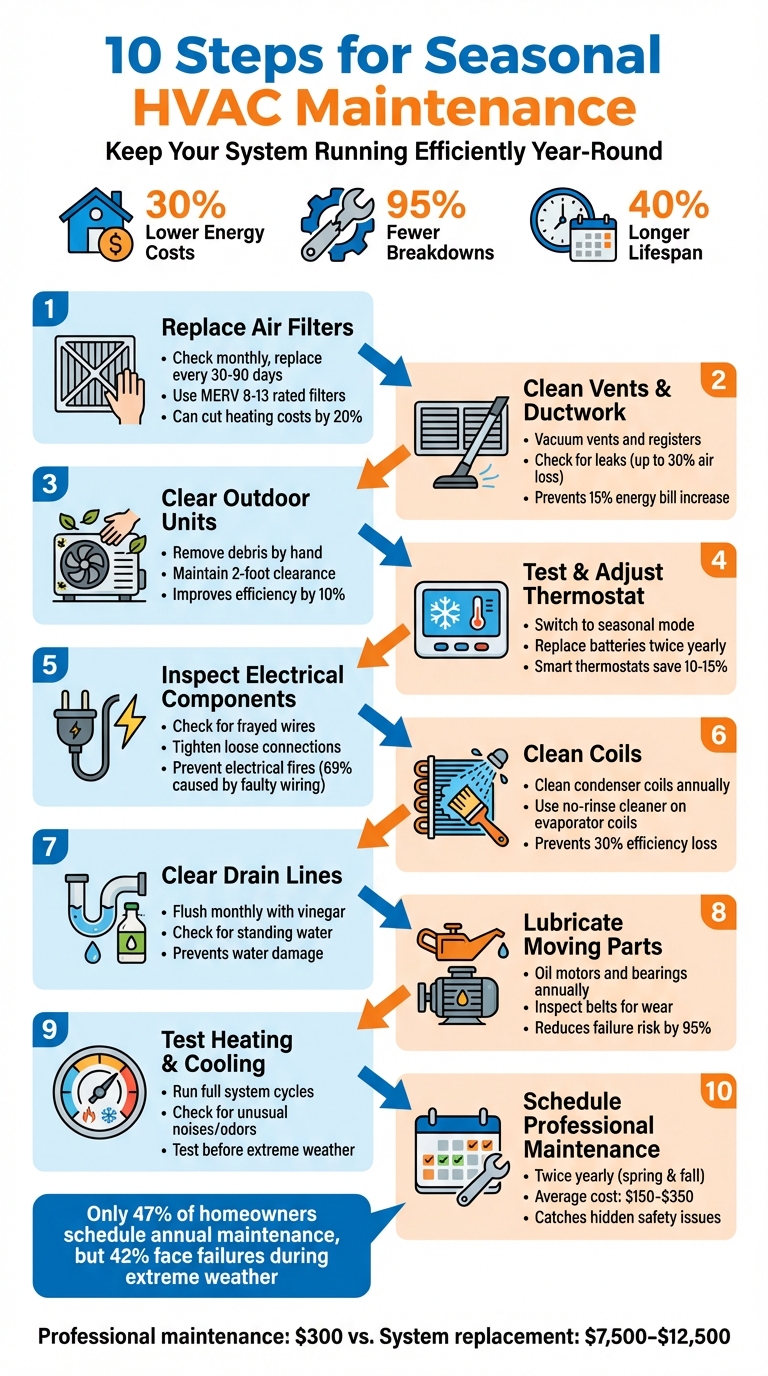
Want to keep your HVAC system running efficiently year-round? Regular maintenance is the key to avoiding costly breakdowns, improving energy efficiency, and extending the lifespan of your system. Here’s a quick summary of the 10 essential steps to maintain your heating and cooling system:
- Replace Air Filters: Check monthly and replace every 30–90 days depending on usage and conditions.
- Clean Vents and Ductwork: Vacuum and inspect for leaks to ensure smooth airflow.
- Clear Outdoor Units: Remove debris and maintain 2 feet of clearance around the unit.
- Test and Adjust Thermostat: Set seasonal modes, replace batteries, and consider upgrading to a smart thermostat.
- Inspect Electrical Components: Tighten connections and look for signs of damage.
- Clean Coils: Remove dust and grime from evaporator and condenser coils to boost efficiency.
- Clear Drain Lines: Flush with vinegar to prevent clogs and check for standing water.
- Lubricate Moving Parts: Reduce friction and inspect belts for wear.
- Test Heating and Cooling Systems: Run full cycles to identify issues before extreme weather hits.
- Schedule Professional Maintenance: Certified technicians can catch hidden problems and ensure safety.
Why it matters: Seasonal HVAC maintenance can cut energy costs by up to 30%, reduce breakdown risks by 95%, and extend your system’s lifespan by 40%. A small investment in upkeep now can save you thousands in repairs or replacements later.
Need expert help? Schedule a professional tune-up with Eco Temp HVAC for peace of mind and peak performance.
10 Essential Steps for Seasonal HVAC Maintenance Checklist
🧰 Complete HVAC System Maintenance | Step by Step Guide for Homeowners & Technicians
Step 1: Check and Replace Air Filters
Your HVAC filter plays a crucial role in keeping dust, pollen, pet dander, mold, and bacteria out of your home. When the filter gets clogged, your system has to work overtime, leading to higher energy bills and putting extra stress on the blower motor.
"A clogged filter forces your HVAC system to work harder, using more energy and driving up your utility costs." – Choate’s Air Conditioning, Heating, Plumbing, and Generators
Make it a habit to inspect your filter every month. During peak usage times – like Chicago’s freezing winters or muggy summers – replace it every 30 days. For milder seasons, changing it every 60–90 days is usually enough. However, if you have pets or someone in your home suffers from allergies, you might need to swap it out as often as every 30–45 days.
When choosing a filter, look for one rated MERV 8–13. Filters in the MERV 11–12 range are especially good at trapping finer particles without disrupting airflow. Skip the cheap fiberglass options – pleated filters are far more effective. Always install the filter with the arrow pointing toward the unit, and make sure to turn off the system before removing the old one.
Keeping up with filter maintenance can cut your heating costs by as much as 20%. Plus, it improves air quality, boosts efficiency, and helps your equipment last longer. Once your filter is squared away, move on to cleaning vents, registers, and ductwork to keep airflow running smoothly.
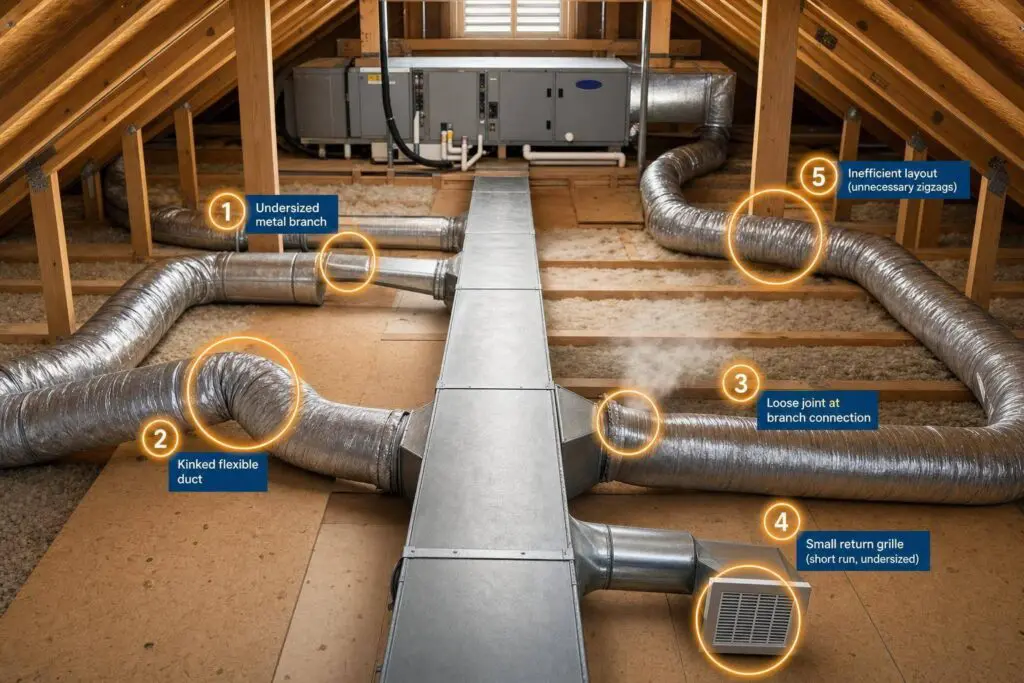
Step 2: Clean Vents, Registers, and Ductwork
Over time, dust and debris collect on vents and registers, hindering airflow and putting extra strain on your HVAC system. When these components get clogged, the system has to work harder to circulate air, which can lead to higher energy bills and unnecessary wear on its parts.
"If they are covered in dust, the air will filter through your furnace much slower, making your system more inefficient."
– Glenn Wisemen, Sales Manager, Top Hat Home Comfort Services
To keep things running smoothly, vacuum all vents and registers using a brush attachment to clear out dust. For tougher grime, scrub them with a brush and wipe them down with a damp cloth. This simple maintenance step can help prevent buildup that might otherwise hike your energy bills by as much as 15%.
While you’re at it, check any visible ductwork in areas like your basement, attic, or garage for leaks, holes, or loose connections. A quick way to spot leaks is by holding a strip of toilet paper near the duct seams – if it moves, you’ve got a leak. Believe it or not, up to 30% of your conditioned air can escape through these gaps. Seal any leaks with duct sealant or metal-backed foil tape. For persistent problems, consider calling in a professional for a more thorough inspection.
If you notice signs like mold, musty smells, or uneven temperatures, it’s time to schedule professional duct cleaning. Companies like Eco Temp HVAC offer specialized services to remove deeply embedded dust, mold, and debris that regular cleaning can’t reach. Their process not only clears out hidden contaminants but also improves airflow and could extend your system’s lifespan by up to 40%.
Step 3: Clear Debris from Outdoor Units
Your outdoor HVAC unit faces constant exposure to debris – leaves, twigs, grass clippings, dirt, and even snow. When this debris builds up, it can block airflow to the condenser, reducing efficiency by up to 10%.
"Plants growing too close to the condenser can block air movement and cause the unit to overheat."
– Andrew Daniels, HVAC Expert, Sears
Start by turning off the power. Flip the outdoor shutoff switch or turn off the dedicated circuit breaker in your main electrical panel. Once the power is off, remove large debris like leaves, sticks, or trash by hand. For finer dirt and dust, use a shop vacuum with a soft brush attachment to gently clean the coils.
Next, rinse the condenser coils with a garden hose set to low pressure, spraying from the inside out to push out dirt and pollen. Avoid using a pressure washer – its force can bend the delicate aluminum fins. If needed, use a brush to clean the fins, making sure to stroke parallel to avoid damage. After cleaning, check that nothing is obstructing the area around the unit.
To keep the unit clear, maintain a 2-foot space around it by trimming back shrubs and ensuring mower discharge is directed away. During winter, make sure snow and ice don’t block vents or cover the unit. These simple steps can improve system efficiency by up to 10% and lower the risk of breakdowns by as much as 95%.
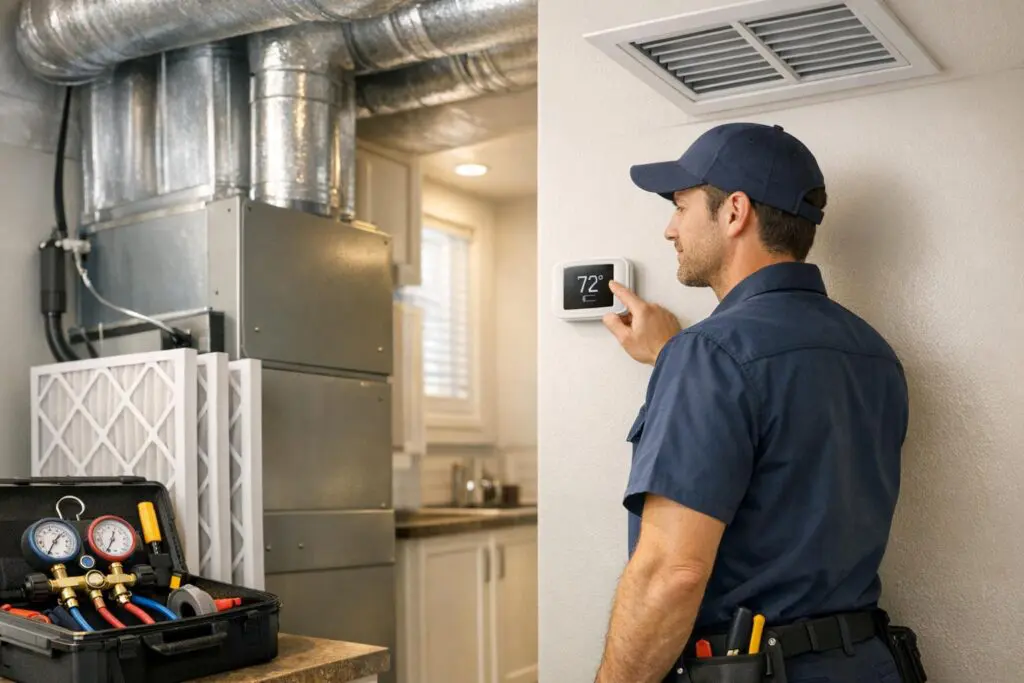
Step 4: Test and Adjust Your Thermostat
Part of keeping your HVAC system running smoothly involves testing and adjusting your thermostat. This small step can make a big impact on your comfort and energy bills – especially since heating and cooling account for about 43% of the average home’s utility bill.
Start by switching your thermostat to the appropriate seasonal mode – “Heat” for winter or “Cool” for summer. Adjust the temperature and wait; your system should kick in within a minute or two. While it’s running, listen for any unusual noises and check if all rooms feel evenly heated or cooled. Uneven temperatures or strange sounds could signal mechanical problems or ductwork issues.
"Check thermostat settings to ensure the cooling and heating system keeps you comfortable when you are home and saves energy while you are away." – Energy Star
To keep your thermostat working properly, replace its batteries and clean off any dust at least twice a year. For winter, aim to set it at 68°F when you’re home and drop it to between 60°F and 65°F when you’re away. You can also take advantage of sunny days by opening blinds to let natural light warm your home, easing the workload on your system.
If you’re looking for more control and savings, upgrading to a smart thermostat might be worth considering. These devices let you adjust settings remotely, create schedules, and even provide energy usage reports. On average, smart thermostats can help you save 10%-12% on heating and about 15% on cooling costs.
Step 5: Check Electrical Connections and Components
Paying attention to your HVAC system’s electrical connections is critical. Faulty wiring accounts for 69% of electrical fires, and in the U.S. alone, over 51,000 electrical fires occur annually, leading to nearly 500 deaths and causing $1.3 billion in property damage. Before you begin any inspection, always turn off the power at the breaker box and the unit’s disconnect switch. Once the power is off, visually inspect the wiring to ensure all connections are secure.
Look for signs of trouble like frayed wires, corrosion, or burnt contacts. Tighten any loose connections you find, whether at the disconnect box or the main panel. During operation, keep an ear out for unusual sounds like buzzing, clicking, or sparking, which may indicate an electrical issue.
"Faulty electrical connections can cause unsafe operation of your system and reduce the life of major components." – Energy Star
While basic checks like these can be done on your own, more complex diagnostics – such as testing capacitors, measuring motor amperage, or inspecting heat strips – should be left to professionals with the right tools and expertise. If you notice warning signs like a burning smell, frequent breaker trips, or visible wire damage, shut down your system immediately and contact a certified technician. These professional inspections are a small price to pay compared to the potential damage caused by electrical faults.
For simple inspections, tools like a flashlight and multimeter can help you identify obvious issues. However, advanced testing equipment should always be handled by trained professionals. To keep your system running safely and efficiently, schedule professional inspections twice a year to ensure all electrical connections are in good shape. Once you’ve confirmed your system’s electrical components are secure, you can focus on maintaining the rest of your HVAC system for reliable, year-round performance.
sbb-itb-b5c10b1
Step 6: Clean Evaporator and Condenser Coils
When dust and grime build up on HVAC coils, they interfere with heat exchange, which can increase energy consumption and reduce cooling efficiency by as much as 30%. Tom Moor from HVAC.com highlights the impact:
"This reduction in heat absorption leads to an inefficient cooling process, causing the system to work harder to achieve the desired indoor temperature".
This is why regular coil cleaning is a must.
Start with the outdoor unit’s condenser coils. These should be inspected and cleaned at least once a year, preferably in the spring before summer usage ramps up. Begin by clearing away leaves, grass, and other debris around the unit, ensuring there’s at least 2 feet of open space on all sides. After turning off the power at the breaker, remove any protective grilles and use a vacuum with a brush attachment to get rid of loose dirt. Apply a foaming coil cleaner and let it sit for 5–10 minutes, then rinse the coils from the inside out using a garden hose. Be careful not to use a high-pressure washer, as it could bend the aluminum fins and restrict airflow.
For indoor evaporator coils, use a soft-bristled brush or vacuum to remove dust. Spray the coils with a no-rinse evaporator coil cleaner or a mild detergent solution. While you’re at it, clean the condensate drip pan and ensure the drain line is clear to prevent mold growth and water damage. This routine helps the system absorb heat efficiently without overworking.
Homes with pets or those in dusty environments may need more frequent attention. In such cases, professional cleaning every three months is recommended. Experts use specialized tools to safely straighten bent fins and handle delicate components. As Luke DeWolfe from DeWolfe Plumbing explains:
"A dirty evaporator coil can easily freeze over… because the coil can’t absorb the warm air, and without the warm air, the refrigerant inside the coil freezes".
Ignoring this issue can lead to serious damage, including compressor failure, which often results in repair costs far higher than regular maintenance.
Step 7: Clear Drain Lines and Check Refrigerant Levels
The 1-inch condensate drain line in your HVAC system plays a key role in removing moisture from the evaporator coil’s drip pan, directing it to a floor drain or outdoors. However, when mold, algae, or sediment clogs this line, water can back up into the drain pan. This can lead to water spilling onto floors, damaging ceilings, or even triggering an automatic system shutdown.
Energy Star highlights the risks:
"A plugged drain can cause water damage in the house and affect indoor humidity levels."
To avoid these problems, it’s a good idea to pour one cup of distilled white vinegar into the drain line each month to help prevent mold and algae growth. If you prefer using bleach, mix a solution of 25% bleach and 75% water, fill the drain hose, let it sit briefly, and then flush it out thoroughly with clean water. For more stubborn clogs, tools like a wet/dry vacuum or a plumber’s snake can help clear the blockage. Also, don’t forget to check the drain pan for standing water.
Once your drain line is clear, shift your focus to refrigerant levels, as they are critical to your system’s performance. If you notice warm air blowing from your vents, your system running continuously, or ice forming on the coils, it’s a sign that refrigerant levels might be low.
The U.S. Environmental Protection Agency provides an important reminder:
"AC refrigerant is considered toxic and flammable, and exposure can increase the risk of asphyxiation."
Low refrigerant levels typically indicate a leak rather than normal usage. Leaks can cause the compressor to work harder, leading to higher energy bills and potentially severe compressor damage. To address this, hire a professional technician to locate and repair any leaks and recharge the refrigerant to the manufacturer’s specifications. On average, professional HVAC inspections cost about $300, while repairs can range from $100 to $3,000 depending on the severity.
Step 8: Lubricate Moving Parts and Check Blowers
Keeping moving parts properly lubricated is essential to avoid unnecessary friction in motors and bearings. Without it, parts wear out faster and energy usage spikes. As Energy Star puts it:
"Parts that lack lubrication cause friction in motors and increase the amount of electricity you use."
Start by consulting your system’s manual to pinpoint which components need lubrication and the type of lubricant to use. Most HVAC systems benefit from this maintenance at least once a year, ideally during your spring or fall checkups. While you’re at it, inspect the blower wheel for dust buildup. Even a thin layer of dust can throw the blades off balance, leading to vibrations and extra strain on the motor.
If your system includes belts and pulleys, give them a close inspection. Look for signs of wear like fraying, cracks, or glazing. Adjust the belt tension to prevent slippage or excessive strain. Should you spot any damage, replace the belt right away to avoid potential system failure.
Be alert for unusual noises like screeching or clanking. These sounds often signal worn parts or loose mounts. Catching these issues early can save you from major breakdowns. In fact, regular lubrication and part inspections can reduce the risk of system failure by up to 95%.
Dirty or misaligned blower components can also cause airflow problems, cutting your system’s efficiency by as much as 15%. To keep everything running smoothly, clean the blower blades, lubricate moving parts, and check belts regularly. By staying on top of these tasks, you’ll keep your HVAC system running efficiently and avoid expensive repairs. Reliable performance starts with well-maintained moving parts.
Step 9: Test Your Heating and Cooling Systems
Once maintenance is complete, it’s time to test your heating and cooling systems to make sure they’re working properly. Running a full system cycle ahead of extreme weather allows you to address potential problems without the added pressure of uncomfortable temperatures. Spring is a great time to test your air conditioning, while fall works well for checking your furnace. Start by adjusting your thermostat for a 5-degree test – set it 5° below the current room temperature to activate cooling or 5° above to activate heating. The system should kick on quickly.
For gas furnaces, pay attention to the ignition sound – it should be smooth and normal. Look through the inspection window to check the flame; a crisp, blue flame is ideal. If you see yellow, orange, or green flames, it could indicate combustion issues that need immediate attention.
Test airflow and temperature consistency throughout your home. Hold a piece of paper near each vent to ensure the airflow is steady and strong. Each room should maintain consistent temperatures; if not, duct leaks could be the culprit.
While testing, focus on both thermostat response and overall system performance. Watch for short cycling – when the system turns on and off frequently – as it could signal a problem with the thermostat, blower motor, or even clogged filters. Did you know that a malfunctioning thermostat can increase your energy bills by up to 10%?.
Be alert for unusual noises like banging, rattling, squealing, or grinding, as well as strange odors. A musty smell might point to drainage problems, while a rotten egg odor could signal a gas leak that requires immediate attention. During summer tests, your air conditioning should maintain indoor humidity levels between 30% and 50%. If your system struggles to reach the desired temperature or takes too long, it could be running inefficiently and might need professional servicing.
"Whether it’s faulty wiring or an outdated model, a bad thermostat can make your system turn on and off at the wrong times or not reach the right temperature."
– Glenn Wiseman, Sales Manager, Top Hat Home Comfort Services
Testing your system early not only ensures everything is functioning correctly but also extends the benefits of regular maintenance. If you notice any problems during your test, jot them down to discuss with a technician. This proactive step helps keep your home comfortable and energy-efficient year-round.
Step 10: Schedule Professional Maintenance with Eco Temp HVAC
Once you’ve checked your system’s performance, it’s time to take the next step: scheduling professional maintenance. While DIY upkeep can handle a lot, professional servicing ensures your system stays reliable, efficient, and safe. Certified technicians can catch hidden problems like refrigerant leaks, electrical issues, or even carbon monoxide risks – things that might go unnoticed during routine checks. Surprisingly, only 47% of homeowners schedule annual maintenance, which may explain why 42% face system failures during extreme weather.
Professional maintenance isn’t just about preventing breakdowns; it can also save you money. Regular tune-ups can reduce energy costs by up to 15% and add years to your equipment’s life – boilers can last 20–30 years, and furnaces 15–30 years with proper care. In Chicago, a residential boiler tune-up typically costs between $150 and $350, while AC tune-ups range from $450 to $1,000 depending on the size of the unit.
"A well-tuned boiler operates more efficiently, burning less fuel and reducing energy costs by up to 15%."
– Eco Temp HVAC
Eco Temp HVAC’s Advanced Maintenance Plan is tailored for Chicagoland residents, offering a comprehensive service package. This plan includes priority scheduling, energy-efficiency checks, and professional air duct cleaning to improve airflow and indoor air quality. As a Mitsubishi Diamond Elite Contractor and Certified Navien Service Specialist, Eco Temp HVAC ensures expert care that adheres to manufacturer warranty requirements and City of Chicago safety standards. Their A+ rating from the Better Business Bureau – an accolade held by only about 2% of HVAC companies – further reflects their commitment to quality.
For the best results, schedule maintenance twice a year: in spring (March/April) before the cooling season and in fall (September/October) before heating season kicks in. This timing helps you secure appointments easily and avoid costly emergency fees. Eco Temp HVAC serves Chicago and over 100 surrounding suburbs, offering 24/7 availability, flexible scheduling with no extra charges for evenings or Saturdays, and a Best Price Guarantee – beating any reasonable estimate by up to 5%.
Conclusion
Taking care of your HVAC system with seasonal maintenance isn’t just about comfort – it’s about protecting your investment. Following these 10 steps can lead to up to 30% lower energy bills and extend your equipment’s lifespan by as much as 40%. Regular checkups catch small issues before they turn into big, costly problems, ensuring your system can handle Chicago’s unpredictable weather.
The stats are clear: while only 47% of homeowners schedule annual HVAC maintenance, 42% end up dealing with equipment failures during heat waves. Don’t let that be you. Professional maintenance goes beyond what DIY efforts can achieve, identifying hidden risks like carbon monoxide leaks, refrigerant issues, or electrical hazards – problems that could jeopardize your safety and your home.
"Proper HVAC maintenance is essential for your safety. A lack of regular professional maintenance can lead to carbon monoxide leaks, refrigerant leaks, or electrical malfunctions, which all pose a serious threat to your health and home."
– Kassidy Barber, Content Editor, Angi
Think of it this way: spending $300 on an inspection is a wise trade-off compared to shelling out $7,500–$12,500 for a system replacement. Plus, regular upkeep could even boost your home’s value by up to 7%, whether you’re planning to sell or stay put.
Ready to schedule your maintenance? Eco Temp HVAC has you covered. With 24/7 availability and certified technicians serving the Chicagoland area, they’ll keep your system running smoothly, no matter the season.
FAQs
How often should I have my HVAC system professionally serviced?
Scheduling professional HVAC maintenance twice a year is a smart move – once in the spring to get ready for the cooling season and again in the fall to prepare for heating. This routine helps keep your system running smoothly and dependably throughout the year. If twice a year isn’t feasible, aim for at least an annual check-up. This can go a long way in keeping your HVAC system in good shape and catching any potential problems early on.
What are the advantages of upgrading to a smart thermostat?
Upgrading to a smart thermostat gives you more control over your home’s heating and cooling while helping you cut down on energy costs. These devices are designed to learn your daily routine and adjust temperatures automatically, reducing wasted energy. In fact, they can potentially lower your utility bills by 10–15%. Plus, with Wi-Fi connectivity, you can manage your thermostat remotely using your smartphone, tablet, or even a voice assistant. Whether you’re at home or miles away, you can ensure your home’s temperature is just right.
Smart thermostats also come packed with handy features like customizable temperature settings, real-time energy usage tracking, and filter replacement reminders. These tools not only make your life easier but also help your HVAC system run more efficiently. If you’re looking to improve your home’s comfort and energy efficiency, Eco Temp HVAC is here to help. They can guide you in choosing the ideal smart thermostat and provide professional installation services in the Chicagoland area.
What are the signs that my HVAC system might have low refrigerant levels?
Low refrigerant levels in your HVAC system can lead to several noticeable problems. You might experience weak or inadequate cooling, notice ice or frost forming on the evaporator coil, or observe longer run times as the system works harder to reach the set temperature. A trained technician may also identify signs like low suction or discharge pressure, which often point to a refrigerant leak.
If you think your system is low on refrigerant, it’s crucial to address it quickly to avoid further damage. Scheduling regular maintenance, like seasonal HVAC tune-ups, can help catch refrigerant issues early, keeping your system running smoothly and efficiently.